

No-Oven Turkish Bread: A Cozy Delight with Just 3 Ingredients
Ah, life’s little pleasures. There’s nothing quite like the smell of freshly baked bread wafting through the kitchen. It’s a scent that wraps around you like a warm blanket, promising comfort and familiarity. And yet, in this chaotic world of takeout and microwave meals, baking bread can feel daunting, even for an experienced home cook. But what if I told you that you could create delicious, pillowy bread with just three ingredients—and without turning on your oven? Enter my go-to recipe for No-Oven Turkish Bread (Bazlama).
The first time I stumbled upon this recipe, I was knee-deep in my “I need to learn something new” phase. I was at home on a particularly rainy day, cozied up with a blanket and scrolling through Pinterest, which is essentially a rabbit hole of culinary inspiration and a potential pathway to kitchen disaster. I clicked on a bright photo of fluffy Turkish bread, and before I knew it, I was dashing to the pantry to gather ingredients. Little did I know I was about to embark on a journey filled with laughter, flour fights, and, yes—unexpected results.
What makes this bread special? Well, aside from the fact that it’s a no-oven wonder, it’s versatile! You can serve it alongside a lavish breakfast spread, slather it with creamy spreads, or even use it to mop up saucy dishes. It’s truly healthy comfort food that hits the spot. Plus, it has that perfect chewy texture that leaves you yearning for just one more piece. Trust me; you’ll want to keep this recipe handy for easy weeknight dinners and quick family meals.
Now, let’s set the scene! Imagine the late afternoon sun filtering through your kitchen window, casting a golden hue over your countertops. You pour warm milk and water into a bowl, mix in the sugar and yeast, and watch as they bloom into a foamy delight. It’s mesmerizing. I like to crank up my favorite playlist as I get into the groove of kneading the dough, although I occasionally end up with flour on my nose when I accidentally flip flour everywhere while shaping. Oops!
This recipe is warm, inviting, and most importantly, messy. It’s a reminder that cooking doesn’t have to be immaculate; it can be joyful, spontaneous, and filled with a few splatter mishaps along the way. So, gather your ingredients, roll up your sleeves, and let’s dive into this spectacular journey of making No-Oven Turkish Bread together!
Why You’ll Love This Recipe
-
Three Simple Ingredients: Yup, you heard it right! Bread flour, warm milk, and warm water are all you need (plus a dash of patience and love).
-
Budget-Friendly: Perfect for those who want to whip up something delightful without breaking the bank.
-
Picky-Eater Approved: It’s hard to say no to warm, fluffy bread! Kids and adults alike will enjoy this.
-
Quick Meal Prep: With just one hour of proofing, you can have homemade bread that’s ready in no time.
-
Versatile Pairing: Whether it’s alongside breakfast, soup, or a mezze platter, it complements just about anything you throw at it.
-
Cooking is Healing: There’s just something soothing about kneading dough; it feels like a slice of therapy amidst the chaos of life.
What Makes This Recipe Special?
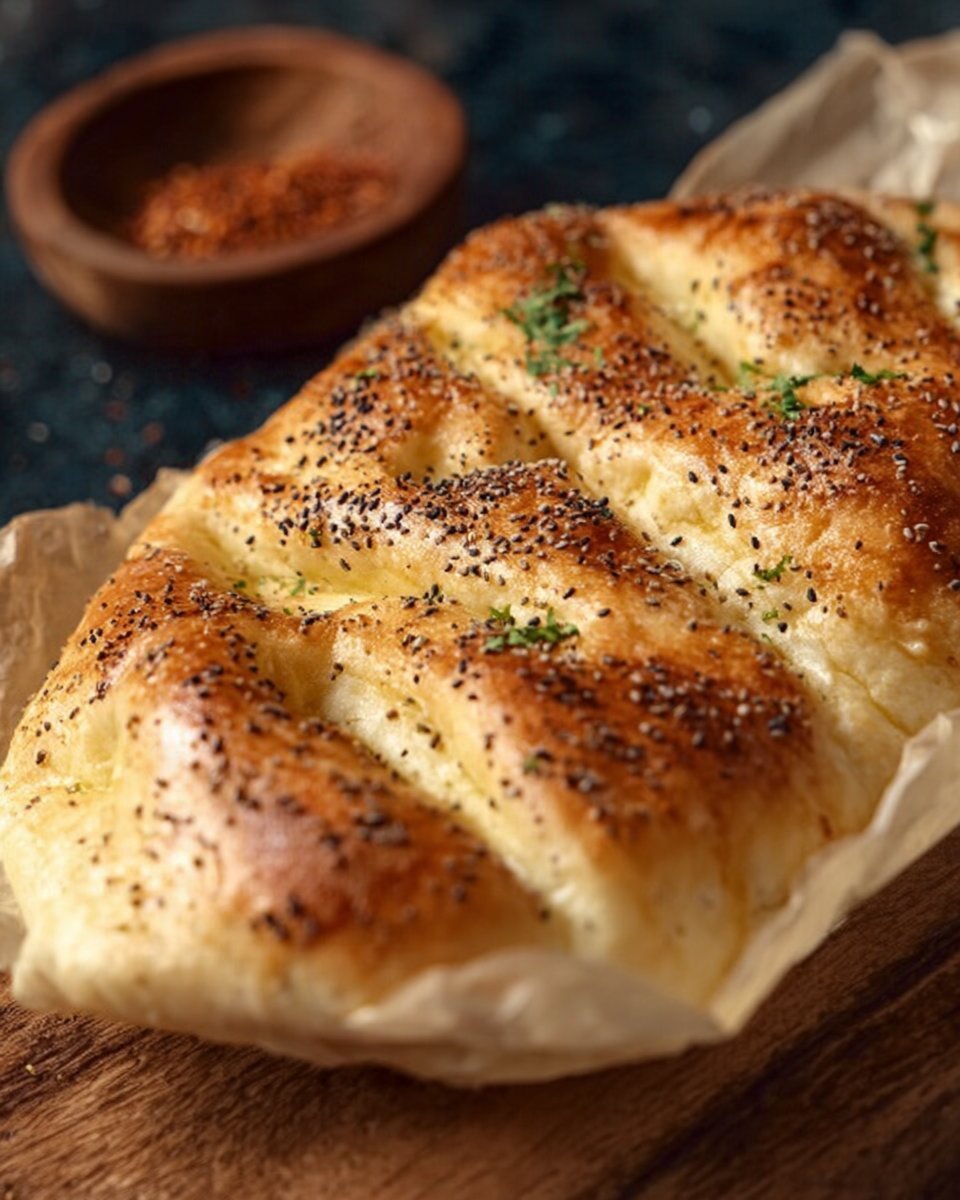
Ah, the magic of Bazlama! This Turkish flatbread exudes warmth and love in every bite. It’s all about the delicate balance of flavors and textures. The combination of bread flour gives it that chewy pull we crave, while the warm milk and water create a soft, tender crumb. Oh, and don’t even get me started on the melted butter brushed on top; it’s like a comforting hug for your taste buds.
Growing up, my mom would often make bread, but it felt like an all-day affair filled with kneading, waiting, and ‘oops, I forgot to preheat the oven!’ moments. This recipe is a fabulous shortcut that honors that nostalgia without the fuss. It’s like taking a trip down memory lane while also realizing you don’t have to spend the whole day in the kitchen.
I’ve learned a lot from my kitchen experiments, some dulcet and some tragic (like the time I tried to speed up the proofing process by sticking the dough in a too-hot oven… let’s just say it went poof). But through all of it, I’ve come to appreciate the beauty in simplicity—a lesson that this easy, no-yeast Turkish bread demonstrates with every soft bite.
Ingredients
-
500 g Bread flour or all-purpose flour (4 cups): The backbone of our beautiful bread! It gives structure and chewiness. I usually opt for bread flour for that extra rise and airy texture, but all-purpose flour works just fine too. Just make sure it’s fresh!
-
160 ml Warm milk (2/3 cup): This adds richness and a hint of sweetness to the dough. Make sure it’s just warm enough to activate the yeast—not too hot (you don’t want to scald it) and not too cold. Just warm is the magic zone, you know?
-
160 ml Warm water (2/3 cup): Helps create the perfect dough consistency. Like the milk, warmth is key here.
-
10 g Instant dry yeast (1.5 tbsp): This is our magic rising agent. Instant yeast is a charm as it doesn’t require proofing but be sure to check that it’s fresh!
-
10 g Sugar (1 tbsp): Sugar feeds the yeast and helps get that lovely rise going. It also adds a slight sweetness to the dough—trust me, it’s lovely!
-
8 g Salt (0.8 tbsp): Salt enhances flavor, creating a more complex taste in your bread.
-
20 g Melted unsalted butter (or olive oil): For that golden brushed finish! I’ve tried both and honestly, you can’t go wrong.
-
Chopped parsley: Not mandatory, but it gives your bread a fresh pop of color and flavor! Feel free to get creative here; herbs can add a lovely touch.
Oh, and here’s a pro tip: Don’t skip on the kneading! Messy hands and flour everywhere may not be the perfect Instagram shot, but that’s where the magic happens.
How to Make It Step-by-Step
Let’s get to the fun part: making this scrumptious bread!
Step 1: Mix the Magic Ingredients
In a medium bowl, pour in 160 ml warm milk and 160 ml warm water. Sprinkle the 10 g sugar and 10 g instant dry yeast over the top. Give it a gentle stir and watch as it transforms. I swear, watching that yeast bubble up is like watching magic happen in your kitchen; there’s something so rewarding about it.
Step 2: Combine the Dry Ingredients
In a separate large bowl, combine the 500 g bread flour and 8 g salt. I like to make a little well in the center for the liquid ingredients. Once that yeast is bubbly (about 5-10 minutes), pour it into the flour mixture.
Step 3: Knead the Dough
Now, this is where the real fun begins! Use your hands—trust me. Mix everything together until you have a shaggy, sticky dough. I remember the first time I tried this. I clenched my jaw and thought, “Okay, let’s knead!” Honestly, it’s like a mini workout. You’ll want to knead until the dough isn’t sticky and feels smooth and elastic. This usually takes about 8-10 minutes. Your arms might feel like jelly afterward, but the results are worth it!
Step 4: Let it Rise
Once you’ve kneaded to perfection, place the dough in a lightly greased bowl, cover it with a clean kitchen towel, and let it rise in a warm spot for about an hour, or until it doubles in size. This is when you can make a cup of tea and just relish in your kitchen triumph!
Step 5: Shape the Dough
After it’s risen, punch it down (trust me, it feels amazing!). Divide the dough into 6 equal pieces and shape each piece into a round ball. Cover the rounds with a plastic bag or kitchen towel so they won’t dry out while you prep them.
Step 6: Roll Them Out
Here’s where you get to have some fun! Dust your countertop with a little flour and roll each ball into a disk about 18 cm wide and 5 mm thick. Aim for a nice evenness here; clearly, no one wants lumpy bread!
Step 7: Time to Cook!
Now, let’s heat things up! Grab a thick-bottomed pan (trust me on this; it’s the secret to that lovely puff) and turn your stove to medium heat. Once hot, place one of your disks in the pan. It should sizzle a bit when it hits the pan.
Step 8: The Pop Quiz
As it cooks, you’ll notice bubbles forming. Patience, my friend! Once it looks like it’s puffing up like a balloon, flip it over and let it cook on the other side. Once it’s golden, reduce the heat to low, cover it with a cloth to keep it warm, and repeat with the remaining rounds.
Step 9: Butter It Up
When they’re all golden and fluffy, brush them with melted butter or olive oil. You can add chopped parsley on top for a bit of flair. It’s those little touches that make you feel like a culinary rockstar!
Step 10: Serve and Enjoy
These fluffy delights are best served warm. I like to bust them out with hummus, olives, or simply enjoy a slice with jam. Just imagine taking a bite; the warm, soft texture dances on your taste buds, and the flavors wash over you—a cozy hug on a plate.
Tips for Best Results
-
Temperature Check: Warm but not hot is key when it comes to activating the yeast. Scalding will kill it, and you’ll end up with sad, flat bread.
-
Don’t Skip the Knead: It’s a workout but oh-so-necessary. Kneading develops gluten, giving the bread its structure.
-
Thick Pan Matters: As I mentioned before, a thick-bottomed pan works wonders for heat distribution. Trust me, don’t try a thin frying pan; it’s a recipe for disappointment.
Ingredient Substitutions & Variations
Feeling adventurous? There are plenty of ways to switch it up!
-
Flour Alternatives: You can use whole wheat flour for a nuttier flavor or even gluten-free flour for a gluten-free version. Just make sure you adjust your liquids as necessary.
-
Add-ins: Try incorporating herbs or cheese into the dough for an extra flavor punch. Imagine that cheesy basil bread! Yum!
-
Seasonal Twists: Throw in some dried herbs in the winter and fresh herbs in the summer for a seasonal flair.
Directions
- Mix warm milk and water with sugar and yeast until bubbly.
- Combine flour and salt, then add the yeast mixture to the flour.
- Knead until smooth (8-10 min).
- Let rise in a greased bowl, covered, for 1 hour.
- Divide into 6 pieces, shape into rounds, and cover.
- Roll each piece flat into disks.
- Heat a thick pan over medium heat.
- Cook each disk until golden on both sides; cover while cooking.
- Brush with melted butter/olive oil and sprinkle with parsley.
When I pair these fluffy breads with a vibrant salad and perhaps a chai latte, it feels like a little slice of heaven on my plate. Tell me, is there anything better than a cozy meal shared with a loved one? Not in my book!
Pairing Ideas (Drinks, Sides, etc.)
Try it with a steaming cup of chamomile tea, accompanied by a fresh Greek salad or some homemade soup. Honestly, this bread steals the show like a star on a movie set. Nothing beats the comfort of fresh bread, a rom-com playing in the background, and a great conversation simmering along!
How to Store and Reheat Leftovers
Got leftovers? Lucky you! Store any unused bread in an air-tight container at room temperature for up to 3 days. If you happen to have any leftover (which is unlikely because it’s that good), you can reheat it in a pan over low heat until warmed through, or briefly pop it in the microwave. Just make sure it doesn’t dry out—nobody wants a sad, chewy piece of bread.
Make-Ahead and Freezer Tips
Dough can be made ahead! Just prepare and after step 3 (before you let it rise), cover it tightly and pop it in the fridge. When you’re ready, let it sit at room temperature for a while before shaping and cooking.
Freezing? Yup, you can! Shape the disks, lay them on a baking sheet to freeze individually, then store them in a freezer-safe bag. Just thaw and cook whenever you’re ready for a homemade bread fix!
Common Mistakes to Avoid
-
Bread Too Flat: This usually means either the yeast didn’t activate or the dough didn’t get enough kneading.
-
Not Enough Heat: If your pan is too cold, the bread won’t puff. It needs that initial heat blast to create those delightful bubbles.
-
Skipping the Rest: Patience is key here. If you don’t give the dough enough time to rise, you get sad little disks rather than a fluffy delight!
Frequently Asked Questions (FAQ)
Can I make the dough in advance?
Yes! You can make the dough ahead of time, refrigerate it, and then shape and cook it later.
Can I use whole wheat flour instead?
Absolutely! Whole wheat will give the bread a heartier flavor. Just keep an eye on your liquids, as whole wheat flour absorbs more moisture.
What should I pair it with?
This bread is super versatile! Think soups, salads, dips, or even as a breakfast option topped with eggs—endless possibilities!
Cooking Tools You’ll Need
- Mixing bowls
- Rolling pin
- Thick-bottomed pan
- Clean kitchen towel
- Plastic bag or kitchen film
Final Thoughts
There you have it! No-Oven Turkish Bread that not only fills your belly but also warms your soul. Make it on a rainy day, at a family gathering, or even as a late-night snack—there’s never a wrong time for these beauties. The blend of ingredients is simple, but the outcome is anything but ordinary. Every bite is a crunchy, soft, beautiful piece of home!
I hope you try this recipe out and enjoy it as much as I do. If you enjoyed this recipe, don’t forget to save it on Pinterest or share it with a friend! Happy baking, friends!

No-Oven Turkish Bread (Bazlama)
Ingredients
Main Ingredients
- 500 g Bread flour or all-purpose flour Fresh flour is preferred for the best texture.
- 160 ml Warm milk Ensure it's warm but not hot to activate the yeast.
- 160 ml Warm water Warmth is key for the perfect dough.
- 10 g Instant dry yeast Make sure it's fresh; no proofing needed.
- 10 g Sugar Feeds yeast and adds slight sweetness.
- 8 g Salt Enhances flavor.
- 20 g Melted unsalted butter or olive oil For brushing on top.
- to taste Chopped parsley Optional for garnish.
Instructions
Preparation
- In a medium bowl, combine warm milk and warm water with sugar and yeast; let it sit until bubbly.
- In a separate large bowl, mix together bread flour and salt, then create a well in the center.
- Pour the yeast mixture into the flour mixture and mix until a shaggy dough forms.
- Knead the dough for 8-10 minutes until smooth and elastic.
- Place the dough in a greased bowl, cover with a towel, and let it rise in a warm place for 1 hour or until it doubles in size.
- Once risen, punch down the dough and divide it into 6 equal pieces. Shape each piece into a round ball.
Cooking
- Roll each ball into a disk about 18 cm wide and 5 mm thick.
- Heat a thick-bottomed pan over medium heat and place one disk in the pan. Cook until golden on both sides.
- Brush with melted butter or olive oil; add chopped parsley if desired.
- Repeat with remaining disks.
Serving
- Serve warm with dips, soups, or spreads.
- Enjoy with family or friends for a cozy meal.


