
Easy Loaded Chili Cheese Fries with Bacon Crumbles
There’s something undeniably comforting about a pile of fries topped with warm, gooey cheese, spicy chili, and crispy bacon crumbles. It’s like a cozy blanket on a chilly winter evening or a warm hug from a friend. I remember the first time I attempted making Loaded Chili Cheese Fries. Picture this: I was a naive college student, trying to impress my friends with my culinary skills. I didn’t realize just how chaotic cooking could be until I found myself with a kitchen covered in flour and cheese shavings, a half-melted block of cheddar on the counter, and a couples of burnt fries that "looked like" tadpoles. Ooops.
But amidst the mess, I discovered a recipe that holds so much nostalgia. As I began to recreate those loaded fries, I felt clarity and excitement mixed with a twinge of fear. Would my chili stick together? Would the cheese melt beautifully instead of turning into a rubbery mess? As the outside world grew colder, I threw on my favorite playlist, cranked up the oven to 425°F (220°C), and the scent of fries baking wafted through my little studio. The glow of the oven reflected off the cheese in the fridge, signaling that maybe—just maybe—I was onto something here.
Let me take you on a flavorful journey that marries easy weeknight dinners with a little sprinkle of culinary wisdom. This isn’t just a recipe; it’s a nostalgic reminder that cooking can be deliciously messy.
Why You’ll Love This Recipe
-
Ultimate Comfort Food: Honestly, who can resist loaded fries? The combination of crunchy russet potatoes, melted cheese, and zesty chili is nostalgic in the best way possible. It feels like a hug in a bowl.
-
Easy to Whip Up: This recipe is perfect for quick family meals. Most of the ingredients are pantry staples, making it as easy as pie—well, easier since pie is way more complicated.
-
Perfect for Leftovers: If you’ve ever made chili (or just happened to have some lying around), this dish turns leftover chili into next-level comfort food. You can toss it together and amaze your family without cooking from scratch again!
-
Picky-Eater Approved: If you have kids or friends who are a bit skeptical about trying new things, these loaded fries are a surefire hit. The bacon and cheese literally make everything better.
-
Meal Prep Win: You can prep the fries and the chili in advance. Just throw them together on a busy weeknight and voila—a healthy comfort food fest that’s bound to satisfy.
What Makes This Recipe Special?
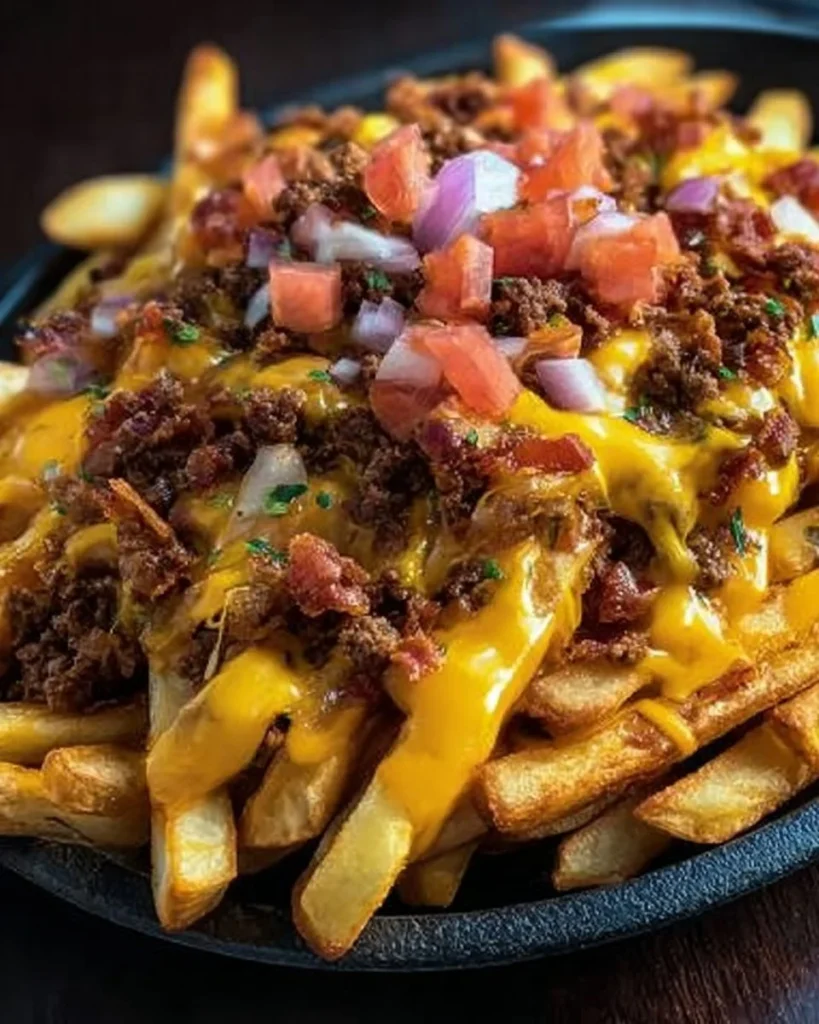
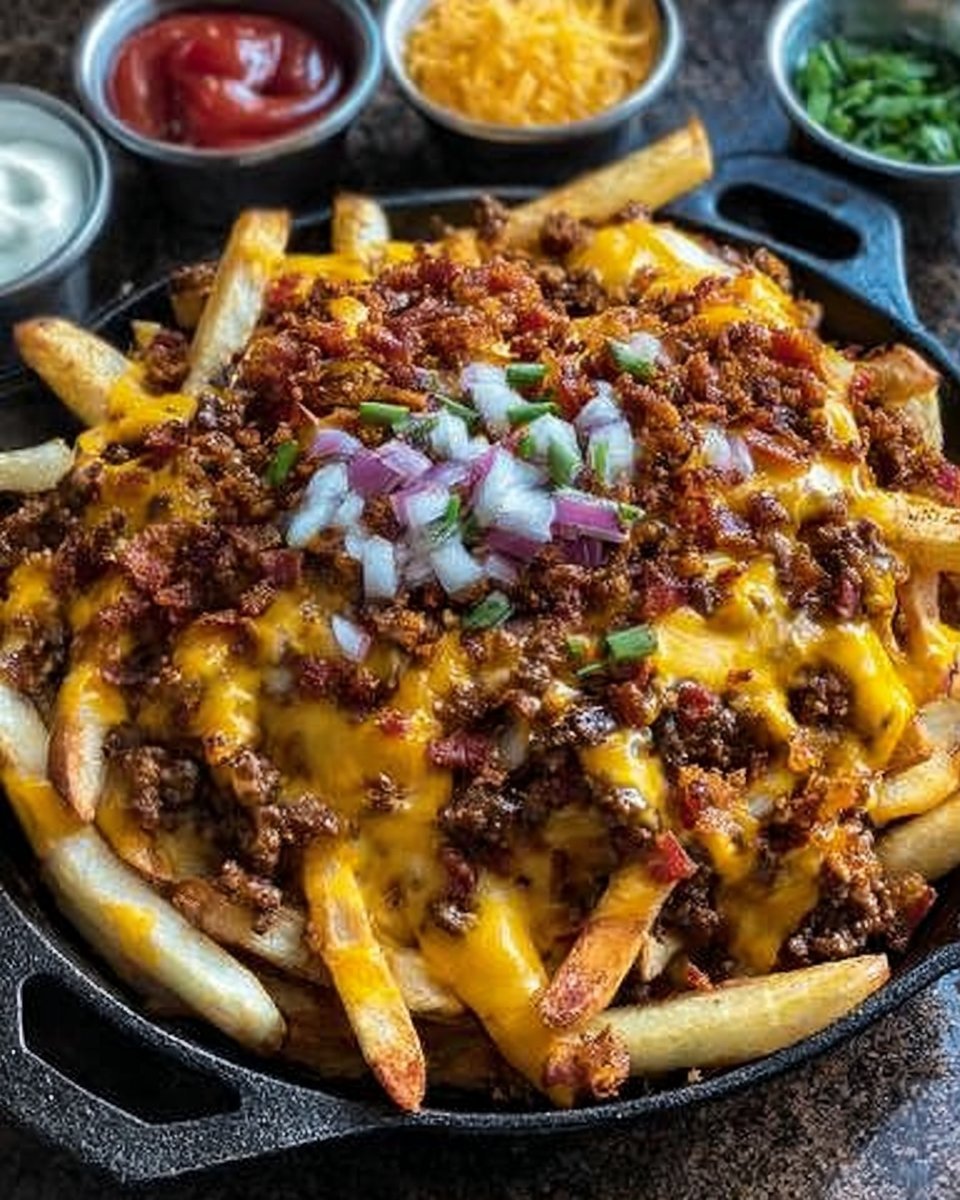
You know how some recipes become time capsules of your life? This was one of them for me. It combines comfort, creativity, and a bit of chaos. The fries are crispy and golden, while the chili is flavorful, hearty, and rich, giving each bite depth and spice. Plus, let’s not forget the magic moment when you pull that baking sheet out of the oven and see the cheese bubbling and stretching—pure bliss, my friend.
Now, here’s the beauty of this recipe: it’s so adaptable. Got a different kind of chili? No problem! Prefer a little kick? Toss in some jalapeños. Feeling wild? Drizzle some spicy mayonnaise just before serving. And the best part? It’s all about personal flair and making it your own.
Ingredients
-
4 large russet potatoes, cut into fries: These provide the perfect foundation. Russets are starchy and become crispy when baked, offering a delightful texture.
-
1 cup cooked chili (beef or vegetarian): This is where the magic happens. Having molten, spiced chili directly on your fries elevates them from good to KNOCK-YOUR-SOCKS-OFF great. Use your favorite recipe or any leftover chili you’ve got.
-
2 cups shredded cheddar cheese: What’s loaded fries without cheese? Cheddar is a classic choice here. I prefer sharp cheddar for that extra tang, but feel free to mix it up with Monterey Jack or pepper jack if you want to stir in some spice.
-
6 slices of bacon, cooked and crumbled: This is the “wow” factor! The crispy bits add a satisfying crunch. If you prefer not to use pork products, feel free to substitute with turkey bacon or a plant-based version.
-
1/2 cup sour cream: It’s the creamy finish that coats everything in deliciousness. Plus, it balances the heat if your chili has a fiery kick.
-
1/4 cup chopped green onions: Adding these brings a fresh and zesty punch that brightens up the dish.
-
Salt and pepper to taste: Essential for tying all the flavors together.
-
Olive oil for frying: This locks in flavors and ensures your fries are golden and crispy.
Tips and Tricks:
-
When selecting potatoes, look for ones that are firm with no sprouts or green spots. They should feel hefty in your hand and should not give in when pressed.
-
Don’t skip the salt on the fries! It’s key to enhancing the flavors.
-
Make sure to let your bacon cool slightly before crumbling it—this prevents finger burns and keeps the bits crispy.
How to Make It Step-by-Step
Alright, ready to roll up your sleeves? Let’s dive into the fun!
Step 1: Preheat and Prepare
First off, preheat your oven to 425°F (220°C). This is the part when your kitchen starts smelling divine.
While the oven preheats, grab those russet potatoes. As you slice them into fry shapes, let the steam from your kitchen envelop you. I like cutting them about 1/4 inch thick; not too thick that they won’t cook through, but thick enough to have a crunchy bite. Messy hands? Totally worth it!
Step 2: Toss and Coat
In a large bowl, toss your cut fries with olive oil, salt, and pepper. It’s almost like giving your fries a spa treatment, letting them get all glowed up for their big moment in the oven. Make sure they’re evenly coated—this is crucial for that beautiful golden crust.
Spread the fries out in a single layer on a baking sheet. I usually line it with parchment paper to make for an easier cleanup. No one wants to end up scrubbing a sticky, cheesy mess off their sheets.
Step 3: Bake for Perfect Crispiness
Pop those beauties in the oven for 30-35 minutes, flipping them halfway through. Keep an eye on them; the kitchen will come alive with that comforting aroma of fries turning golden. As you open the oven door, the sizzle and the smell are absolute joy. Honestly, relish this moment!
Step 4: Heat the Chili
While the fries are baking, grab a saucepan and start warming up your chili. It doesn’t have to be sizzling hot—just heated through. Your whole kitchen might start to smell so good you’ll want to dive headfirst into a bowl of that chili right away.
Step 5: Assemble Your Masterpiece
Once the fries are perfectly crisp and golden, remove them from the oven (cue the applause). Immediately top those hot fries with the warmed chili and the generous shower of shredded cheese. I mean, sure you could be subtle, but who are we kidding? The more cheese, the better!
Step 6: The Melty Moment
Return them to the oven for an additional 5-7 minutes. Keep peeking, and when the cheese is all melty and dreamy, take them out. The sounds of bubbling cheese are music to your ears.
Step 7: Final Touches
Now, this is where you can really have fun. Sprinkle the crispy bacon bits over the top, add dollops of sour cream, and finish it all off with those vibrant green onions. Again, take a moment to admire your work.
Step 8: Serve and Enjoy!
Serve immediately! Gather your family or friends around—this is definitely one to share. Don’t forget to snap a pic for your Instagram before everyone digs in! And honestly, if the fries fall apart, embrace it. It’s like a flavor confetti explosion, and perfection is overrated.
Tips for Best Results
-
Make sure your fries are as dry as possible before tossing them in olive oil. This helps in getting that perfect crisp.
-
For extra flavor, sprinkle a bit of smoked paprika or garlic powder onto the fries for that extra punch.
-
If you can, try to let the fries cool slightly before adding the toppings. This helps keep the cheese from sliding off when you dive in.
Ingredient Substitutions & Variations
-
Chili Variations: Swap in taco meat or spicy shredded chicken if you’re feeling adventurous. You can also try a homemade chili or make a vegan version using black beans and lentils.
-
Cheese Choices: Feel free to experiment with different cheeses like Monterey Jack or pepper jack for a kicky twist. Provolone and gouda are also great choices!
-
Vegetarian Version: Use a delicious vegetarian chili with beans and veggies instead of beef. Trust me, it’s just as satisfying.
Serving Suggestions
Best pairings? Think good vibes all around! Serve with a side of pickled jalapeños or a refreshing coleslaw to balance the richness. A cold drink—like a crisp lemonade or iced tea—pairs beautifully with these fries. Honestly, if you find a rom-com to binge while eating loaded fries on the couch, you’ve truly created a masterpiece of a cozy evening.
How to Store and Reheat Leftovers
If you find yourself with leftovers (which is rare, trust me!), store the fries separately from the chili and cheese in an airtight container. When it comes to reheating, pop those fries in the oven for a quick crisp up, maybe just 10 minutes at 350°F (175°C), and reheat the chili in a saucepan.
Make-Ahead and Freezer Tips
You can cut the potatoes beforehand and store them in cold water in the fridge for a day if you want to pre-prep. Don’t add oil until just before baking! As for freezing, it’s better to freeze the chili separately and bake the fries fresh when you’re ready to indulge again.
Common Mistakes to Avoid
-
Don’t over-crowd the baking sheet. This can lead to soggy fries instead of crispy ones.
-
Be mindful of cooking times. Every oven behaves a little differently—trust your senses.
-
Don’t skip seasoning! Fries need love, and salt is pivotal in bringing out their natural flavors.
Frequently Asked Questions (FAQ)
-
Can I use frozen fries?
Absolutely! Frozen fries can be a convenient alternative. Just follow the cooking directions on the package and then top with the chili and cheese. -
How can I make these fries healthier?
Try using fewer toppings, like swapped cheese for a lower-fat option. You can also bake instead of fry for a lighter version. -
Can this be made vegan?
Yes, use a lentil-based chili and skip the cheese or substitute with vegan cheese. There are so many delicious varieties available!
Cooking Tools You’ll Need
- Baking sheet
- Parchment paper (for easy cleanup)
- Large mixing bowl
- Saucepan for heating chili
- Sharp knife and cutting board for prepping potatoes
Final Thoughts
There’s something inherently joyful about cooking loaded chili cheese fries. They remind me of cozy nights with friends and the simple pleasure of enjoying great food together. The chaos, warmth, and enthusiasm this dish invokes is simply unparalleled. I’d love to hear how yours turn out! Did you add a unique twist? What toppings did you go for?
If you enjoyed this recipe, don’t forget to save it on Pinterest or share it with a friend! There’s enough chaos in the kitchen; let’s spread the deliciousness!

Loaded Chili Cheese Fries
Ingredients
For the fries
- 4 large russet potatoes, cut into fries These provide a crispy texture when baked.
- 2 cups shredded cheddar cheese Sharp cheddar is recommended for extra flavor.
- 6 slices bacon, cooked and crumbled Use turkey bacon or plant-based bacon as a substitute.
- 1/2 cup sour cream This balances the heat from the chili.
- 1/4 cup chopped green onions Adds a fresh, zesty punch.
- Salt and pepper to taste Essential for enhancing flavors.
- Olive oil for frying Helps achieve golden and crispy fries.
For the chili
- 1 cup cooked chili (beef or vegetarian) Elevates the fries to another level of flavor.
Instructions
Preparation
- Preheat your oven to 425°F (220°C).
- Cut russet potatoes into fry shapes, about 1/4 inch thick.
Toss and Coat
- In a large bowl, toss cut fries with olive oil, salt, and pepper.
- Spread fries in a single layer on a lined baking sheet.
Bake for Crispiness
- Bake fries for 30-35 minutes, flipping halfway through.
Heat the Chili
- In a saucepan, warm up your chili until heated through.
Assemble Your Masterpiece
- Once fries are golden, top them with warmed chili and shredded cheese.
The Melty Moment
- Return fries to the oven for an additional 5-7 minutes until the cheese is melted.
Final Touches
- Sprinkle bacon bits, dollops of sour cream, and green onions on top.
Serve and Enjoy
- Serve immediately and enjoy with family and friends!


