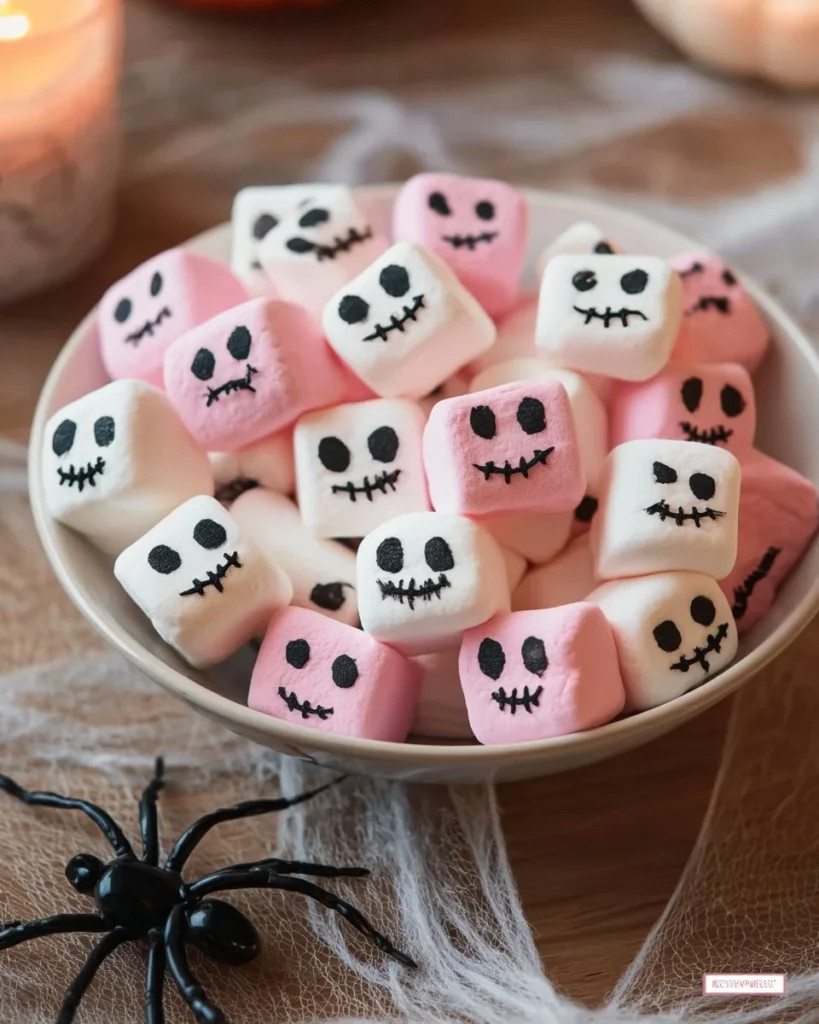

Easy Halloween Marshmallows with Skeletons Recipe
Ah, Halloween. The season where the air gets crisper, leaves crunch underfoot, and every aisle in the grocery store is packed with the eerie delights of the season. Growing up, Halloween was a magical time. I vividly remember the thrill of frantically assembling my costume the day before—the inevitable chaos of fabric strewn across the living room, a half-eaten candy stash spilling out of my trick-or-treat bucket, and of course, baking creepy treats that were more fun than functional. Speaking of creepy treats, today I want to share my easy Halloween Marshmallows with Skeletons recipe. This is one of those quick family meals that doubles as a spooky sweet snack—perfect for Halloween gatherings or a cozy night in.
I first stumbled upon this idea when a friend invited me over for a Halloween-themed movie marathon. Amidst the ghostly flicks, she presented these perfectly refined marshmallows, each intricately designed with tiny skeletons and drizzled with chocolate. Honestly, I was in awe—not just of their cuteness but also at how these sweet little morsels could bring the whole vibe of Halloween alive. Naturally, I had to try making them myself. Spoiler alert: my initial attempt was a hilarious disaster. I think I ended up with a sticky marshmallow blob that vaguely resembled a ghost rather than a skeleton. But hey, that’s the beauty of it! Cock-ups in the kitchen lead to some of life’s most entertaining moments, right?
But let’s set the mood a bit: Imagine your kitchen filled with the sweet scent of melting marshmallows, chocolate wafting through the air, and your favorite Halloween playlist softly humming in the background. It’s that delightful combination of excitement and chaos that turns a simple recipe into something unforgettable. So, pull on those spooky socks and get ready for some Halloween fun!
Why You’ll Love This Recipe
- Visual Fun: These marshmallows aren’t just delicious; they are miniature works of art that’ll have your friends gasping (in delight, not horror!).
- Kid-Approved: If you’re looking for a way to get the kiddos involved in Halloween festivities, nothing beats making these skeleton marshmallows together.
- Perfect for Parties: These little guys are show-stoppers, ideal for any Halloween bash or cozy family gathering.
- Easy to Make: Trust me, if my marshmallow disaster days didn’t stop me, you can definitely pull this off.
- Yum Factor: Soft, fluffy marshmallows paired with decadent chocolate? Yes, please!
- Versatility: Got leftover marshmallows? No problem! You can use them in hot cocoa or just enjoy them as they are, and they’re perfect for meal prep too!
What Makes This Recipe Special?
This recipe stands out because it allows you to be both creative and inventive. You can stick with the classic skeleton shape or go wild and make other Halloween-themed designs (let’s be real, there’s nothing wrong with a Frankenstein too). My favorite part is seeing each creation come to life, or, in this case, come to sweet, sticky existence!
A delicious treat not only warms your heart but also creates memories. This recipe doesn’t just remind me of my childhood—it’s a way to create new traditions with the people you love. Honestly, the laughter and fun that emerge while crafting these treats make the whole experience.
Ingredients
For this easy Halloween treat, you’ll need:
- 1 bag of mini marshmallows: The star of this show, they’re fluffy and sweet—what else could you want?
- Chocolate chips or melting chocolate (2 cups): Choose your favorite! Dark chocolate adds that rich depth, while milk chocolate gives a classic sweetness that pairs with marshmallows beautifully.
- Skeleton molds: You can find silicone molds online or in craft stores; they yield the spookiest little skeletons.
- Sprinkles or edible glitter (optional): Because let’s face it, what’s Halloween without some extra sparkle?
- Vegetable oil: Just a touch, to grease the molds and help the chocolate glide like a dream.
- Powdered sugar (for dusting): To finish off those marshmallows, giving them that snow-like touch.
Personal Tips: Avoid using super cheap chocolate. Trust me when I say the taste difference is significant. I once used a brand that shall not be named—let’s just say my marshmallows turned out with a bit of a chalky texture. Seriously, no bueno!
Don’t Do This Warning: Whatever you do, do NOT skip the greasing step on the molds. Believe me, I learned the hard way—my skeletons were stuck like they were in a jaw-dropping horror movie!
How to Make It Step-by-Step
-
Gather Your Ingredients: First things first, make sure everything is in one spot. If your counters are anything like mine, it’ll look like a bomb went off. Grab those marshmallows, chocolate, molds, and anything else you’ll need.
-
Melt the Chocolate: I like to use the microwave for this. Place the chocolate chips in a microwave-safe bowl and microwave in 30-second intervals, stirring in between. The first couple times, it’ll look like nothing is happening, but suddenly, whoosh! You’ll have a bowl of deliciously melted chocolate. Hint: Try not to burn the chocolate. I once got distracted by some Halloween TikToks and had to deal with that crispy chocolate situation—no good.
-
Prepare the Molds: Using a paper towel or your fingers, lightly coat the molds with vegetable oil. You just want a whisper of oil—too much, and it can get messy.
-
Fill the Molds: Working quickly, pour the melted chocolate into the skeleton molds, filling them about halfway. Channel your inner artist here!
-
Add the Marshmallows: Drop a few mini marshmallows into each mold. Resist the urge to crowd them! I learned the hard way that too many marshmallows turn your skeletons into a marshmallow mess (which can be a bit amusing, but not the goal).
-
Seal with More Chocolate: Pour more melted chocolate over the marshmallows, covering them completely. Use a spatula or the back of a spoon to smooth out the top.
-
Chill: Pop those molds into the fridge for about 30 minutes or until the chocolate is set. During this time, clean up whatever you can—things can get messy fast!
-
Remove from Molds: Once firm, gently tap out the skeletons from the molds. Here’s where that greasing comes into play. Those little guys should slide right out. If they give you a hard time, just gently work them out with your fingers.
-
Dust with Powdered Sugar: For that extra Halloween magic, put a bit of powdered sugar in a bowl and coat the skeletons lightly. This prevents sticking and makes them look super cute.
-
Add Sprinkles: If you’re feeling whimsical, sprinkle some edible glitter or cute Halloween sprinkles on top.
Ta-da! Your Halloween Marshmallows with Skeletons are ready. Each one feels like a warm hug on a chilly fall evening. They’re not just a treat; they’re little pieces of joy that can make anyone’s Halloween a bit more special.
Tips for Best Results
- Make sure your chocolate is melted completely and smooth. If it’s chunky or grainy, that could lead to your skeletons looking a bit… well, sketchy.
- Always use silicone molds; they’re easier to manage. The last thing you want is a skeleton that breaks before it makes it to the party.
- Don’t overfill your molds. Trust me on this one; melted chocolate has a way of finding its own way to escape.
Ingredient Substitutions & Variations
If you’re looking to jazz this up a bit, consider using flavored marshmallows! Peppermint or caramel marshmallows can impart a lovely twist to your skeletons. You can even use colored chocolate to match your Halloween theme—think orange and black for a true autumn aesthetic.
If you want a healthier version (yes, they exist!), swap out the chocolate for yogurt-coated marshmallows; they might not have the same sweetness but they have a unique flavor!
Serving Suggestions
These Halloween Marshmallows are great on their own, but if you want to take it over the top, pair them with a cup of your favorite hot cocoa. Picture this: a cozy evening, wrapped in a blanket, watching a classic Halloween movie, and sipping on a steaming mug of cocoa shaped like a pumpkin spice. Perfection!
You could also set up a little dessert table featuring these skeleton marshmallows alongside some spooky cupcakes or even a Halloween cheese platter (yes, even cheese can be festive!).
How to Store and Reheat Leftovers
If you somehow have leftovers—and honestly, that’s a miracle—place them in an airtight container at room temperature. They should keep fresh for about a week. If they start getting too soft (thanks, humidity), you can pop them in the fridge for a few days, but let them come back to room temperature before indulging to keep that fluffy texture.
Make-Ahead and Freezer Tips
You can totally make these ahead of time! Just whip them up a day or two before your Halloween gathering. They travel really well, too, so if you find yourself invited to a last-minute spook fest, you can always whip them out of the freezer, defrost, and voilà—instant Halloween cred.
Common Mistakes to Avoid
-
Skimping on Greasing the Molds: Your molds need that oil to work their magic! No oil = chocolate meltdown.
-
Skipping the Chill Time: Seriously, don’t skip this step unless you want a gooey disaster.
-
Rushing the Chocolate Melting: We live in a world where patience is a virtue—take the time to melt your chocolate slowly to avoid burning it.
Frequently Asked Questions (FAQ)
Can I use large marshmallows?
Absolutely! Just cut them in half. But honestly, mini marshmallows just mix better with chocolate.
How can I make these gluten-free?
Most marshmallows and chocolate are gluten-free, but definitely check the packaging to ensure there are no cross-contamination issues.
Can I use white chocolate?
Totally! White chocolate would add a fun contrast to the skeletons and an extra layer of sweetness.
Cooking Tools You’ll Need
- Microwave-safe bowl (or a double boiler if you’re feeling fancy)
- Silicone molds (for those skeleton shapes!)
- Spatula
- Airtight container for storage
- A whisk to mix up any mixture (although that’s not necessary here)
Final Thoughts
Making these Halloween Marshmallows with Skeletons is more than just a cooking project—it’s about creating memories and bringing joy to the season. So go ahead, put your own spin on these treats, share them with friends, and take the time to savor the mishaps and successes that happen along the way. Plus, you know deep down that a bit of kitchen chaos never hurt anyone!
Remember, it’s not about perfection—it’s about the laughter, the sticky fingers, and the delicious memories we create! If you enjoyed this recipe, don’t forget to save it on Pinterest or share it with a friend! Happy haunting!
Halloween Marshmallows with Skeletons
Ingredients
Main Ingredients
- 1 bag mini marshmallows The star ingredient for this treat.
- 2 cups chocolate chips or melting chocolate Choose between dark or milk chocolate.
- 1 set skeleton molds Silicone molds preferred for easy removal.
- 1 tablespoon vegetable oil For greasing the molds.
- powdered sugar for dusting powdered sugar To give marshmallows a snowy finish.
- optional sprinkles or edible glitter For extra Halloween sparkle.
Instructions
Preparation
- Gather all your ingredients in one spot.
- Melt the chocolate in a microwave-safe bowl at 30-second intervals, stirring in between until smooth.
- Lightly coat the silicone molds with vegetable oil.
- Pour melted chocolate into the molds, filling halfway.
- Add mini marshmallows into each mold without overcrowding.
- Seal with more melted chocolate, covering marshmallows completely.
- Chill the molds in the refrigerator for about 30 minutes until the chocolate is set.
- Gently tap the skeletons out of the molds once set.
- Dust lightly with powdered sugar and add sprinkles if desired.


