
The Best Easy Creamy Lemon Squares Recipe: A Nostalgic Delight
There’s something about Creamy Lemon Squares that just hits different. Maybe it’s the zesty punch or the creamy texture that dances across your tongue. Or it could be all those fond memories of summertime picnics when my family would whip these up while the summer sun cast golden rays through the kitchen window. But to be real, it’s likely a mix of everything.
I still remember the first time I attempted to make these luscious squares. Picture a kitchen filled with flour clouds, an unexpected eruption of lemon juice (oops!), and a rather large amount of powdered sugar clinging to my hands like some bizarre kitchen badge. The first batch? Let’s just say it was less "creamy" and more "tangy lemon pudding disaster." But hey, every kitchen adventure tells a story, right? The fragrant scent of zesty lemon wafting through the air reminded me that even mess-ups can lead to something magical.
This recipe matters so much to me because it connects me to those warm afternoons, with the sun slowly setting and family gathered around the table, eagerly waiting for that refreshing treat. It has that cozy charm that seems to wrap around you like a soft sweater. Trust me; when you taste these squares, it’s like a hug in dessert form!
Let’s set the mood here: the warm colors of dusk filtering through your kitchen, the zingy aroma of lemon dancing around you, and the sweet laugh of someone you love making memories with. Honestly, is there anything more comforting than that? Let’s dive into why you’ll absolutely love making these Creamy Lemon Squares, a perfect addition to your easy weeknight dinners or gatherings!
Why You’ll Love This Recipe
-
Simple Ingredients: No fancy stuff here! Just a handful of basic pantry staples.
-
Quick Preparation: You’ll be on your way to enjoying a delightful treat in under an hour.
-
Guilt-Free Indulgence: They’re so light and zesty that they seem healthy to eat (not that we’re counting calories here!).
-
Crowd-Pleasing: Picky eaters will find it hard to resist these creamy squares.
-
Perfect for Meal Prep: Store them for a quick dessert on hand. Trust me, it feels like having a little sunshine saved for a rainy day.
-
Comfort Food at its Best: Each bite feels like a burst of joy, reminiscent of those lazy summer days.
What Makes This Recipe Special?
First off, the zing of lemon zest paired with the sweetness of powdered sugar creates a heavenly balance that you won’t find in your typical dessert. Each bite brings a tangy flavor that contrasts beautifully with the custardy filling—seriously, it’s like a mini vacation in your mouth.
The best part? This dessert is embarrassingly easy to prepare. No need for extensive baking skills or culinary degrees—trust me; if I can do it, you can too! And oof, the satisfaction of taking them out of the oven, perfectly set, is one for the books!
Now that your appetite is whetted, let’s talk about the stars of the show.
Ingredients
-
1 cup all-purpose flour: This is the backbone of our crust, giving it a lovely structure.
-
1/2 cup powdered sugar: Sweet and light, this adds a touch of magic to both the crust and the finishing dusting.
-
1/2 cup unsalted butter, softened: Because buttery crusts are everything—who needs margarine here? Softened butter ensures a smooth blend.
-
2 large eggs: They bring the creamy filling together. Make sure they’re at room temperature for the best results!
-
1 cup granulated sugar: Sweetens the lemon mixture—if you omit this, you’ll find yourself with a mouthful of chaos!
-
2 tablespoons lemon juice: Freshly squeezed, of course! It’s the zing we all crave in these squares.
-
1 tablespoon lemon zest: Adds that beautiful citrus aroma. Pro tip: zest the lemon before juicing it for easy zesting!
-
1/4 teaspoon salt: This balances everything out—don’t skip it!
-
2 tablespoons powdered sugar (for dusting): It’s that final touch that makes everything sparkle.
Personal Tips:
-
If you can, use fresh lemons! The taste difference is night and day compared to bottled lemon juice.
-
For the crust, make sure not to overwork the dough. You want it to be crumbly but not a sticky mess.
-
Don’t skim on the eggs—they’re vital to the creamy texture.
Don’t Do This:
-
Overbaking the squares can turn your dessert into rubber! Keep an eye on them as they bake.
-
Don’t use cold eggs or butter; they’ll create a lumpy filling!
How to Make It Step-by-Step
Alright, let’s get our hands a little messy and dive into this delightful process!
Step 1: Preheat the Oven
First things first, preheat your oven to 350°F (175°C). This way, the whole kitchen will start to warm up, setting the stage for the creamy goodness about to unfold. Grease a square baking dish (8×8 is ideal) or line it with parchment paper for easy removal.
Step 2: Prepare the Crust
In a mixing bowl, combine 1 cup all-purpose flour with 1/2 cup powdered sugar. Time to channel your inner baker! Cut in 1/2 cup softened unsalted butter until the mixture resembles coarse crumbs. It’s satisfying, watching those little bits of butter get incorporated. When it starts looking crumbly but holds together when you squeeze it, it’s ready. Honestly, I tend to think, “Is this even going to hold up?” Trust the process!
Press the mixture firmly into the bottom of your greased baking dish. It’s okay if it’s a little uneven—this is home cooking, not the Great British Bake Off! Bake this crust for about 15 minutes and take a moment to breathe in that buttery aroma wafting through your kitchen!
Step 3: Prepare the Filling
While the crust is baking, let’s work on that heavenly filling. In a separate bowl, whisk together 2 large eggs, 1 cup granulated sugar, 2 tablespoons lemon juice, 1 tablespoon lemon zest, and 1/4 teaspoon salt. This will make your kitchen smell citrusy fresh—don’t be surprised if you suddenly feel like you’re on a sunny beach! The mixture should be light and a bit frothy.
Step 4: Combine and Bake Again
Once your crust is done and slightly cool, pour the luscious lemon filling over the warm crust, spreading it evenly. Pop it back into the oven for an additional 20-25 minutes or until it’s set and just lightly golden on top. You’re looking for a nice jiggle but not too wobbly—if it’s too runny, it tends to lean more towards lemon soup than square. I once had a batch that didn’t set right—yikes!
When the timer goes off, allow it to cool completely (trust me, I know the struggle of wanting to dive right in). Once cooled, sprinkle it generously with 2 tablespoons powdered sugar for that Instagram-worthy finish!
Tips for Best Results
For the best results, allow your squares to chill in the fridge for an hour before cutting. This helps them firm up beautifully. If you cut them too soon, you might have a messy situation rather than clean squares. Plus, they taste even better cold!
Experiment with the lemon levels! If you love citrus, don’t be shy—add a bit more lemon juice or zest.
Ingredient Substitutions & Variations
No lemons on hand? No problem! You can replace them with other citrus fruits like orange or even grapefruit for a different zest twist. If you’re going for a vegan option, flax eggs work lovely, and a dairy-free butter can replace the butter —just pay attention to the texture!
Feeling a little adventurous? Toss in some berries (like raspberries or blueberries) before the filling sets. That extra burst of flavor can take these creamy squares to the next level.
Serving Suggestions
Pair your Creamy Lemon Squares with a refreshing glass of iced tea or lemonade for the ultimate summer experience! If you’re feeling daring, how about pairing them with a scoop of vanilla ice cream? Just imagine: the luscious citrus cuts the creamy texture of the ice cream—now that’s summer love on a plate!
And for those cozy nights in, settle down on your couch with a rom-com, your favorite blanket, and a plate of these dreamy squares. Perfection!
How to Store and Reheat Leftovers
Let’s be real: they probably won’t last long, but if you do happen to have some leftovers (wow, I’m impressed), store them in an airtight container in the fridge. They’ll be good for about 5 days. Just remember to dust them with powdered sugar again before serving, because we all appreciate a little presentation!
If you ever want to reheat them, a quick 10-15 seconds in the microwave will do the trick, but always be careful not to overheat. You don’t want them turning rubbery!
Make-Ahead and Freezer Tips
These squares actually freeze pretty well! Just cut them into squares, place them in an airtight container layered between parchment paper, and freeze for up to a month. Thaw them in the fridge overnight when you’re ready.
Common Mistakes to Avoid
-
Don’t rush the cooling process! Cutting them too soon will turn your lovely squares into sad lemon pudding.
-
Always check for doneness using the jiggle test. Too wobbly? Back it in the oven!
-
Don’t forget to zest before juicing; once you cut that lemon open, zesting becomes near impossible!
Frequently Asked Questions (FAQ)
Q: Can I use a different type of flour?
Absolutely! Almond flour or gluten-free flour blends can be used, but you may need to adjust the liquid slightly for the right consistency.
Q: Can I add other flavors?
Of course, try adding a hint of vanilla extract to the filling! It adds a lovely comforting warmth.
Q: How do I keep it from burning on the ends?
Cover the edges with foil if they start to brown too much while baking. It’s like giving your squares a little sunhat!
Q: Can I make them smaller?
Definitely! Just adjust the baking time for the crust and filling as needed—they’ll be adorable mini versions!
Q: What should I serve with them?
Honestly, a dollop of whipped cream or a side of fresh fruit can really elevate your serving game.
Cooking Tools You’ll Need
-
Mixing bowls (always good to have a selection for different tasks).
-
A whisk (or electric mixer for those extra frothy moments).
-
A greased square baking dish (8×8 inches).
-
Measuring cups and spoons (you always want to be accurate!).
-
A sharp knife (for those clean cuts!).
Final Thoughts
These Creamy Lemon Squares are more than just a dessert; they’re a testimony to simplicity and joy in the kitchen. Each time I make them, I’m reminded of sunny afternoons, laughter, and kitchen chaos—every drop spilling is just a part of the fun!
So go ahead; take this recipe, make it your own, and enjoy the cozy vibes that come with each square. And hey, if you’ve found joy in this recipe, please save it on Pinterest or share it with a friend. Let’s spread the love one lemon square at a time!

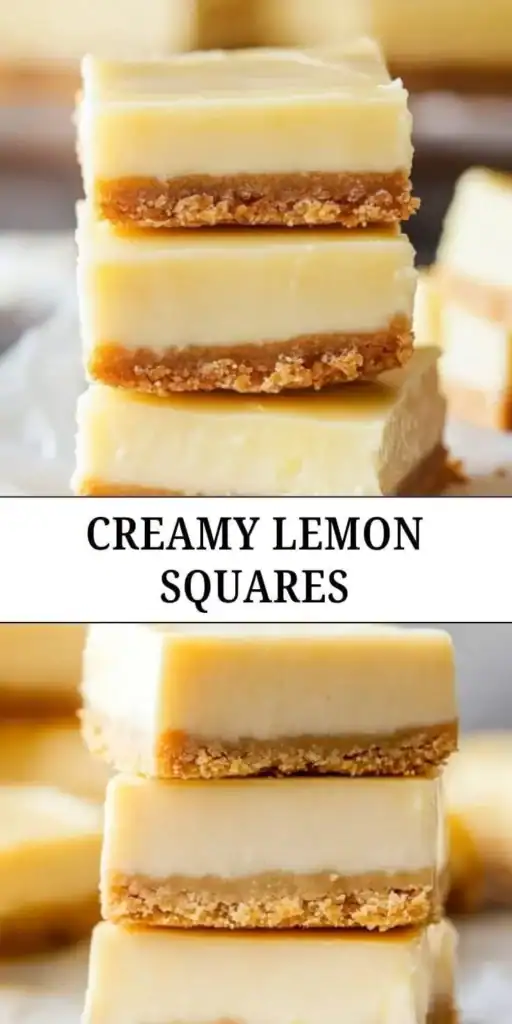
Creamy Lemon Squares
Ingredients
For the crust
- 1 cup all-purpose flour This is the backbone of our crust, giving it a lovely structure.
- 1/2 cup powdered sugar Sweet and light, this adds a touch of magic to both the crust and the finishing dusting.
- 1/2 cup unsalted butter, softened Softened butter ensures a smooth blend for the crust.
For the filling
- 2 large eggs Make sure they’re at room temperature for the best results!
- 1 cup granulated sugar Sweetens the lemon mixture.
- 2 tablespoons lemon juice Freshly squeezed for the best flavor.
- 1 tablespoon lemon zest Adds a beautiful citrus aroma.
- 1/4 teaspoon salt Balances the flavors.
For dusting
- 2 tablespoons powdered sugar For the final touch before serving.
Instructions
Preparation
- Preheat your oven to 350°F (175°C) and grease an 8x8 baking dish or line it with parchment paper.
- In a mixing bowl, combine the all-purpose flour and powdered sugar. Cut in the softened butter until the mixture resembles coarse crumbs.
- Press the mixture firmly into the bottom of the prepared baking dish and bake for about 15 minutes.
Prepare the Filling
- While the crust is baking, whisk together the eggs, granulated sugar, lemon juice, lemon zest, and salt in a separate bowl until light and frothy.
Combine and Bake Again
- Once the crust is done and slightly cool, pour the lemon filling over it evenly. Bake for an additional 20-25 minutes or until set and lightly golden on top.
- Allow it to cool completely, then sprinkle with powdered sugar before serving.


