
Easy Chocolate Peanut Butter Pie: A Delicious Family Favorite
Chocolate and peanut butter—a combo that has stood the test of time and continues to bring joy to our taste buds. Honestly, what’s not to love? This easy Chocolate Peanut Butter Pie is not just a dessert; it’s an emotional journey back to the days of childhood sweet indulgences, family gatherings, and late-night snacks with friends. I can still smell the rich aroma wafting through my kitchen, swirling with laughter and happy chatter.
Let me take you back. Picture this: it’s a cozy Saturday evening in my warm kitchen, the kind of night where the rain softly patters against the window, and I find myself craving something distinctly comforting. I rummaged through my pantry, tossing aside bags of flour and jars of baking soda, until my eyes landed on a treasure trove of Oreos. Now, I can’t emphasize enough how essential Oreos are to this recipe. The moment I opened that bag, a flood of nostalgia hit me—memories of being a kid, sneaking cookies before dinner and dunking them in milk. Oh boy, here comes the sugar rush!
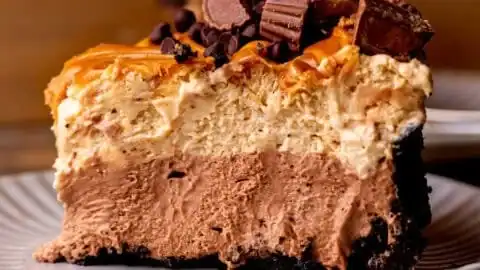
This Chocolate Peanut Butter Pie is a delightful marriage of an Oreo crust filled with a creamy chocolate layer and a velvety peanut butter filling that signals your taste buds to kick back and relax. What makes me love this pie even more is that it packs tons of flavors without requiring “MasterChef” skills. So, grab a spoon; it’s time to dig in!
Why You’ll Love This Recipe
- Feel-Good Vibes: The luscious chocolate peanut butter combo feels like a warm hug, perfect for those cozy nights.
- Perfect for Leftovers: You’ll wish there were leftovers! But if there are, they keep well in the fridge.
- Picky-Eater Approved: Kids—and let’s be real, adults!—can’t resist this pie. It’s dessert perfection!
- Make-Ahead Magic: You can whip this up a day ahead of time, which is a game-changer for those busy evenings.
- Impressive Yet Simple: Bring this beauty to gatherings, and I promise people will be asking for your “secret recipe”—but only you’ll know how easy it was!
- Customizable: Switch things up with toppings or a drizzle of chocolate or caramel. The possibilities are endless!
What Makes This Recipe Special?
This pie is more than just a dessert; it’s a concoction of textures—crunchy Oreo crust, creamy chocolate filling, and rich peanut butter layered harmoniously together. It’s a testament to the simple joys in life, like when you realize you have all the ingredients on hand. Honestly, I didn’t expect it to be that easy! Cooking is about experimentation, and this pie is a playground for creativity.
But hold on, let me share a little secret. One time, I intended to make the classic peanut butter pie, only to realize I was out of cream cheese! Cue the panic! After some quick last-minute thinking, I improvised and used Greek yogurt instead. The result? A surprisingly delightful twist that added a subtle tang. So, don’t be afraid to get a little wild in the kitchen!
Ingredients
- 25 Oreos (the whole Oreo)
- 5 TBSP Unsalted butter (melted)
- 6 oz Cream cheese (room temperature)
- 2 TBSP Unsweetened cocoa powder
- 1/2 cup White granulated sugar
- 1/3 cup Sour cream (room temperature or Greek yogurt)
- 1 tsp Pure vanilla extract
- 3.5 oz Chocolate bar (melted; I used Lindt 72%)
- 10 oz Cream cheese (room temperature)
- 1/4 cup White granulated sugar
- 3/4 cup Peanut butter (creamy)
- 1 tsp Pure vanilla extract
- 1/4 cup Sour cream (room temperature or Greek yogurt)
- 2 cups Heavy cream (cold)
- 1/2 cup Powdered sugar
- 1/4 cup Peanut butter (melted)
- Peanut butter cups (for decoration)
Let’s break down these ingredients, shall we?
- Oreos: The star of the crust! I always go for the classic—not that double-stuffed nonsense—because we want the pie to be indulgent but balanced.
- Unsalted Butter: This helps bind the crust together, giving it a lovely texture. Trust me, don’t skip on melting it!
- Cream Cheese: It adds that rich creaminess, especially when you let it come to room temperature. It’s all about that smooth texture!
- Cocoa Powder: For depth of flavor, and you can’t go wrong. I usually keep a canister of this around for adding to everything—yes, even pancakes!
- Sour Cream or Greek Yogurt: I love the slight tanginess it brings. And for those on a mission for high protein meals, Greek yogurt works wonders here!
- Heavy Cream: Say hello to the light, fluffy whipped topping that crowns this pie. You want it cold so it whips nicely, hence the chill before we start.
- Peanut Butter: No skimping here! This is where the flavor explodes. Use creamy for a smoother consistency, and if it’s got those tiny bits of peanuts, that’s just a bonus texture!
How to Make It Step-by-Step
Okay, get comfy in your kitchen. I swear I can almost hear the heavy whipping cream begging to be whipped!
-
Start with the Crust: Preheat your oven to 350°F (175°C). Crush those Oreos until they resemble sand. I use a food processor, but you could also toss them in a zip-top bag and go to town with a rolling pin or, let’s be real—your fist. (Just don’t break your counter!) Once crushed, mix in the melted butter until it resembles wet sand.
-
Press and Bake the Crust: Firmly press the Oreo mixture into a pie dish. Press, press, press! Go ahead—use your fingers. I’ve even used the bottom of a cup! Bake in the preheated oven for 8-10 minutes. The edges should look a bit crispy, then let it cool. Your kitchen will now smell like cookies! Achievement unlocked.
-
Prepare the Chocolate Layer: In a medium bowl, beat 6 oz of cream cheese until smooth. Add that delicious cocoa powder, the granulated sugar, and mix until fluffy. Then toss in that room-temperature sour cream and vanilla extract. Here’s where it gets exciting; pour in the melted chocolate and stir until all the ingredients sing in harmony. This mixture should oozey, creamy bliss.
-
Fill the Crust with the Chocolate Layer: Now, spread that glorious chocolate filling over your cooled crust. Don’t be shy; there’s no such thing as too much chocolate. Chill while you tackle the peanut butter filling.
-
Make the Peanut Butter Layer: In another bowl, whip the softened cream cheese until smooth. Add the peanut butter and sugar, mix until well combined. Toss in the sour cream and vanilla extract like the daring creator you are.
-
Whip the Heavy Cream: In another bowl, beat the cold heavy cream until soft peaks form. Sifting in the powdered sugar helps it blend better. Then, gently fold in half of the whipped cream into the peanut butter mixture. Feel free to get in there with a spatula, folding it in like a gentle embrace. Once combined, add the rest of the whipped cream, making sure not to over-mix.
-
Assemble the Pie: Spread that luxurious peanut butter layer over the chocolate layer until perfectly smooth.
-
Chill Again: Pop that beauty back into the fridge for at least 4 hours (or overnight if you can! I know, the wait is agonizing).
-
Decorate: Right before serving, drizzling on some melted peanut butter and topping it with crushed peanut butter cups is non-negotiable. It’s like the cherry on top, but, you know, way better.
-
Serve and Enjoy: When ready to dig in, cut yourself a slice, scoop up some of that crust, and revel in that rich, peanut buttery goodness. Your taste buds will do a happy dance, I promise!
Tips for Best Results
- Room temperature ingredients are your best friends! Everything just mixes better when they aren’t cold. Essentially, you’re inviting them to the party—let them hang out together for a bit before the big event!
- Want an easy weeknight dinner vibe? Make this pie as your after-dinner treat. It will genuinely feel like a little celebration of your meal.
- Be gentle when folding in whipped cream. This is not the time for aggression! Gently presents a light and fluffy attitude.
Ingredient Substitutions & Variations
- Swap out Oreos for crushed graham crackers if you fancy a twist—a s’mores version is totally possible!
- Try using Skippy or other nut butter brands if peanut butter doesn’t float your boat. It goes without saying, but almond butter would be fabulous too!
- For a keto meal plan, you could explore using a sugar substitute for the filling, and low-carb crushed cookies for the crust.
Serving Suggestions
Alright, let’s get this party started! This pie pairs wonderfully with a scoop of vanilla ice cream for that delightful temperature contrast and additional creaminess. Or picture this: curling up on your cozy couch with a slice and your favorite rom-com—perfection!
If you’re feeling extra fancy, why not drizzle a little chocolate sauce over the top? I often whip up a quick hot cocoa with a splash of milk to wash down this breadcrumb of happiness.
How to Store and Reheat Leftovers
If you find yourself with leftovers—lucky you! Store this pie in the fridge in an airtight container or cover it tightly with plastic wrap. It should keep for about a week. I can’t guarantee it will last that long, though—my family and I usually polish it off way before then!
Make-Ahead and Freezer Tips
Honestly, this pie is ideal for making ahead of time. Preparing it a day or even two in advance allows the flavors to meld wonderfully. However, I wouldn’t recommend freezing it, as the whipped cream might not hold up well—it could separate and be more sad than tasty. Save yourself some heartache!
Common Mistakes to Avoid
- Forgetting to use room temperature ingredients leads to a lumpy texture—trust me, nobody wants that!
- Overmixing the whipped cream results in a grainy mess. We want it to hold its shape!
- Not chilling the layers properly can lead to a disaster when cutting. Patience is essential—don’t rush this!
Frequently Asked Questions (FAQ)
1. Can I use natural peanut butter?
Absolutely! Just be aware that the texture might be a little different; natural peanut butter separates more easily.
2. How can I make this pie gluten-free?
Use gluten-free Oreos or any gluten-free cookie crumbs for the crust!
3. Is this pie served warm or cold?
Cold. It’s best served chilled, straight from the fridge, with whipped cream and peanuts on top for that perfect lovely texture!
Cooking Tools You’ll Need
- Mixing bowls (at least three)
- Food processor or zip-top bags for crushing cookies
- Whisk or electric mixer
- Rubber spatula (for folding)
- Pie dish or a deep-dish plate
Final Thoughts
Cooking is about love, messiness, and learning from the oops moments. I hope this Chocolate Peanut Butter Pie brings a smile to your face, just as it has for me and my family. Give it a try, and I’d absolutely love to hear how yours turned out. What’s your secret spin on this recipe?
If you enjoyed this recipe, don’t forget to save it on Pinterest or share it with a friend! Trust me; they’ll thank you!

Chocolate Peanut Butter Pie
Ingredients
For the Crust
- 25 pieces Oreos, whole Classic Oreos are recommended for the best flavor.
- 5 TBSP Unsalted butter, melted Melt the butter to help bind the crust.
For the Chocolate Layer
- 6 oz Cream cheese, room temperature Ensure it's at room temperature for smooth mixing.
- 2 TBSP Unsweetened cocoa powder Adds depth of flavor.
- 1/2 cup White granulated sugar
- 1/3 cup Sour cream, room temperature or Greek yogurt Greek yogurt can be used for a higher protein option.
- 1 tsp Pure vanilla extract
- 3.5 oz Chocolate bar, melted Lindt 72% chocolate is recommended.
For the Peanut Butter Layer
- 10 oz Cream cheese, room temperature Use the same note as above.
- 1/4 cup White granulated sugar
- 3/4 cup Peanut butter, creamy No skimping here!
- 1 tsp Pure vanilla extract
- 1/4 cup Sour cream, room temperature or Greek yogurt
- 2 cups Heavy cream, cold Keep it cold for best results.
- 1/2 cup Powdered sugar Sifting helps it blend better.
- 1/4 cup Peanut butter, melted For decoration.
Decoration
- as needed pieces Peanut butter cups For decoration.
Instructions
Preparation of the Crust
- Preheat your oven to 350°F (175°C).
- Crush the Oreos until they resemble sand.
- Mix in the melted butter until the mixture resembles wet sand.
- Firmly press the Oreo mixture into a pie dish.
- Bake for 8-10 minutes until the edges look crispy and then let it cool.
Making the Chocolate Layer
- In a medium bowl, beat 6 oz of cream cheese until smooth.
- Add cocoa powder, granulated sugar, sour cream, and vanilla extract. Mix until fluffy.
- Pour in the melted chocolate and stir until well combined.
Filling the Pie
- Spread the chocolate filling over the cooled crust and chill.
- In another bowl, whip the softened cream cheese until smooth.
- Add the peanut butter and sugar, then mix until well combined.
- Add the sour cream and vanilla extract and mix again.
- In a separate bowl, beat the cold heavy cream until soft peaks form.
- Fold half of the whipped cream into the peanut butter mixture, then add the rest of the whipped cream without over-mixing.
- Spread the peanut butter layer over the chocolate layer until smooth.
Final Steps
- Chill again for at least 4 hours or overnight.
- Before serving, drizzle melted peanut butter and top with crushed peanut butter cups.
- Serve cold and enjoy!


