
Easy and Delicious Tiramisu Cold Brew Coffee Cheesecake Recipe
I’ll be honest: when I first heard about Tiramisu Cold Brew Coffee Cheesecake, I thought it was just another wild mashup that my sweet tooth would adore. Do you ever have those moments, standing in your kitchen, the sweet smell of vanilla wafting through the air, while you daydream about what you could create? That was me, but with a twist. This recipe popped into my life on a cozy afternoon when I was deep in a Netflix binge, debating whether I should grab takeout or whip up something sweet. Spoiler alert: I chose sweet.
This recipe means a lot to me. You see, it reminds me of family gatherings, where coffee and dessert dance together in perfect harmony, lighting up the room as everyone shares laughter and stories. I’ll never forget the first time I tried creating this glorious mix, though. It was a disaster. Picture this: my cream cheese decided it wanted to congeal and fight me, the cold brew coffee sported an attitude, and I had cocoa powder dust all over my face! But, oops, who knew? Sometimes the biggest flops can lead to something heavenly.
There’s something wonderfully comforting about a cheesecake. It’s rich, creamy, and feels like a warm hug. Let’s dive into this delicious recipe together, shall we? You’re going to want to make this for every gathering, cozy night in, or just because it’s Tuesday and you deserve something amazing.
Why You’ll Love This Recipe
- Tiramisu Magic: It combines the best of two worlds—cheesecake and tiramisu—into one decadent dessert that feels like an intimate hug.
- No Baking Required: Yes, you read that right. Simply assemble and chill. It’s truly an easy weeknight dinner dessert that even the kids can help with.
- Coffee Lovers Rejoice: If you’re a fan of coffee (like yours truly), this cheesecake will be your new best friend and a great way to enjoy your high protein meals.
- Perfect for Leftovers: Just when you thought cheesecake couldn’t get better—imagine savouring it the next day! Leftover cheesecake is like a sweet gift from the dessert gods.
- Picky Eater Approved: Trust me; it’s hard to resist just one slice. You might have to keep your family members at bay to preserve your precious leftovers!
- Meal Prep Wins: If you’re someone who loves to prep in advance, this cheesecake can be made ahead, making it a great addition to your quick family meals roster.
What Makes This Recipe Special?
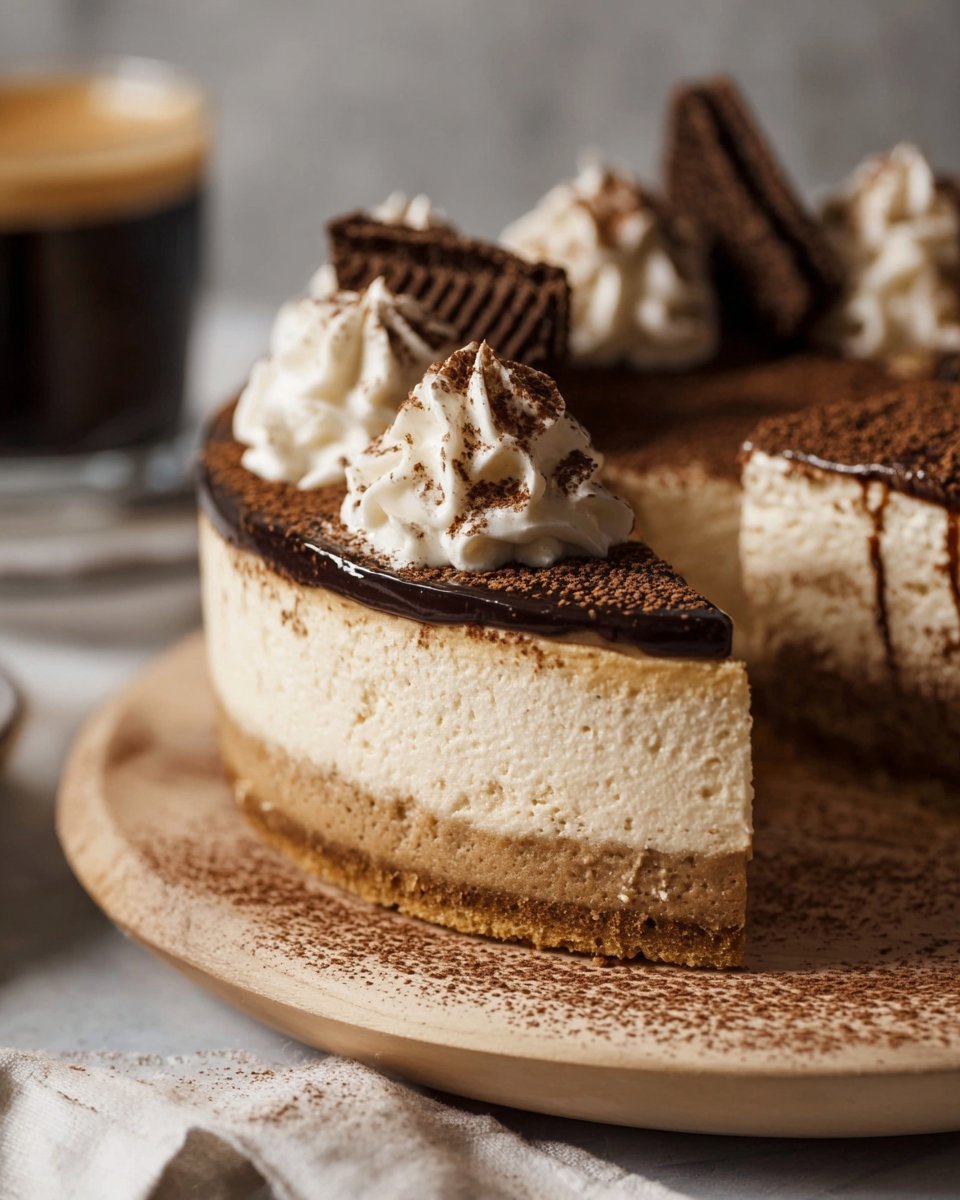
Let’s talk about the very essence of what makes this cheesecake truly unique. The layer of ladyfingers soaked in cold brew coffee is the game changer. Each slice integrates a harmonious balance of creamy sweetness and rich coffee flavors that dances on your palate.
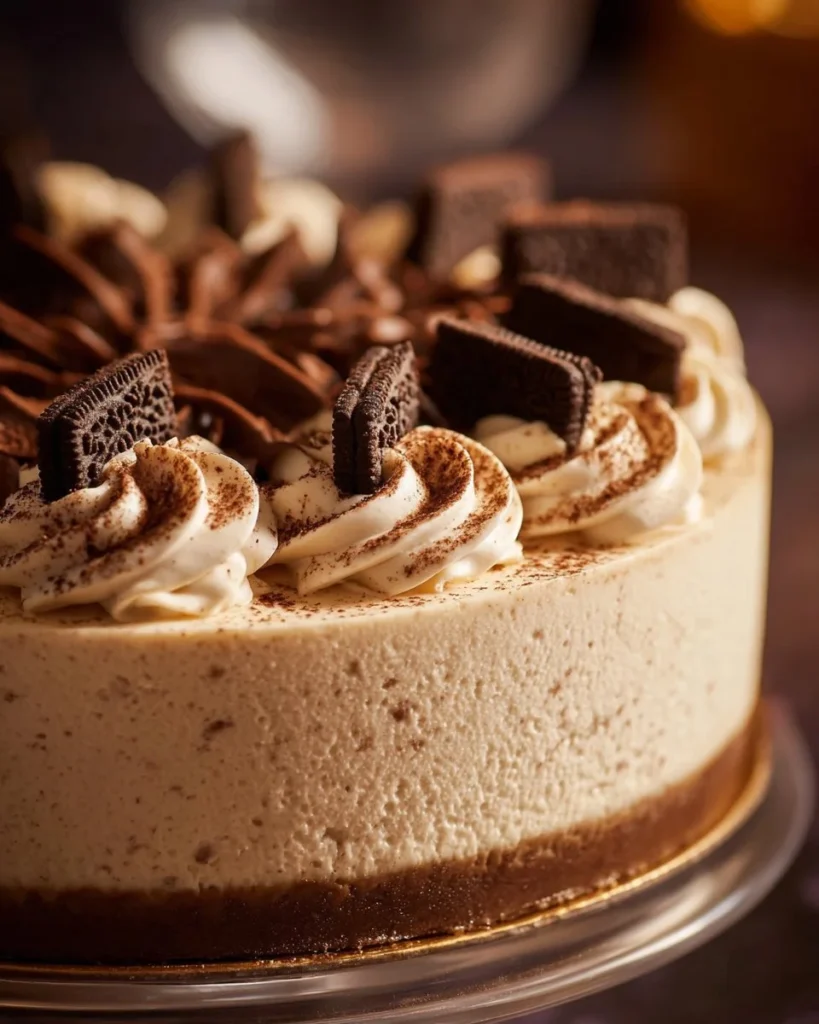
In addition, the use of heavy whipping cream makes the cheesecake super lush. Honestly, there’s just something about that silky texture that feels indulgent without being overwhelming. The cocoa dusting at the end? Just chef’s kiss. It’s the aesthetic and flavor finish that brings everything together—it wouldn’t be a tiramisu-inspired dessert without it.
Ingredients
- 1.5 cups graham cracker crumbs or crushed biscotti: Depending on your mood, you can go classic or adventurous; both offer great bases.
- 6 tbsp unsalted butter, melted: This luscious fat ties the crust together and adds richness.
- 16 oz cream cheese, softened: The creamy foundation for your cheesecake.
- 0.75 cup powdered sugar: Sweetness that won’t overpower the flavors.
- 1 cup cold brew coffee, strongly brewed: Honestly, the star of the show! Brew it strong so that it stands out in the cheesecake.
- 1 tsp vanilla extract: A dash of warmth to complement the coffee.
- 1.5 cups heavy whipping cream, cold: For that airy texture we all crave in a cheesecake.
- 12 pieces ladyfingers, cut in half: These will soak up the cold brew delights!
- 2 tbsp unsweetened cocoa powder for dusting: The classic finish that will have your guests marveling at your skills.
Personal Tip: Always check your cream cheese for lumps; those little buggers can wreak havoc in your mix. And don’t rush the creaming process—it’s where the magic starts!
How to Make It Step-by-Step
Okay, let’s roll up our sleeves and dive into the process. Prepare yourself for the captivating symphony of aromas, textures, and little “oops” moments that might pop up along the way.
Step 1: Making the Crust
Start by combining those graham cracker crumbs (or crushed biscotti) with the melted butter in a bowl. The sound of the crumbs meeting butter is music to my ears! You want to mix until everything is moistened. The texture should resemble wet sand—crumbly but not too dry.
Now, press this glorious mixture firmly into the bottom of a 9-inch springform pan. Honestly, there’s something therapeutic about this step. Pretend you’re a sculptor making the base of a cheesecake masterpiece. Once it’s all pressed down, slide your crust into the fridge and chill for about 10 minutes.
Step 2: The Fun Part – Cream Cheese Mixture
While that crust is setting, it’s time for the creamy goodness. In a large mixing bowl, beat together the softened cream cheese and powdered sugar until it’s smooth and luscious. The texture will be thick but oh-so-silky. You might find yourself having a moment there, just enjoying the creaminess.
Next, add in the vanilla extract and half a cup of your cold brew coffee. You might find the smell intoxicating—mix until it’s all blended in. Now the fun continues: in a separate bowl, whip the heavy cream until stiff peaks form. When you lift your whisk, the peaks should confidently hold their shape.
Gently fold the whipped cream into the cream cheese mixture. At this stage, be gentle! You don’t want to deflate the beautiful air you’ve created. The mixture now should be light and airy—an echo of the fluffy cheesecake that awaits you.
Step 3: Layering Your Cheesecake
Grab those ladyfingers and dip each piece quickly into the remaining coffee. No need to soak; just a quick dip will do. Lay them gently in a single layer over your chilled crust.
Okay, let’s be real. I once got a bit too enthusiastic and soaked my ladyfingers. Let’s just say they turned into a mushy mess. We want them to hold their structure while still imparting that delightful coffee flavor.
Once layered, spread your cream cheese mixture evenly over those ladyfingers. The cascade of creamy cheesecake over the coffee-kissed layer is astounding. Pop the whole thing into the fridge to chill for at least four hours—ideally, overnight is even better. This is where the flavors deepen and the cheesecake firms up.
Step 4: Dust and Serve
Finally, let’s jazz it up with some unsweetened cocoa powder. Use a fine mesh sieve to dust it across the top just before you serve. Slice that delicious cheesecake into pieces and watch the layers peek through. Each slice reveals that tantalizing coffee and cream swirl, and oh boy, does it look indulgent!
Tips for Best Results
So, you want to make sure this cheesecake steals the spotlight at your gathering? Here are a few small changes that can make a world of difference.
- Use Quality Ingredients: The better the ingredients, the better the taste. Choose a strong coffee you love.
- Room Temperature Cream Cheese: If you forget to take your cream cheese out to soften ahead of time, it will not blend well. Trust me, I’ve learned this the hard way.
- Chill It Longer: For best results, let that cheesecake rest overnight. It’ll only help the flavors develop.
- Serve Fresh: Dust the cocoa powder right before serving. It keeps that beautiful finish intact.
Ingredient Substitutions & Variations
Life’s too short for boring food! Here are some fun variations and swaps you can try:
- Gluten-Free Version: Use gluten-free cookies or graham crackers for the crust.
- Coffee Lovers Upgrade: Add a splash of coffee liqueur to the cream cheese mix for an extra kick.
- Fruit Twist: Layer fresh raspberries or strawberries between the ladyfingers and cheesecake for a fruity surprise.
- Chocolate Lovers: Blend in some melted dark chocolate into the cream cheese mix for an intense chocolate flavor.
Directions
- Combine graham cracker crumbs or crushed biscotti with melted butter. Press firmly into the bottom of a 9-inch springform pan, then refrigerate for 10 minutes.
- In a mixing bowl, beat together the cream cheese and powdered sugar until smooth. Mix in vanilla and 0.5 cup cold brew coffee.
- In a separate bowl, whip heavy cream to stiff peaks, then gently fold into the cream cheese mixture.
- Briefly dip ladyfingers in the remaining cold brew and layer over the crust. Spread the cheesecake mixture over ladyfingers and refrigerate for at least four hours (preferably overnight).
- Dust with cocoa powder before serving and slice to enjoy!
Pairing Ideas (Drinks, Sides, etc.)
This cheesecake stands perfectly on its own, but if you want to fancy it up, pair it with a cup of strong espresso or a glass of vanilla-flavored almond milk. I can just picture myself curling up with this cheesecake on a cozy night, a rom-com playing in the background—pure bliss!
How to Store and Reheat Leftovers
If you happen to have leftovers (which you might not, let’s be real), store them covered in the fridge. They’ll last about 3-4 days, and it’s a delicious treat for when you need a midnight snack. Just don’t try reheating this; it’s best enjoyed chilled.
Make-Ahead and Freezer Tips
Want to be a superstar host? Make this cheesecake a day ahead so flavors can meld like a beautiful symphony. If you want to freeze it, go for it! Wrap it tightly in plastic before freezing (up to 2 months). Just know that the integrity of the ladyfingers might change slightly, but it’ll still be heavenly.
Common Mistakes to Avoid
We all have our flops in the kitchen, and here are a few common culprits with this cheesecake:
- Over-whipping the Cream: You want it fluffy, not grainy. Be gentle!
- Not Chilling Long Enough: This cheesecake needs time to set and gather its flavors.
- Over-soaking Ladyfingers: A quick dip is all they need, or you’ll have a soupy mess.
Frequently Asked Questions (FAQ)
Can I use Instant Coffee?
Yes! Just dissolve it in hot water to make a strong coffee.
What’s the best way to cut this cheesecake?
Use a hot, wet knife for clean cuts. It’ll save you from cheesecake ruins!
Can I add different flavors?
Absolutely! Go wild with flavors like caramel or hazelnut.
Cooking Tools You’ll Need
- A 9-inch springform pan
- Mixing bowls
- Hand mixer or stand mixer
- Whisk
- Sieve for dusting cocoa powder
Final Thoughts
Oh, how I cherish this Tiramisu Cold Brew Coffee Cheesecake! It’s the epitome of comfort food that resonates on so many levels—memories, flavors, and that warm sense of home it brings. I can’t help but smile when I think about sharing it with friends and family, all while recounting tales that make us laugh.
So next time you’re stuck on what to make, remember this recipe. Invite your loved ones to join you in the kitchen chaos; it’s those messy moments that truly make cooking special. And hey, if you enjoyed this adventure, don’t forget to save it on Pinterest or share it with a friend! Let’s spread the love one recipe at a time!
Tiramisu Cold Brew Coffee Cheesecake
Ingredients
For the crust
- 1.5 cups graham cracker crumbs or crushed biscotti Choose based on preference.
- 6 tbsp unsalted butter, melted Adds richness to the crust.
For the cheesecake filling
- 16 oz cream cheese, softened Ensure it’s at room temperature for easy mixing.
- 0.75 cup powdered sugar Adds sweetness without overpowering.
- 1 cup cold brew coffee, strongly brewed The star ingredient, brew strong for best flavor.
- 1 tsp vanilla extract Adds warmth to the flavor.
- 1.5 cups heavy whipping cream, cold For an airy texture.
- 12 pieces ladyfingers, cut in half Quickly dip in coffee before layering.
- 2 tbsp unsweetened cocoa powder for dusting To finish the cheesecake.
Instructions
Preparation
- Combine graham cracker crumbs (or crushed biscotti) with melted butter in a bowl and mix until moistened.
- Press the mixture firmly into the bottom of a 9-inch springform pan and refrigerate for 10 minutes.
Cream Cheese Mixture
- In a mixing bowl, beat together cream cheese and powdered sugar until smooth.
- Mix in vanilla extract and half a cup of cold brew coffee.
- In a separate bowl, whip heavy cream to stiff peaks and then gently fold into the cream cheese mixture.
Layering
- Briefly dip ladyfingers in the remaining cold brew and layer over the crust.
- Spread the cream cheese mixture evenly over the ladyfingers.
- Refrigerate for at least four hours (preferably overnight) to allow flavors to meld.
Serving
- Dust with cocoa powder just before serving and slice to enjoy!


