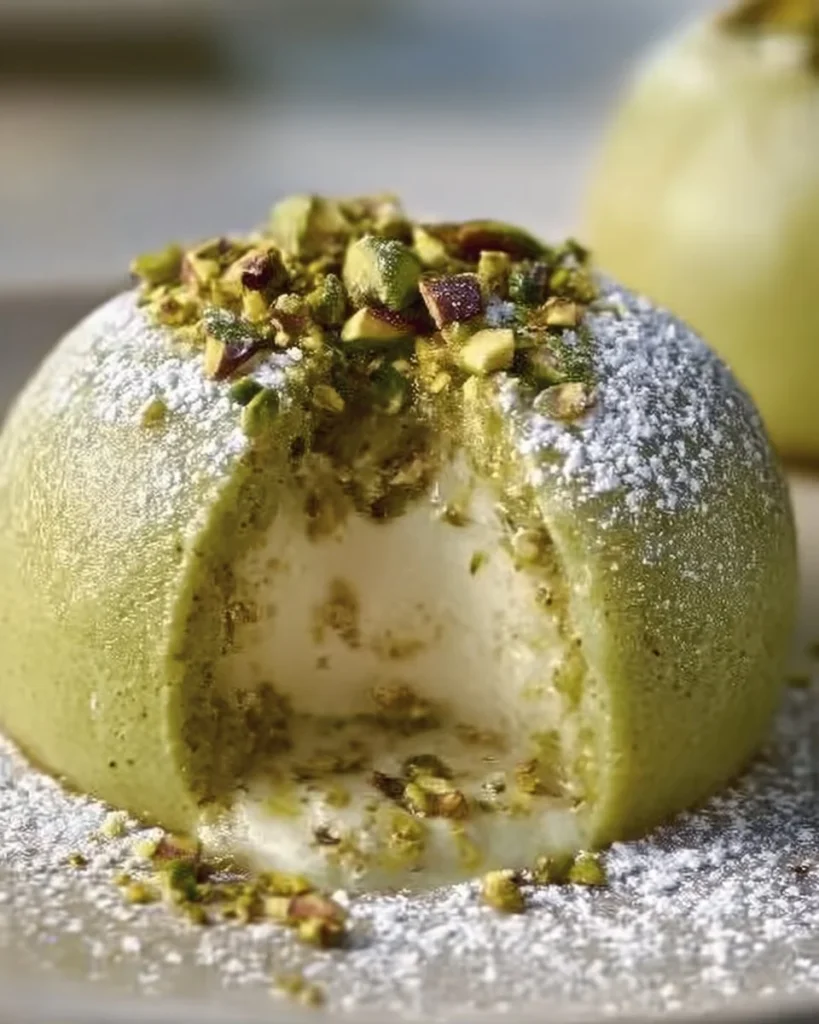

Molten Pistachio Lava Cakes That Will Wow Your Guests
If you’re anything like me, the kitchen is your happy place, but let’s be real—sometimes it turns into a chaotic playground of flour explosions and half-melted butter. One night, after a long week of juggling work, family, and about a million things on my to-do list, I found myself craving something sweet, something that could lift my spirit like a delicious hug. Enter molten pistachio lava cakes. I mean, who doesn’t want a dessert that erupts with gooey goodness and pistachio flavor? I can still remember that first moment of waiting for the molten center to ooze out when I took my first bite. I didn’t expect it to be that magical!
These cakes have a richness that’s simply comforting, which is just what you need after a busy day. The first time I made them, I was convinced I could somehow mess it up—overbake it into a sad cookie or underbake it into a soupy disaster. Spoiler alert: I did both! But with each subsequent attempt, I learned something new, and now they’re a staple in my dessert rotation, especially when I have guests.
Imagine the scene: the oven timer dings, and as I pull these beauties out, the kitchen fills with the intoxicating aroma of melting chocolate blended with the subtle nuttiness of pistachio. It’s pure bliss. I promise you, your guests won’t just be impressed; they’ll be asking for seconds. (Or thirds. I wouldn’t blame you!)
Why You’ll Love This Recipe
- Wow Factor: Seriously, a dessert that looks fancy but is deceptively easy to whip up? Sign me up!
- Rich and Decadent: The combination of rich white chocolate and pistachio paste creates a flavor explosion that’s hard to resist.
- Perfect for Any Occasion: Birthdays, date nights, or even that "just because" moment—this treat fits any bill.
- Leftovers (if you have any): These cakes store surprisingly well, making them a delightful treat for the next day’s dessert or a midnight snack.
- Picky-eater Approved: Kids and adults alike will be clamoring for more, making it perfect for family gatherings!
- MealPrep Wins: You can prepare the batter ahead of time and pop them in the oven right before serving, so you can enjoy the moment without sweating in the kitchen.
What Makes This Recipe Special?
Let’s chat about what sets these molten lava cakes apart. First off, pistachio paste isn’t just a trendy ingredient—it’s a flavor powerhouse that elevates this dessert to another level. When you break into the cake, watch out for that molten center! It’s creamy, dreamy, and has the nutty depth of pistachio that lingers on your palate long after the last bite.
There’s no need for complicated techniques here. The magic happens when you pour the batter into greased ramekins, patiently await the baking time, and let the oven work its magic. Just a pinch of salt? Sure! It brings a little balance to the sweetness of the white chocolate, making the whole thing sing!
Ingredients
So, let’s break down what you’ll need to make these heavenly molten pistachio lava cakes. Here’s the star cast of ingredients:
- 1/2 cup Unsalted Butter (Plus extra for greasing): Essential for richness and that delightful gooey texture. Don’t skimp; butter is life.
- 4 oz White Chocolate: Please, don’t substitute this! White chocolate delivers that creamy base that contrasts perfectly with the pistachio flavor.
- 1/3 cup Pistachio Paste: This is the game-changer! Look for a high-quality paste for the best results. Trust me, it makes all the difference.
- 2 large Eggs (Room temperature): Eggs provide structure and help achieve that perfect molten center.
- 1/4 cup Granulated Sugar: No direct substitutes here either; we’re aiming for that sweetness balance.
- 1 tsp Vanilla Extract: It rounds out the flavors and brings warmth to the dish.
- 1/4 cup All-Purpose Flour: Just a little to help bind everything together.
- 1 pinch Salt: A tiny bit enhances the flavors, bringing all the elements together.
- 2 tbsp Chopped Pistachios: These are for decoration. A little crunch on top is delightful.
- 1 tbsp Powdered Sugar: For that professional touch, a light dusting on top makes it look restaurant-worthy.
Pro tip: If you want gluten-free options, swapping the all-purpose flour for almond flour works brilliantly here!
How to Make It Step-by-Step
Alright, grab your apron (or don’t—it’s a judgment-free zone here), and let’s dive into the process of creating our molten pistachio lava cakes. Just remember, I’m right there with you in the kitchen chaos!
Step 1: Preheat and Prep
First things first, preheat your oven to 425°F (yes, precisely, no higher, no lower). While that’s warming up, get your ramekins ready. A quick brush of butter will ensure our cakes don’t stick. I’ve made the mistake of skipping this step, and let’s just say my cakes went in as intact little rounds and came out looking like abstract art—think melted puddles.
Step 2: Melt the Goodies
In a microwave-safe bowl, combine the butter and white chocolate. Pop it in the microwave (30 seconds at a time) and watch for it to turn melty and smooth. I like to stir between intervals because, honestly, nobody wants burnt chocolate in their lives. The scent wafting from the microwave will have you tempted to dive in, but stay strong—patience is key.
Step 3: Mix It Up
Once your chocolate mixture is gloriously smooth, stir in the pistachio paste. The color and the aroma? Oh, my goodness, I can almost taste it! Next, let the mixture cool a bit before adding the eggs; we don’t want scrambled eggs in our molten cakes ( trust me—I’ve done it before, and it was not cute).
Add in those room-temperature eggs, sugar, vanilla extract, flour, and a pinch of salt. Stir gently until everything is combined but try not to overmix. The texture should be silky and just slightly thick.
Step 4: Portion and Prepare to Bake
Now it’s time to pour the batter into your prepared ramekins. Fill them about 2/3 of the way full; we want some room for that lovely molten lava effect. Remember, we’re going for cakes that ooze when you cut into them!
Step 5: Bake, Baby, Bake
Place those ramekins in the oven and set the timer for 12-14 minutes. The key here is to keep an eye on them—every oven is a little different, so 12 minutes might be perfect, while others might need an extra minute or so. You know they’re done when the edges look set but the center is still slightly jiggly. Any more time, and you risk a solid cake instead of a glorious molten center!
Step 6: The Moment of Truth
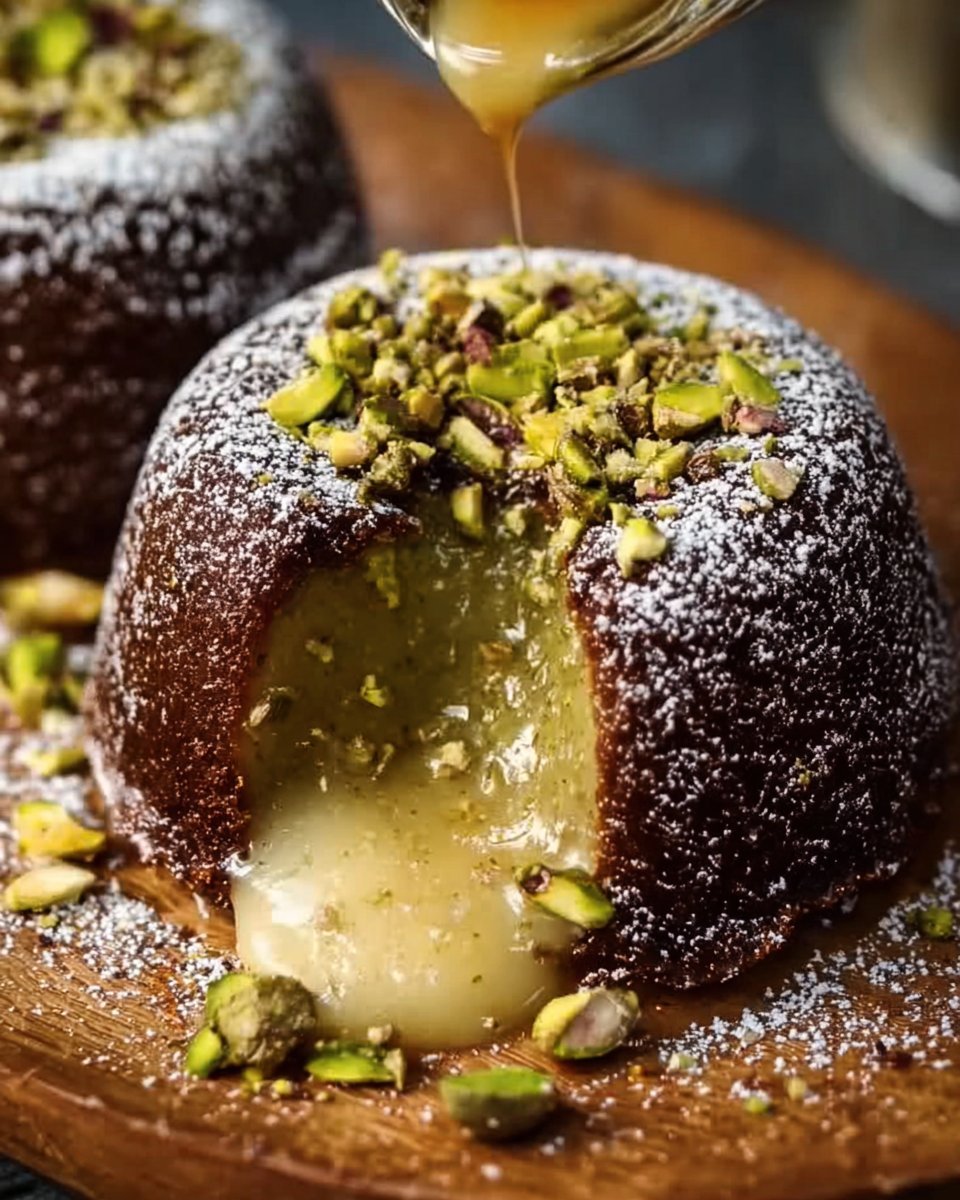
I like to let my cakes cool for just a minute, then flip them onto a plate. The thrill of that first experience—watching the center ooze—is always a joy! Dust them with powdered sugar and sprinkle with chopped pistachios. If you’re feeling fancy (and let’s be honest, who isn’t?), a dollop of whipped cream or a scoop of ice cream on the side would push this dessert over the top.
If you’ve kept everything in mind, you should have these fabulous little gems ready to impress your guests!
Tips for Best Results
Let’s chat about some tips that I’ve learned through trials and errors:
- Room Temperature Ingredients: Always use room-temperature eggs and ingredients to help them incorporate better.
- Watch the Timer: Oven temperatures can vary, so keep an eye on the cakes in their final minutes.
- Don’t Skip the Greasing: This is one of those “learn the hard way” lessons. Carefully greasing the ramekins prevents heartbreak!
- Serve Immediately: The molten center is best enjoyed right out of the oven. Don’t let them sit too long or you risk losing that gooey magic!
Ingredient Substitutions & Variations
Here are a few ways you can tweak the recipe to make it your own:
- Nut Allergies?: Leave out the pistachio paste and replace it with something like almond butter or chocolate hazelnut spread for a different flavor profile.
- Chocolate Lovers?: Replace white chocolate with dark chocolate for a bolder taste. Just keep in mind that it alters the balance of flavor.
- Vegan Option: You can experiment with avocado or a fruit puree in place of eggs to create a plant-based version, though it may change the gooey texture we love.
Serving Suggestions
Pair these molten cakes with a smooth vanilla ice cream or a pour of fresh crème brûlée. Honestly, these cakes are the perfect ending to a cozy dinner, and a classic rom-com playing in the background is the cherry on top.
A cup of freshly brewed coffee or a rich espresso complements the sweetness and nutty flavors beautifully. Seriously, if you want your guests to feel like they’ve been transported to their favorite café, this combo is the way to go.
How to Store and Reheat Leftovers
If you find yourself with any leftover cakes (though let’s be honest, this is rare), you can cover them with plastic wrap and store them in the fridge for up to 48 hours. To reheat, pop them in the microwave for about 30 seconds. The center won’t be as molten as right-out-of-the-oven, but they’ll still be delicious.
Make-Ahead and Freezer Tips
Making ahead? You can prepare the batter and fill the ramekins, then cover and refrigerate them for a day before baking. The big “pro tip” here is to add a minute or two to the baking time since they’ll be chilled.
Need to make them ahead further? Freeze the filled ramekins! Just wrap them tightly and they can be stored for about a month. When you’re ready to bake, let them thaw in the fridge overnight, and then bake as you would.
Common Mistakes to Avoid
- Overbaking: This is probably the number one mistake. Keep an eye on those cakes as they bake.
- Under-greasing the Ramekins: I can’t stress this enough! Nothing is worse than a stuck cake; butter it up!
- Not Letting Them Cool: Allowing them to cool for a minute helps the structure stay intact when you flip them.
Frequently Asked Questions (FAQ)
Can I use a different kind of nut paste?
Absolutely! Almond, hazelnut, or any nut paste will work, but remember to adjust flavors accordingly.
How do I know if they’re done baking?
Look for set edges and a slightly jiggly middle. They should wiggle a little, promising molten magic inside.
Can I make this in a muffin tin?
You definitely can! Just ensure to reduce the baking time slightly, as muffin tins will bake quicker than ramekins.
Cooking Tools You’ll Need
- Ramekins: For that perfect molten cake presentation.
- Microwave-Safe Bowl: To melt your chocolate and butter mix.
- Whisk: For blending ingredients smoothly.
- Spatula: To scrape every bit of deliciousness from the bowl.
Final Thoughts
These molten pistachio lava cakes have found a cherished spot in my heart and kitchen. They’re perfect for moments of indulgence, for sharing laughter with friends, or for those cozy nights when all you want is something sweet and comforting. Honestly, I can’t wait to hear how yours turn out! If this recipe brings a smile to your face (or an ooze of happiness to your plate), don’t forget to let me know!
If you enjoyed this recipe, don’t forget to save it on Pinterest or share it with a friend! Happy baking!
Molten Pistachio Lava Cakes
Ingredients
For the batter
- 1/2 cup Unsalted Butter (Plus extra for greasing) Essential for richness and gooey texture.
- 4 oz White Chocolate Don't substitute! Delivers creamy base.
- 1/3 cup Pistachio Paste Look for a high-quality paste.
- 2 large Eggs (Room temperature) Provides structure for the molten center.
- 1/4 cup Granulated Sugar Aiming for sweetness balance.
- 1 tsp Vanilla Extract Rounds out the flavors.
- 1/4 cup All-Purpose Flour Helps bind everything together.
- 1 pinch Salt Enhances the flavors.
For decoration
- 2 tbsp Chopped Pistachios For decoration and added crunch.
- 1 tbsp Powdered Sugar For a professional finishing touch.
Instructions
Preparation
- Preheat your oven to 425°F and prepare ramekins by greasing them with butter.
Melt the Goodies
- In a microwave-safe bowl, combine the butter and white chocolate, melting it in 30-second intervals until smooth.
Mix It Up
- Stir in the pistachio paste and let the mixture cool slightly before adding the eggs, sugar, vanilla, flour, and salt.
Portion and Prepare to Bake
- Pour the batter into the greased ramekins, filling them about 2/3 full.
Bake
- Bake in the oven for 12-14 minutes, until the edges are set and the center is slightly jiggly.
Serve
- Let the cakes cool for a minute, then flip onto a plate, dust with powdered sugar, and sprinkle with chopped pistachios.


