
No-Bake Oreo Cheesecake: The Ultimate Easy Dessert
Let me take you back to one of those blissfully chaotic evenings in my tiny kitchen, where the scent of dessert wafted through the air like an invitation to indulge. Picture this: I had friends coming over, and the usual dinner prep was a whirlwind of chopping vegetables for healthy comfort food while my mind was secretly pleading, “Please let my dessert not turn into a Pinterest fail.” I rummaged through my pantry and stumbled upon a stash of Oreo cookies left over from who-knows-when — a gift from a last-minute grocery run that turned into a me-and-my-cravings situation.
That’s when the idea struck me like a lightning bolt: No-Bake Oreo Cheesecake! It screamed comfort and simplicity and promised a sweet escape from the chaos. You know the kind of dessert that feels like a hug in a bowl? This was it. So, I threw caution to the wind and decided to dive in. Honestly, I can’t remember what I was wearing, but I do recall being neck-deep in crushed cookie crumbs, and oh, the creaminess of the cheesecake mixture! It was pure magic, mixed with a generous dash of kitchen chaos.
Now, this recipe means so much to me. It’s not just a dessert; it’s an experience, a reminder of those evenings filled with laughter, a few catch-up sessions, and of course, bites of this creamy, dreamy cheesecake. It might not sound like a major life event, but for someone who once burned toast (don’t ask), mastering this has felt like winning a gold medal in the Olympics of home baking. Every time I whip this up, it brings me back to that cozy kitchen moment, under dim lights, with the sound of laughter echoing through the night.
So grab your apron, beat the odds of kitchen chaos with me, and let’s dive into the creation of this No-Bake Oreo Cheesecake. Spoiler alert: it’s ridiculously easy and downright delicious!
Why You’ll Love This Recipe
- No-Bake Goodness: This cheesecake is a breeze to whip up. No oven required! Perfect for those hot summer nights or whenever kitchen heat sounds less than appealing.
- Comfort in Every Bite: Each creamy, cookie-filled slice feels like a warm hug. It’s dessert therapy at its finest.
- Picky-Eater Approved: Seriously, even the fussiest eaters can’t resist! If you’ve got kids or picky adults, they’ll devour this like it’s their last meal.
- Leftover Perfection: If, and that’s a big if, there are any leftovers, they make for the best midnight snack. Trust me; I’ve done the research.
- Meal-Prep Wins: This dessert is great for prepping ahead of time. Just store it in the fridge, and you’re good to go!
- A Crowd-Pleaser: Bring this to any potluck or family gathering, and you’ll be the star of the show, no doubt.
Okay, do you feel the excitement? Let’s keep this momentum rolling!
What Makes This Recipe Special?
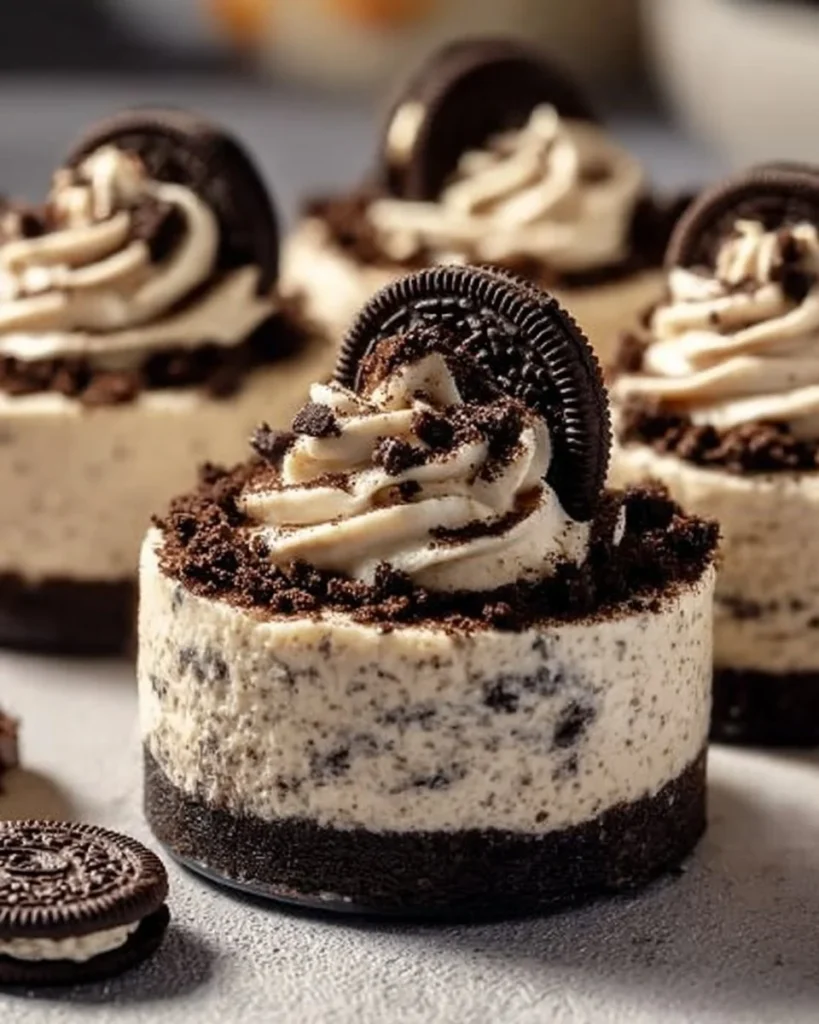
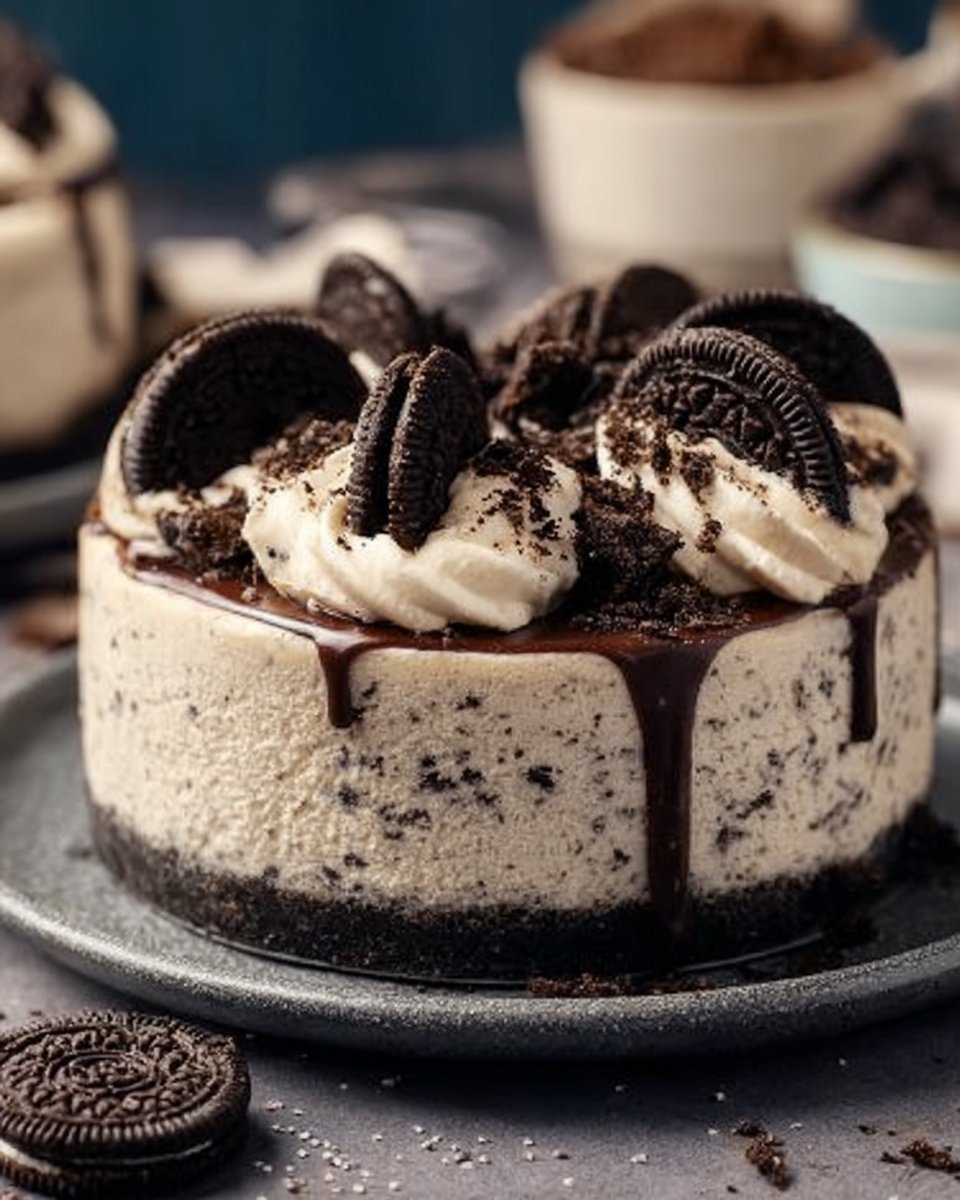
This No-Bake Oreo Cheesecake is like a sweet time capsule, containing memories of good friends, laughter, and joyful food adventures. What sets it apart is how shockingly simple it is while still being irresistibly indulgent. The crunch of the Oreo crust, the smooth, creamy filling, and those extra cookie crumbles on top — it’s a textural dream come true! Plus, there’s magic in using real ingredients like cream cheese and heavy cream.
The unique combination of flavors marries perfectly — it’s the beloved Oreo in cheesecake form, and that just gets me. My friends often ask for the recipe, which only adds to the delight; sharing it feels like passing on a warm tradition.
Ingredients
To create this delicious masterpiece, gather the following:
-
Oreo Cookies: About 24 cookies. This classic biscuit is the backbone of your crust and the star of the show! Don’t skimp here because their cookie crunch is essential.
-
Butter: Melted, about ½ cup. This not only binds the crust but adds richness, making it that much more delightful. I usually stick with unsalted because it gives me more control over the flavor.
-
Cream Cheese: 8 oz, softened. This is your cheat code to a rich, creamy filling. Make sure it’s at room temperature to avoid any lumps — and trust me, lumps are not your friends here (talk about a party foul).
-
Sugar: ¼ cup. Regular granulated sugar sweetens the deal. Adjust to your taste — sometimes my sweet tooth calls for a little extra, and sometimes, I hold back. It’s all about balance!
-
Vanilla Extract: 1 teaspoon. Because a hint of vanilla is always a good idea to elevate the flavor. Go for pure extract; it’s worth it!
-
Heavy Cream: 1 cup. This lightens the filling while adding lusciousness. Whipping it to stiff peaks feels like an accomplishment every single time — don’t skip this step!
-
Extra Crushed Oreos: For topping. You can never have too much Oreo goodness — right?
As for brand preferences? I admittedly have a bit of a sweet tooth for the classic Oreo. If you’re feeling adventurous, try different flavors, but be ready for some unexpected results. I once tried it with mint Oreos. Oh boy, that was a ride!
Don’t do this: Avoid using low-fat cream cheese or non-dairy substitutes, if you’re after that classic cheesecake experience. It simply won’t be as dreamy!
How to Make It Step-by-Step
Let’s get into the fun part: making this cheesecake! Follow along as I share the nitty-gritty details, quirks, and maybe even a kitchen disaster or two.
-
Crush the Oreos: Start by preheating your kitchen with a little hustle (or your favorite playlist). Grab your 24 Oreos, toss them into a food processor, and pulse until they resemble fine crumbs. If you don’t have one, no worries! Just put the cookies in a zip-top bag and crush them using a rolling pin. However, it can get a bit messy, and you might need a vacuum cleaner afterward — just saying.
-
Make the Crust: In a medium bowl, combine the crushed Oreos with melted butter. Mix well until it resembles wet sand. You want every crumb to feel the butter love. Now, press this mixture firmly into the bottom of a springform pan. Channel your inner strength and really pack it down; a sturdy crust is your best friend here. If it crumbles, that’s okay—it’ll still taste fantastic!
-
Cream Cheese Mixture: In a larger mixing bowl, beat together the softened cream cheese, sugar, and vanilla extract. You want it to be super smooth and creamy, no lumps allowed. Using an electric mixer makes this part simple and fun. Mix until it’s as smooth as a jazz melody!
-
Whip the Heavy Cream: In another bowl, whip the heavy cream until stiff peaks form. This is where magic happens! The whipped cream adds volume and lightness to your cheesecake. Honestly, it’s almost hypnotizing watching it transform. I may or may not have indulged in a few spoonfuls of the whipped cream before folding it in. Oops!
-
Combine the Mixtures: Gently fold the whipped cream into the cream cheese mixture until combined. Be careful not to deflate the whipped cream — you want to maintain that airy texture. As you blend, the colors will introduce themselves in a delightful swirl, and you’ll be convinced you’ve just created culinary art.
-
Spread Over the Crust: Pour this heavenly mixture over your Oreo crust, smoothing the surface with a spatula. It’s like topping a canvas of Oreo goodness with rich, creamy clouds.
-
Top with Crushed Oreos: For the final touch, sprinkle the extra crushed Oreos on top. This isn’t just for looks; it adds that extra crunch we crave. Don’t be shy — go for it!
-
Refrigerate: Cover the cheesecake with plastic wrap and pop it in the fridge. Let it chill for at least four hours, but overnight is even better! During this setting time, you can pretend you’re on a cooking show, but really, you’ll be just waiting…and maybe sneaking a spoonful of leftovers from the bowl.
Trust me; this waiting game will be excruciating, but totally worth it! I once tried to speed up the setting process by freezing it. Let’s just say the texture went all wrong, and I ended up with an Oreo ice cream facade. Interesting, but definitely not what we’re after here.
Tips for Best Results
- Make sure all your ingredients, especially cream cheese, are at room temperature for a silky smooth filling.
- Don’t skip the whipped cream folding step — this is crucial for achieving that light, airy texture.
- If you’re pressed for time, letting it chill for about two hours might work, but the longer it sits, the better the flavors meld.
- Use a good-quality springform pan; it’ll make serving so much easier.
Ingredient Substitutions & Variations
- Gluten-Free Version: Swap the Oreos for gluten-free cookies. There are some decent alternatives that still hold up!
- Vegan Option: For a vegan twist, try using cashew cream or silken tofu in place of cream cheese and coconut cream for the whipped cream.
- Flavor Additions: Mix in some melted chocolate for a rich mocha layer or a sprinkle of espresso powder for coffee lovers.
- Seasonal Twists: Top with seasonal fruit like berries or caramel for a festive vibe.
Serving Suggestions
So, you’ve made it through the labor of love. Now, how do you elevate your No-Bake Oreo Cheesecake game when presenting it?
Pair this sweet delight with a big dollop of whipped cream on top; it’s just heavenly. If it’s during the warmer months, a refreshing mint tea or a scoop of vanilla ice cream on the side makes for the perfect companion. Trust me; this and a rom-com streaming in the background is the ideal cozy night combo.
How to Store and Reheat Leftovers
Got leftovers? First of all, good for you! Cherish that sweet morsel. Store your No-Bake Oreo Cheesecake in an airtight container—or simply cover it tightly with plastic wrap—if you’re feeling low maintenance. It will keep in the fridge for up to five days.
And let’s be real; you probably won’t have to worry about reheating it any time soon since it’s best enjoyed chilled. If, by some miracle, you have to store it longer, I wouldn’t recommend freezing. The creaminess might suffer when thawed, and you could end up with a soggy mess of disappointment — believe me, I’ve been there!
Make-Ahead and Freezer Tips
This cheesecake is the epitome of make-ahead dessert. You can prepare it the day before a gathering or event, and trust me, it’s a game changer. Just make sure to let it set overnight for the best flavor and texture.
As mentioned before, I don’t recommend freezing it, but if you must, slice it before freezing and wrap each piece individually. Just know you’re flirting with culinary fate here!
Common Mistakes to Avoid
- Not letting it chill long enough: Think of chilling time as a nice spa day for your cheesecake. The longer, the better! Patience is key.
- Using cold ingredients: This can lead to a lumpy filling, so make sure everything is room temperature.
- Not packing the crust firmly enough: A crumbling crust is the enemy here. Give it some elbow grease — show that crust who’s boss!
- Skipping the whipped cream folding: Avoid rushing this step; be gentle to keep that airiness.
Frequently Asked Questions (FAQ)
Can I use other cookies for the crust?
Absolutely! Any firm cookie can work. Just keep in mind that the flavor will change. Try chocolate chip or even graham crackers for a different spin!
How long does it need to chill?
To achieve the best texture and flavor, let it chill for at least four hours — but overnight is even better!
Can I make this without a springform pan?
You can, but it will be trickier to remove. If you use a regular pan, line it with parchment paper for easier removal when serving.
Cooking Tools You’ll Need
- Food processor or rolling pin for crushing cookies
- Medium and large mixing bowls
- Electric mixer (hand or stand)
- Springform pan for assembling
- Rubber spatula for folding and spreading
Final Thoughts
Ah, the No-Bake Oreo Cheesecake — a true champion of desserts! Each slice brings along not only flavors but also the joyful memories of gatherings and sweet treats shared with loved ones.
Baking (or not baking in this case) is all about experimenting, failing, and eventually succeeding, and I hope you feel the same warmth and excitement when you make this at home.
If you end up making your own creation, drop me a comment and let me know how it goes!
And hey, if you enjoyed this recipe, don’t forget to save it on Pinterest or share it with a friend! Happy baking!
No-Bake Oreo Cheesecake
Ingredients
For the Crust
- 24 cookies Oreo Cookies Essential for the crust.
- 0.5 cups Butter, melted Unsalted preferable for better flavor control.
For the Filling
- 8 oz Cream Cheese, softened Make sure it’s at room temperature to avoid lumps.
- 0.25 cups Sugar Adjust to taste.
- 1 teaspoon Vanilla Extract Pure extract is recommended.
- 1 cups Heavy Cream Whipped to stiff peaks.
- Extra Crushed Oreos For topping.
Instructions
Prepare the Crust
- Crush the Oreos in a food processor until fine crumbs form.
- In a medium bowl, combine crushed Oreos with melted butter and mix until it resembles wet sand.
- Press the mixture firmly into the bottom of a springform pan.
Make the Filling
- In a large mixing bowl, beat together the softened cream cheese, sugar, and vanilla extract until smooth.
- In another bowl, whip the heavy cream until stiff peaks form.
- Gently fold the whipped cream into the cream cheese mixture until fully combined.
Assemble and Chill
- Pour the cheesecake mixture over the crust, smoothing the surface with a spatula.
- Sprinkle extra crushed Oreos on top.
- Cover with plastic wrap and refrigerate for at least 4 hours or overnight.


