
Easy Banana Pudding Tiramisu: A Delicious Twist on a Classic
When I first stumbled upon the concept of Banana Pudding Tiramisu, I didn’t know whether to laugh or jump for joy. It seemed both absurd and brilliant at once—like that moment when you find the last chocolate in your stash when snacking while working from home, which is truly a moment of small victory! This recipe combines the beloved layers of classic tiramisu with the pleasing flavors of banana pudding, and I knew I had to try it.
The appeal of this dessert hit me hard during a warm evening in late summer. You know those nights when the sun hangs low in the sky, casting golden light all around? I had just come home from a chaotic day at work, overwhelmed by the usual stresses—emails, deadlines, and a never-ending list of quick family meals I wanted to try. It was the kind of day that felt like it needed an immediate sweet remedy, but I didn’t want to bake a complicated cake or fuss over delicate pastries. Instead, I wanted something that felt like a hug in a bowl.
As I went through my pantry, I came across ladyfinger biscuits and a nearly-empty jar of ripe bananas on the counter that were begging to be used. My eyes lit up; this was the moment I’d been waiting for! Armed with an enticing recipe I found online, I dove into the delightful chaos of my kitchen. Spoiler alert: it wasn’t flawless, but that’s what makes cooking so incredibly rewarding, right? I’m talking about the smell of the mascarpone wafting through the air, the soft peaks of whipped cream—whoo! My kitchen turned into bliss.
What I love about this Banana Pudding Tiramisu is how it captures those childhood memories of banana pudding, all while serving them up in a sophisticated dessert. It’s a delightful twist that somehow manages to feel both nostalgic and innovative. It’s sweet but not overly so, creamy with tantalizing layers and just a touch of espresso to keep things interesting. So, gather your ingredients, prep yourself for a delicious mess, and let’s dive into this comforting and unique treat!
Why You’ll Love This Recipe
-
Easy Preparation: Seriously, if I can whip this up after a long day of work, anyone can! You don’t have to be a Michelin-star chef to make this dessert shine.
-
Warm and Cozy Flavors: Think of it as the dessert equivalent of a cozy blanket. The flavors of banana and cream are just so comforting, especially with a hint of coffee.
-
Crowd-Pleaser: This dish is a sure win for gatherings or family dinners. Picky eaters? No problem! Everyone loves bananas and pudding—it might just disappear faster than you can say “tiramisu!”
-
No-Bake Delight: With no baking required, this dish is your summer savior, letting you skip the oven heat and take only a few minutes hands-on time.
-
Perfect for Make-Ahead: This dessert gets better with time, making it an excellent option for meal prep or dinner parties; there’s no last-minute stress!
-
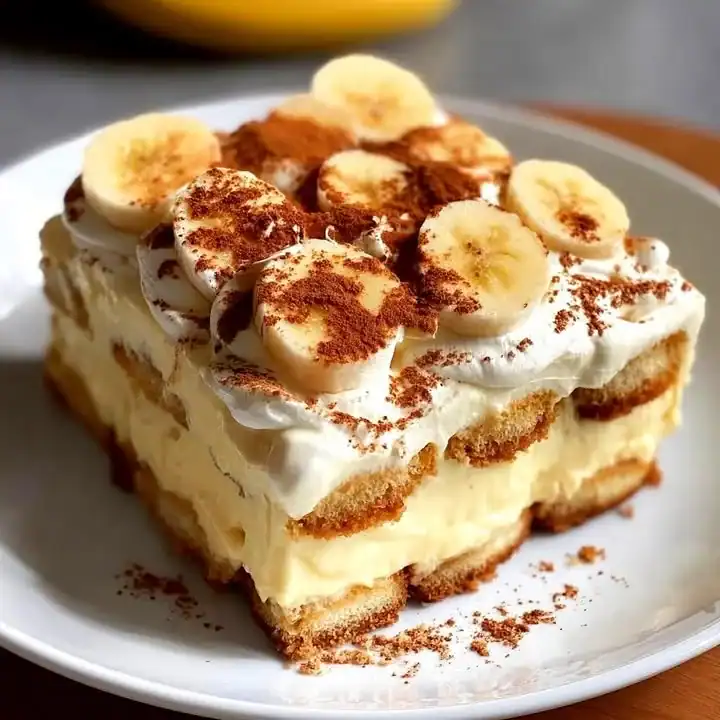
A Visual Feast: The layers of dark cocoa powder contrasting with the creamy banana mixture and the gentle hints of banana slices create a beautiful presentation!
What Makes This Recipe Special?
Banana Pudding Tiramisu isn’t just a dessert; it brings together countless flavors and memories. The combination of rich mascarpone and cream cheese gives the pudding a wonderful texture and taste that’s irresistibly smooth—seriously, it’s like indulging in a creamy cloud! The addition of bananas adds a natural sweetness, while the espresso provides that necessary kick, grounding the dish in a lovely depth of flavor.
There’s something inherently sentimental about banana pudding for many of us. It’s one of those desserts that reminds you of family gatherings, potlucks, and home-cooked meals. Merging that nostalgic experience with the sophistication of a tiramisu brings a modern twist to an old favorite. If you’ve ever had a good meal prep plan or just need to escape the hustle and bustle of life, this recipe does wonders for the soul.
Ingredients
-
1 package (225 g) mascarpone cheese, softened: The creamy texture of mascarpone is essential for that dreamy layer we all cherish in tiramisu.
-
1 block (225 g) cream cheese, softened: Adds a delightful tanginess that complements the mascarpone perfectly. Make sure it’s softened to avoid lumps, or you’ll end up with unexpected clumps. Ask me how I know!
-
1 can (400 g) condensed milk: This is pure magic when it comes to sweetness and creaminess. Don’t skip it! You’ll want to drown your sorrows in the deliciousness if you do.
-
1 package (96 g) instant banana pudding mix: This brings that banana flavor front and center in the sweetest way.
-
1 ½ cups cold milk: Regular whole milk will give you the best flavor. You know me—going for that richness!
-
1 ½ cups cream: This is for whipping; the thicker, the better! I prefer heavy cream to achieve those luscious peaks.
-
2 teaspoons vanilla extract: A splash of vanilla does wonders to elevate the flavors.
-
1 ½ cups chilled coffee or espresso: This is where the tiramisu magic happens. Grab your favorite brew; the stronger the better!
-
1 package of ladyfinger biscuits (approximately 24 pieces): Foundation of your dessert—don’t skimp here as they soak up the coffee beautifully.
-
3–4 ripe bananas, sliced: I like to go with super ripe bananas because they’re naturally sweeter and less starchy.
-
Cocoa powder or crushed vanilla cookies: This will be your decorative touch! Cocoa adds a beautiful contrasting color, while crushed vanilla cookies can be a fun spin.
You can mix and match these ingredients based on what you have at home! Ran out of bananas? Use some sliced strawberries for an extra fruit kick. Just remember, each ingredient plays its part, so don’t go changing the mascarpone for a low-fat version—we all deserve some indulgence once in a while!
How to Make It Step-by-Step
Alright, let’s paint a picture of the delicious chaos that is to come! Get ready for some sweet layers of love.
Step 1: Prepare the Banana Cream
This is where the magic starts! Grab a sturdy bowl and toss in the softened cream cheese and mascarpone. Trust me; it will be like magic watching them meld together. As you beat them, you’ll notice a beautiful, creamy texture forming—it’s a sight that warms the heart!
Once combined smoothly, slowly add in the condensed milk. Honestly, at this point, I was almost tempted to eat it directly. Oops! Not yet, I reminded myself. Next, sprinkle in that instant banana pudding mix. This is when things start to tickle your senses—the smell of banana wafting through the air is heavenly, and your taste buds will start doing a happy dance.
Now, pour in the cold milk and beat until the mixture is thick and creamy. And by thick, I mean "I’d rather eat this straight from the bowl" kind of thick. You want it to hold its shape when you layer it later on.
Step 2: Whip the Cream
In a separate bowl, pour in your heavy cream and add the vanilla extract. Get that whisk in motion (or use an electric mixer if you’re feeling lazy, I mean energized). Whip it until soft peaks form. Don’t over-whip, or you’ll be left with butter—or as I like to call it, a kitchen disaster! If that happens, fear not; just ensure you start over with fresh cream. Don’t let my mishaps scare you; just keep it gentle!
Once you hit those soft peaks, gently fold the whipped cream into the banana mix. I prefer to use a spatula for this step, slowly and thoughtfully folding it in. The idea is to keep that airiness—who doesn’t want a light, fluffy dessert?
Step 3: Assemble the Tiramisu
Now that your banana cream is prepared and your kitchen smells heavenly, it’s assembly time!
Grab your lovely ladyfingers. Take a moment to appreciate how cute and delicate they look. Quickly dip each biscuit into the chilled coffee. Just a quick dip—don’t let them soak too long! The goal is to keep them soft without making them mushy; the last thing we want is sad, soggy biscuits.
Arrange a layer of dipped biscuits in a 23×23 cm (9×9 inch) dish. Don’t get fussy about it; they don’t need to be perfect. Once you’ve got your biscuit base laid down, spread half of your banana cream mixture on top. The sight of the creamy layer resting over those happy biscuits is so rewarding!
Next, take your banana slices and lay them over the cream. Seriously, the combination is divine – each layer builds anticipation for the delicious flavors to follow!
Repeat with another layer of ladyfingers, and then the remaining banana cream, finishing off with some more banana slices on top.
Step 4: Chill
Now for the hardest part: the waiting game. Cover the dessert and shove it into the fridge for at least 4 hours (or overnight, preferably). Since this was during one of those warm evenings, I found myself frequently sneaking glances in the fridge, eagerly anticipating that first bite.
Step 5: Serving
Finally, it’s here—time to bring this masterpiece out! Sprinkle with cocoa powder or crushed vanilla cookies just before serving. I love the richness the cocoa adds and how it contrasts with the creaminess and vibrant banana flavors. Your guests (or just you, no judgment!) won’t be able to resist digging right in!
Tips for Best Results
-
Quality Ingredients: Make sure you’re using the best ingredients you can find, especially for the mascarpone and coffee. It truly matters—trust me!
-
Chill Well: The longer it sits, the better the flavors meld. Overnight is ideal if you can wait that long!
-
Be Gentle When Folding: When combining the whipped cream with the banana mix, fold gently to keep the fluffiness.
Ingredient Substitutions & Variations
Feel free to get creative! Substitute different fruits based on what’s in season or what you have around. Berries, peaches, or even mangoes can be delightful alternatives.
If you’re aiming for a healthier twist, you could swap in Greek yogurt for some of the cheese—gasp! Just know it’ll change the flavor and texture a bit, so proceed cautiously!
You can also make a vegan low-calorie meal plan version by using dairy-free cream cheese and whipped cream alternatives if that’s your thing. The flavor profiles will change, but it’s still worth a shot!
Serving Suggestions
While Banana Pudding Tiramisu is rich enough to stand on its own, if you want to pair it with something, a hot cup of coffee or a refreshing iced tea could be perfect accompaniments.
What truly makes this moment even better is curling up with your favorite rom-com afterward, because what is life without a little cinematic distraction while enjoying a dessert this luscious?
How to Store and Reheat Leftovers
You can keep leftover tiramisu in an airtight container in the fridge for about three days—if it lasts that long! Just know that the texture and flavors become even more pronounced as it sits, so don’t be surprised if the leftovers taste even better!
Avoid putting it in the freezer; the texture just doesn’t hold up well. Trust me—I’ve been there, and it wasn’t pretty!
Make-Ahead and Freezer Tips
This dessert is perfect for making ahead of time. Simply assemble it the night before or, if you’re planning for a gathering, you can make it two days in advance for an effortless dessert option. Just cover tightly and chill away!
Common Mistakes to Avoid
-
Over-soaking the ladyfingers: Keep it quick under the coffee. You want them soft but not overly soggy.
-
Not chilling long enough: Give it some time to set—even if your stomach can’t handle it! Trust me, the flavors need time to shine.
-
Using cold ingredients: Make sure everything is at room temperature before you start mixing (except the whipped cream, obviously). Otherwise, you’ll end up with lumpy cream—no one wants that!
Frequently Asked Questions (FAQ)
-
Can I use different flavors of pudding?
Absolutely! Chocolate or vanilla pudding can work beautifully in this recipe. -
How can I make this gluten-free?
Simply substitute traditional ladyfingers with gluten-free versions, and you’re all set! -
Can I use a different type of milk?
Definitely! Almond milk, oat milk, or any plant-based milk works as a substitute, but remember that it will alter the flavor and texture slightly. -
How long can I keep this in the refrigerator?
It will last about three days in the fridge, but trust me—it’s best enjoyed fresh!
Cooking Tools You’ll Need
- Mixing bowls
- Hand mixer or stand mixer
- Spatula
- 9×9 inch dish
- Measuring cups and spoons
Final Thoughts
There’s something about Banana Pudding Tiramisu that strikes a chord deep within. It’s nostalgic and comforting, yet it carries a sense of modern elegance that’s hard to resist. Every bite is a reminder of the simple joys in life—those chaotic kitchen moments and the shared laughter around the table. So if you’re looking for an easy, healthy comfort food option, make this dessert, then share it with friends and family.
If you enjoyed this recipe, don’t forget to save it on Pinterest or share it with a friend! Let’s keep these sweet connections alive, one banana pudding tiramisu at a time!

Banana Pudding Tiramisu
Ingredients
For the Banana Cream
- 1 package 225 g mascarpone cheese, softened Essential for the creamy layer.
- 1 block 225 g cream cheese, softened Adds a delightful tanginess.
- 1 can 400 g condensed milk Provides sweetness and creaminess.
- 1 package 96 g instant banana pudding mix Brings the banana flavor forward.
- 1.5 cups cold milk Regular whole milk is best.
For the Whipped Cream
- 1.5 cups heavy cream The thicker, the better for whipping.
- 2 teaspoons vanilla extract Enhances the flavors.
For Assembly
- 1.5 cups chilled coffee or espresso A strong brew enhances tiramisu flavor.
- 1 package ladyfinger biscuits (approximately 24 pieces) Foundation of the dessert.
- 3-4 ripe bananas, sliced Super ripe bananas add natural sweetness.
- Cocoa powder or crushed vanilla cookies For garnishing.
Instructions
Preparation of the Banana Cream
- In a bowl, beat the softened cream cheese and mascarpone until smooth.
- Slowly add the condensed milk, followed by the instant banana pudding mix.
- Add in the cold milk and beat until thick and creamy.
Whipping the Cream
- In a separate bowl, whip the heavy cream with vanilla extract until soft peaks form.
- Gently fold the whipped cream into the banana mixture.
Assembling the Tiramisu
- Quickly dip each ladyfinger into the chilled coffee and arrange them in a 9x9 inch dish.
- Spread half of the banana cream mixture over the ladyfingers.
- Layer with banana slices, followed by another layer of dipped ladyfingers and the remaining banana cream.
- Top with additional banana slices.
Chill and Serve
- Cover the dish and refrigerate for at least 4 hours, or overnight.
- Before serving, sprinkle cocoa powder or crushed vanilla cookies on top.


