
The Best Easy Vanilla Butter Chocolate Fudge Cake
Ah, the aroma of a cake baking can instantly transform any ordinary day into something magically whimsical. I still remember the first time I attempted to make a chocolate fudge cake. The kitchen was a battlefield: flour dust settled on every surface, cocoa powder sprinkled across the counter like a bleak winter snowfall, and I—well, let’s say I resembled a slightly frazzled baker rather than an elegant chef. But despite my initial chaos, this recipe, my trusty Vanilla Butter Chocolate Fudge Cake, has become a cherished favorite in my home.
The background story? It all began on a chilly autumn day, with thick clouds rolling overhead and a scent of impending rain wafting through the air. I was in my cozy little kitchen, with the warm lighting casting a soft glow as I rummaged through my pantry—a typical Saturday adventure, as I like to call it. I had marked this day as “baking day” in my head, a commitment I planned to keep despite my somewhat spotty history in the kitchen.
Now, I won’t say my first attempt at this cake was flawless—oh no! There were cracked layers and a slightly burnt bottom layer because I lost track of time while watching an old rom-com. But, I didn’t lose heart. With each reattempt, the cake got a little better, a little more decadent. Now it feels like a cozy hug on a plate, a dessert that can bring even the most stressed cooks together.
This cake matters to me not just because of the end result, but because of the journey—the memories made amid giggles, flour fights, and a few “oops” moments. Perfect for cozy nights in, birthday celebrations, or just when you want to eat something that feels like pure love, this cake is a must-have in your baking repertoire. Honestly, imagine the wholesome blend of rich cocoa and sweet vanilla in every mouthful. Heaven, I tell you!
Why You’ll Love This Recipe
- Moist and Luscious: Trust me, this cake is incredibly moist because of the hot water—or coffee, if you’re feeling adventurous!
- Easy to Make: This isn’t a fussy recipe. You can mix and match and get a scrumptious cake perfect for any occasion!
- Picky Eater Approved: I’ve watched friends who claim they don’t like chocolate devour this cake. It’s smooth and rich without being overwhelmingly sweet.
- Perfect for Leftovers: If there are any leftovers (and that’s a big “if”), it keeps well in the fridge and tastes even better the next day.
- Meal Prep Win: You can whip it up in advance. Then, simply frost and serve for a delightful dessert any time!
- Décor Possibilities: All the toppings you desire, from sprinkles to fresh berries, can elevate this cake further.
What Makes This Recipe Special?
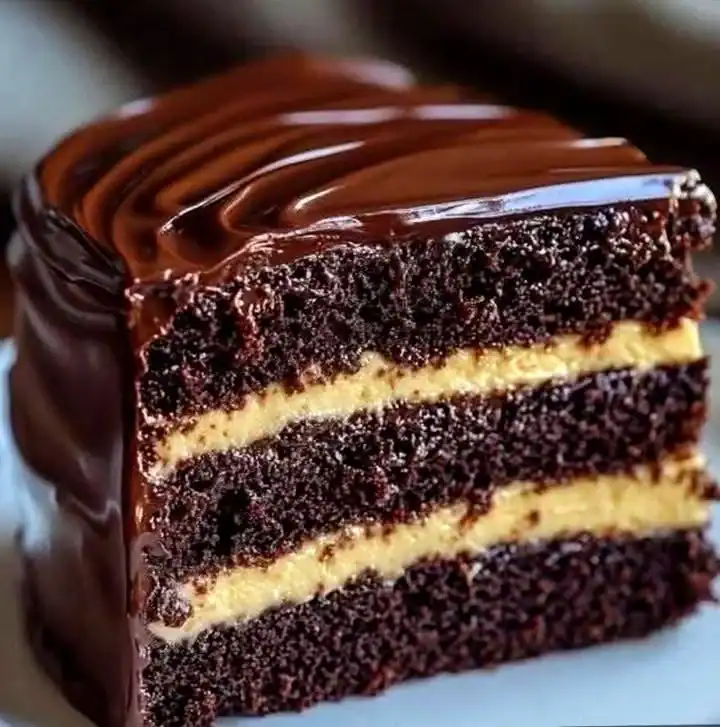
There’s something inherently comforting about the classic marriage of chocolate and vanilla. Vanilla Butter Chocolate Fudge Cake brings a richness that wraps you in warmth, reminiscent of family gatherings. The buttercream, oh the buttercream—so light yet rich, airy yet satisfying—makes it all sing in harmony.
In my experience, baking is like a personal therapy session. I find joy in melding the dry ingredients, watching as they turn into a velvety batter, and inhaling that rich, chocolatey scent wafting through my home. This cake is more than just dessert; it’s an experience infused with love, laughter, and an occasional kitchen mishap that leads to heartfelt stories. So let’s dive right into what you’ll need, nothing fancy, just good quality ingredients that can create pure magic!
Ingredients
- 1 3⁄4 cups (220 g) flour: The backbone, providing structure.
- 3⁄4 cup (75 g) unsweetened cocoa powder: Adds depth and that gorgeous chocolate flavor we crave.
- 2 cups (400 g) granulated sugar: For sweetness and to balance the chocolate.
- 1 1⁄2 teaspoons baking powder: The magic leavener that keeps the cake from being a dense brick.
- 1 1⁄2 teaspoons baking soda: Works alongside baking powder, ensuring that rise!
- 1 teaspoon salt: Makes everything elevated, trust me.
- 2 large eggs: Binding and helping keep moisture.
- 1 cup (240 ml) whole milk: It’s about that richness.
- 1⁄2 cup (120 ml) vegetable oil: Ensures lovely moisture—don’t skip it!
- 2 teaspoons vanilla extract: A must for flavor and that warm aroma.
- 1 cup (240 ml) hot water or hot coffee: Coffee deepens the chocolate flavor. Who knew?
- 1 cup (227 g) unsalted butter (softened at room temperature): For a luxuriously creamy frosting.
- 4 cups (480 g) powdered sugar: Sweetness for your frosting, naturally!
- 2 teaspoons vanilla extract: Adding that delicious aroma and flavor to your buttercream.
- 3–4 tablespoons (45–60 ml) milk or cream: Adjusts the frosting consistency (it’s the magic touch).
- A pinch of salt: Just a pinch to balance all that sweetness.
Pro Tip: Always use room-temperature ingredients (especially eggs and butter) for an easier blending process.
Eep—may I remind you? Avoid trying to mix cold butter! It’s a workout your mixer doesn’t need. I’ve tried and failed spectacularly with that one.
How to Make It Step-by-Step
Let’s get to the nitty-gritty—the part where your kitchen becomes a bakery, and the magic unfolds.
- Preheat the oven to 175°C (350°F): This is non-negotiable. Pre-heating your oven is pivotal for even baking.
- Prepare your pans: Grab your trusty three 20 cm (8-inch) round cake pans. Grease them up and line the bottoms with parchment paper. Trust me, you want to make sure those layers come out beautifully.
- Sift and mix the dry ingredients: Sifting can feel like a chore, but it’s essential for a fluffy cake. In a large bowl, combine the flour, cocoa, sugar, baking powder, baking soda, and salt. Channel your inner scientist and mix well!
- Wet that mixture: Toss in the eggs, milk, vegetable oil, and vanilla extract. Beat it all together with a mixer until smooth and velvety. You should be imagining how it’s going to taste by now!
- Time for the hot liquid: Slowly add either the boiling water or hot coffee. The batter will be super runny—don’t panic. Runny is what keeps this cake moist!
- Divvy it up: Pour the batter into your prepared pans evenly. Pop them into the oven, and bake for 30–35 minutes. Your kitchen will be filled with heavenly smells, so be prepared to resist the urge to eat it raw!
- Testing for doneness: Stick a toothpick in the center; if it comes out clean, it’s party time! Let the cakes cool in the pans for 10 minutes, then transfer them to a wire rack to cool completely.
- Whipping up the buttercream: While your cakes are cooling, let’s get to that buttercream. Beat the softened butter for about 2 minutes until it’s creamy. You’ll want it nice and silky.
- Sugar rush: Gradually add the powdered sugar while mixing. Watch for the delightful cloud of sweetness that will form!
- Flavor lift: Add that vanilla extract and a pinch of salt, then slowly mix in the milk or cream to get the consistency just right—thick but spreadable. Continue beating for another 2–3 minutes until fluffy.
- Assembling time: Now that the cakes are cooled, place the first layer on your serving plate. Spread a generous dollop of buttercream on top before adding the second layer, and repeat! There’s satisfaction in stacking, let me tell you.
- Finishing touches: Smooth the top and sides with a spatula. Get creative or keep it simple. I love to sprinkle chocolate chips or shavings for that extra flair.
Is it just me, or is baking like a hug in the form of food? But wait, before I dive into that, let’s chat about tips for getting this cake just right.
Tips for Best Results
- Use quality cocoa: It’s essential. The better the cocoa, the richer your cake. Go for Dutch-processed if you can.
- Don’t overmix: Mix only until combined. Overmixing can lead to a tougher cake.
- Room temperature ingredients are key: It really does make a difference in texture!
- Check oven temperature: All ovens are different. An oven thermometer can help ensure you’re baking at the right heat.
Ingredient Substitutions & Variations
This cake is pretty versatile, too! Here are some tweaks you can consider:
- Floured baking pans: Instead of just greasing, try flouring, too, for that extra security— I’ve done it, and it makes a difference!
- Gluten-Free Flour: I’ve had success with a gluten-free blend in this recipe; just ensure it has a good binding agent.
- Dairy-Free Options: Swap the butter for a dairy-free alternative and use almond or oat milk for a dairy-free cake.
- Additional Flavors: Try adding a few tablespoons of brewed espresso for a deeper flavor, or add peppermint extract for a little zing. I didn’t expect that cross of freshness to work, but voilà!
Serving Suggestions
So, how do you make this cake go from amazing to utterly fantastic? Pair it with a scoop of vanilla ice cream, a drizzle of chocolate sauce, or a handful of fresh berries. That combo, paired with a charming rom-com on a cozy evening? Oh my goodness, it’s pure bliss!
How to Store and Reheat Leftovers
If, and I say if, you have leftovers, they can be stored in an airtight container in the fridge for up to a week—although I make no promises it will last that long!
Pro Tip: I’ve made the mistake of taking it straight from the fridge and slicing. Allow it to sit at room temperature for about 15-20 minutes for a softer slice. Totally worth it!
Make-Ahead and Freezer Tips
The beauty of this cake lays in its flexibility. You can make the cakes ahead of time and freeze them! Just wrap the cooled cake layers in plastic wrap and pop them in the freezer. They can be frozen for up to three months!
When you’re ready to serve it, take them out and let them thaw in the refrigerator overnight. Then, frost and enjoy the following day—if you can wait that long!
Common Mistakes to Avoid
- Skipping the cooling time: Frosting a hot cake will lead to a melted mess. Don’t do it!
- Not tasting as you go: While this is primarily for the cake, you should also make sure the buttercream is what your heart desires.
- Ignoring battery consistency: Too thin or thick can affect the denseness and bake time.
Frequently Asked Questions (FAQ)
-
Can I make this cake in advance?
Absolutely! It stores beautifully in the fridge or freezer. -
Can I substitute the vegetable oil?
Yes! You can use melted coconut oil or melted butter as a direct swap. -
How do I make it less sweet?
Use less powdered sugar in the buttercream to balance sweetness.
Cooking Tools You’ll Need
- Mixing bowls (large and medium)
- Spatula
- Microphone, or whisk if you’re into high-tech baking gadgets
- Measuring cups and spoons
- Electric mixer (optional, but a big help)
- Three 8-inch round cake pans
- Cooling rack
Final Thoughts
This recipe has moved from being a simple dessert to a family favorite—a tradition in our kitchen. It represents love and the cozy, chaotic moments shared while baking. I invite you to make this cake a part of your baking history, too. Adjust it, make it your own, and share those delicious results with loved ones!
If you enjoyed this recipe, don’t forget to save it on Pinterest or share it with a friend! Happy baking!
Vanilla Butter Chocolate Fudge Cake
Ingredients
Dry Ingredients
- 1 3/4 cups flour Provides structure.
- 3/4 cup unsweetened cocoa powder Adds depth and flavor.
- 2 cups granulated sugar For sweetness.
- 1 1/2 teaspoons baking powder Leavening agent.
- 1 1/2 teaspoons baking soda Additional leavener.
- 1 teaspoon salt Enhances flavor.
Wet Ingredients
- 2 large eggs Add moisture.
- 1 cup whole milk Provides richness.
- 1/2 cup vegetable oil Ensures moisture.
- 2 teaspoons vanilla extract Flavor enhancer.
- 1 cup hot water or hot coffee Deepens chocolate flavor.
For the Buttercream Frosting
- 1 cup unsalted butter Softened.
- 4 cups powdered sugar For sweetness in frosting.
- 2 teaspoons vanilla extract Adds flavor to frosting.
- 3–4 tablespoons milk or cream Adjusts frosting consistency.
- a pinch salt Balances sweetness.
Instructions
Preparation
- Preheat the oven to 175°C (350°F) and prepare three 20 cm (8-inch) round cake pans by greasing and lining with parchment paper.
- In a large bowl, sift together the flour, cocoa powder, sugar, baking powder, baking soda, and salt.
- Add the eggs, milk, vegetable oil, and vanilla extract to the dry mixture, then beat until smooth.
- Slowly mix in the hot water or coffee until the batter is smooth.
- Divide the batter evenly among the prepared pans and bake for 30–35 minutes.
- Check readiness by inserting a toothpick; if it comes out clean, the cakes are done. Let them cool in the pans for 10 minutes before transferring to a wire rack.
Frosting
- Beat the softened butter until creamy, about 2 minutes.
- Gradually add the powdered sugar and mix while watching for any clouds of sweetness.
- Stir in vanilla extract and a pinch of salt, then add the milk or cream until you reach the desired frosting consistency.
- Continue to beat for another 2–3 minutes until fluffy.
Assembly
- Once the cakes are completely cool, place the first layer on a serving plate.
- Spread a layer of buttercream on top and place the second cake layer on top of it; repeat for the third layer.
- Smooth the frosting on top and sides as desired.


