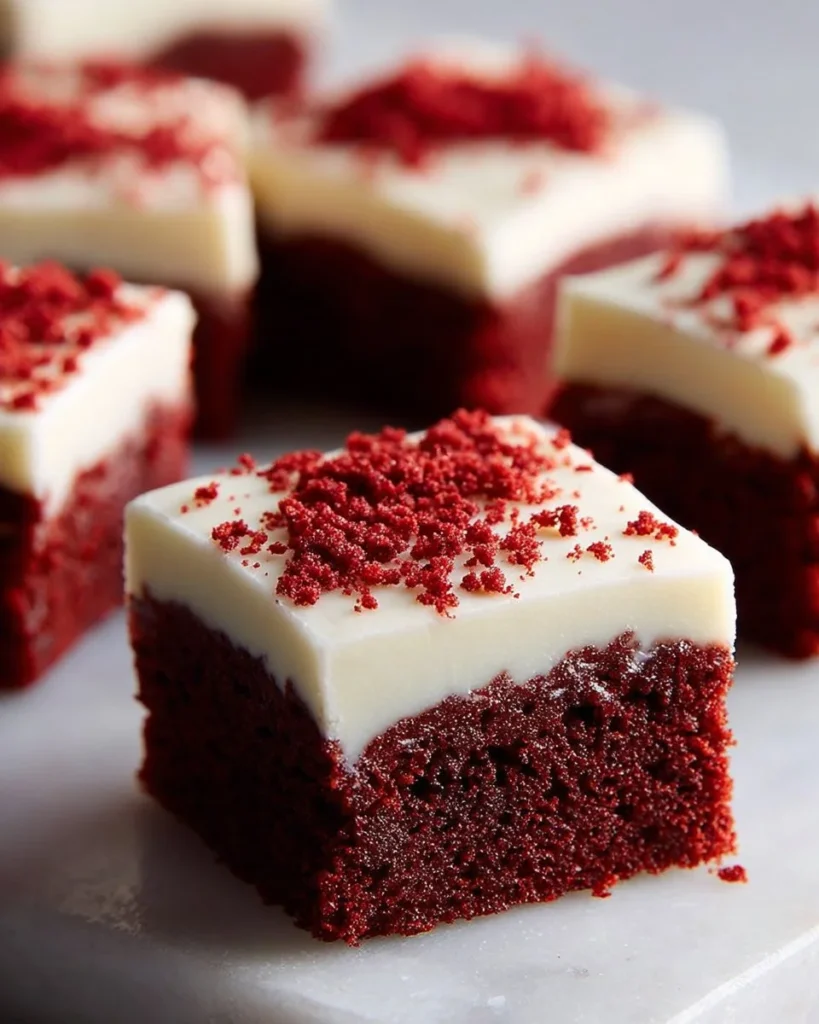

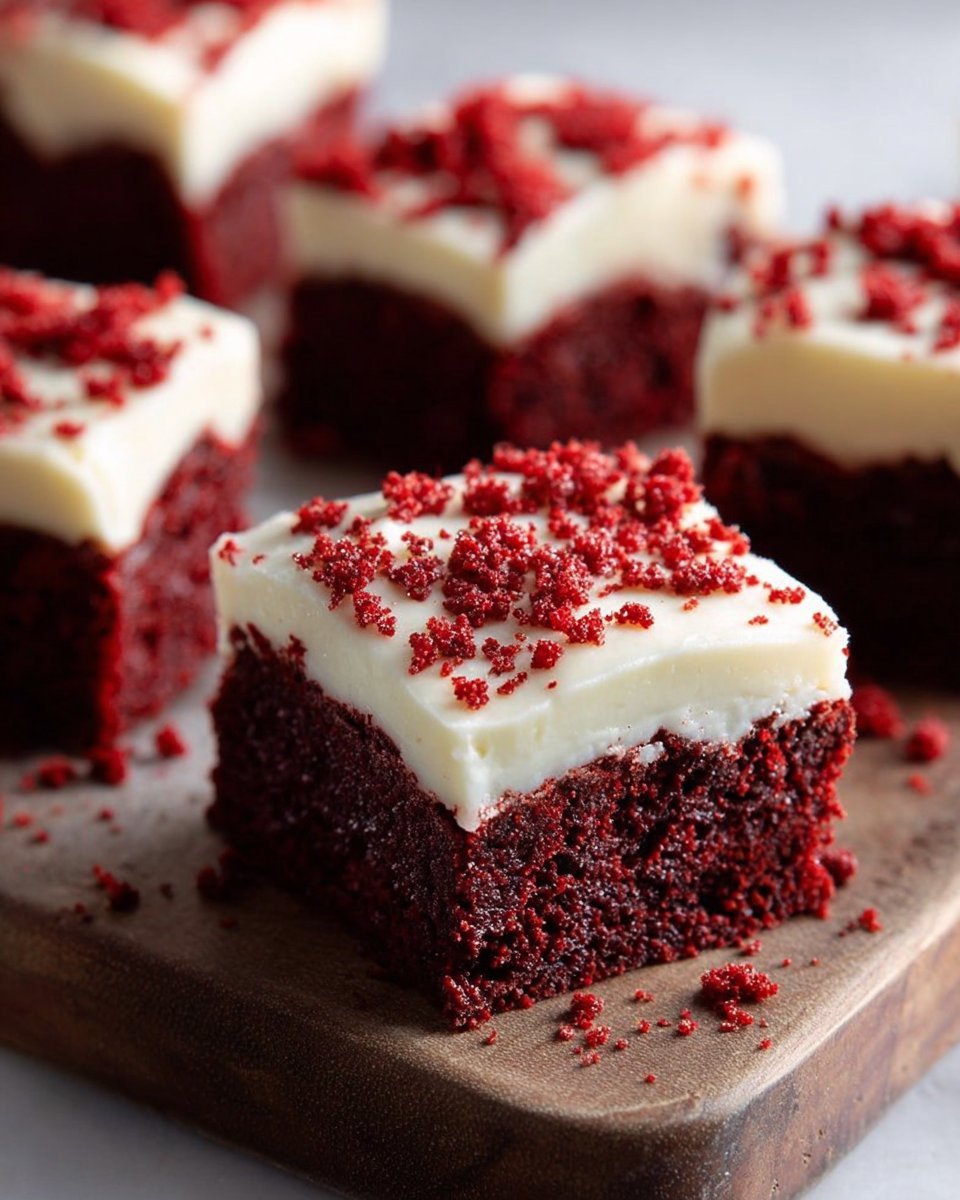
The Best Red Velvet Brownies with Cream Cheese Frosting
Is there anything more delightful than a warm brownie fresh out of the oven? I mean, when that chocolatey aroma fills the kitchen, it’s like a hug that smells amazing. But what if I told you that there’s a way to elevate that experience to something divine? Let me introduce you to my cherished Red Velvet Brownies with Cream Cheese Frosting.
These brownies don’t just sit pretty; they bring together the classic allure of red velvet cake with the fudgy, rich goodness of brownies. I remember the first time I stumbled upon this recipe—it was one of those cozy winter evenings when I was wrapped in a blanket, scrolling through old family cookbooks, feeling a wave of nostalgia wash over me. The recipe popped out, and I couldn’t resist the vibrant color and the promise of cream cheese frosting.
Now, I don’t want to brag, but my first attempt? Well, let’s just say it didn’t look like the mouthwatering images on Pinterest. The batter was a little too runny, and I might have confused tablespoons with teaspoons concerning the red food coloring—oops! But hey, that’s part of the fun, right? You learn, you adjust, and you end up with something sensational. Every time I make these brownies, I’m reminded of that evening, the chaotic laughter, and the flavors bursting in my mouth.
The anticipation builds as they bake, and my home fills with the heavenly smell of sweet, rich chocolate mixed with that signature hint of vanilla. Game-changer! I can tell you this: these brownies feel like a comforting hug after a long day. Honestly, if "comfort food" were a tangible item, these brownies would be the best version of it.
Why You’ll Love This Recipe
- Easy to Make: Even if you’ve never baked a day in your life, this recipe is straightforward and manageable. If I can pull this off, so can you!
- Perfect for Any Occasion: Birthdays, holidays, or just a Wednesday that needs cheering up. These brownies fit every scenario.
- Taste Explosion: The combination of rich cocoa and creamy frosting creates a flavor profile that dances on your taste buds.
- Picky Eater Approved: Even the fussier members of your family will grab for seconds.
- Great Leftovers: If there happen to be any left (which, let’s be real, is rare!), they keep well in the fridge and taste amazing straight out of the fridge too.
- A Showstopper: The beautiful red color topped with creamy frosting looks so inviting that you’ll undoubtedly bring smiles to faces!
What Makes This Recipe Special?
Ah, glad you asked! It’s not just the beautiful color; it’s the texture that truly makes these brownies shine. When you bite into one, it’s like diving into a cloud of chocolate bliss—a soft, chewy outer layer and a gooey, fudgy center. Pair that with the tangy, creamy frosting, and you’ve got a match made in dessert heaven.
There’s something inherently comforting about red velvet—its roots tracing back to a time when cakes were made with love and care. Incorporating it into a brownie takes that classic and turns it into something even more irresistible.
By infusing that rich cocoa flavor with a hint of cream cheese frosting, you’ve got a dessert that’s pure magic. It’s a bit of nostalgia mixed with the modern twist of brownies, reflecting the warmth of home. Honestly, it just feels like the best kind of indulgence.
Ingredients
To whip up these delicious Red Velvet Brownies with Cream Cheese Frosting, you’ll need the following:
- 1 ¼ cups (155g) all-purpose flour: This forms the base of your treats, providing structure.
- ¼ cup (25g) unsweetened cocoa powder: This adds that rich, chocolatey flavor we’re all craving.
- 1 cup (200g) granulated sugar: Sweetness! It balances all that cocoa and enhances flavors.
- ½ cup (115g) unsalted butter, melted: For that fudgy, moist texture. You’ll want to use unsalted to control the overall saltiness.
- 2 large eggs: These bind everything together and provide richness.
- 1 tsp vanilla extract: It’s the classic flavor booster that elevates everything.
- 1 tbsp red food coloring (liquid or gel): This gives those brownies their signature hue. I highly recommend gel—it’s more concentrated and won’t alter the batter’s consistency.
- ¼ tsp salt: Just a pinch to amplify all the amazing flavors.
- 4 oz (115g) cream cheese, softened: The star of the frosting! It provides a tangy, rich addition.
- 2 tbsp unsalted butter, softened: This gives the frosting a creamy texture.
- 1 cup (120g) powdered sugar, sifted: It sweetens the frosting while keeping it fluffy and light.
- ½ tsp vanilla extract: A must for the frosting to meld those flavors!
Make sure to measure precisely (especially the dry ingredients) for the best results. Trust me, following the recipe will save you from having to sprinkle the brownies with despair.
How to Make It Step-by-Step
Okay, here we go! Let’s dive into the step-by-step process to create these delicious brownies. I promise, it’s way more fun than it sounds.
Step 1: Preheat the Oven
First things first, preheat your oven to 350°F (175°C). Trust me, this is crucial. A preheated oven means you’ll bake those brownies perfectly without any weird undercooked scenarios. While that’s heating, line an 8×8-inch baking pan with parchment paper, making sure to leave a little overhang. This is your secret weapon for hassle-free brownie removal later.
Step 2: Whisk the Dry Ingredients
In a medium bowl, grab your whisk and combine the all-purpose flour, unsweetened cocoa powder, and salt. This step is important as it ensures these dry ingredients play nice together later on. Whisk it together until it’s evenly mixed. Set this bowl aside, feeling like a total kitchen pro.
Step 3: Mix the Wet Ingredients
In a large mixing bowl, stir together the melted unsalted butter and granulated sugar. Honestly, this combination is like magic—the sugar dissolves into the warm butter, and it smells divine. Then, add in the eggs, one at a time, and mix thoroughly after adding each. This is where things get exciting. Stir in the vanilla extract and red food coloring until your mixture turns a beautiful, vibrant red. You might even feel like a wizard in a chocolatey wonderland. It should be rich, glossy, and oh-so-tempting.
Step 4: Combine the Dry and Wet Mixtures
Now for the marathon moment: gradually add the dry ingredients to the wet ingredients. Use a spatula (no need for heavy-duty mixing here!), and fold it in gently until just combined. You want to avoid overmixing—this is not a workout session! The less you mix, the more tender your brownies will be.
Step 5: Bake the Brownies
Pour that heavenly batter into your prepared baking pan. Smooth the top with a spatula, and pop it in the preheated oven. Bake for about 20-25 minutes, but do keep an eye out. A toothpick inserted into the center should come out with just a few moist crumbs—not gooey but definitely not dry. They are done when they’re still slightly soft.
Step 6: Cool It Down
Let your brownies cool completely in the pan. I know, I know. This can feel like watching paint dry, but patience is key! It’ll also help them set better, making it easier to spread on the frosting.
Step 7: Make the Cream Cheese Frosting
While those brownies are cooling, let’s whip up the frosting. In a mixing bowl, combine the softened cream cheese and unsalted butter, and beat until you achieve a smooth, creamy consistency. Now, gradually add the sifted powdered sugar. The sifting is important; it keeps your frosting from being gritty. Mix well after each addition. Last but not least, stir in the vanilla extract. Just a quick taste is all it takes to feel like you’re in a pastry shop.
Step 8: Frost Those Brownies
Once the brownies have cooled to room temperature, it’s time to spread the cream cheese frosting evenly over the top. Don’t hold back; it’s a party! Finally, using that parchment overhang, lift the brownies out of the pan and onto a cutting board. Slice them into squares, and voila! You’ve made a batch of beautifully red velvet brownies that will make you the dessert hero of your home.
Tips for Best Results
- Use Quality Ingredients: Seriously, the better the chocolate, the better the brownie.
- Don’t Overbake: Trust your instincts. If the toothpick gives you just a few crumbs, pull them out. Brownies continue to cook once out of the oven.
- Let Them Cool: I know it’s painful, but allowing them to cool will make cutting them so much easier and mess-free.
Ingredient Substitutions & Variations
If you’re feeling adventurous or have dietary restrictions, here are some ideas:
- Gluten-Free: Use gluten-free all-purpose flour for a flawless swap.
- Dairy-Free: Substitute the butter for coconut oil and the cream cheese for a dairy-free version.
- Less Sweet: If you prefer a less sweet brownie, reduce the sugar a bit. But remember, it might change the fudgy texture!
- Add-Ins: Consider throwing in some chocolate chips or nuts for a little extra crunch and flavor.
Directions
- Preheat your oven to 350°F (175°C). Line an 8×8-inch pan with parchment paper.
- In a medium bowl, whisk together the flour, cocoa powder, and salt.
- In a large bowl, mix melted butter and sugar until combined. Add eggs and mix well, then stir in vanilla and food coloring.
- Gradually add the dry mix to the wet ingredients. Fold gently until just combined.
- Pour into the prepared pan and smooth the top. Bake for 20-25 minutes.
- Allow to cool completely in the pan.
- For frosting, beat cream cheese and butter until smooth. Gradually mix in powdered sugar, then stir in vanilla.
- Frost cooled brownies, lift out, slice, and enjoy!
Pairing Ideas (Drinks, Sides, etc.)
These Red Velvet Brownies are delightful on their own but can be paired beautifully with a scoop of vanilla ice cream or a dollop of whipped cream. And honestly, a hot cup of cocoa or coffee would seal the deal. Throw in a rom-com movie, and you have yourself a cozy night in. Seriously, if this doesn’t scream "comfort food," I don’t know what does!
How to Store and Reheat Leftovers
If you somehow have leftovers (which is like finding gold in your backyard), these brownies can be stored in an airtight container in the fridge for about a week. They’re also great if you pop them back into the microwave for 10-15 seconds for a melty revival. Just be careful not to overdo it, or they’ll turn into a brownie lava!
Make-Ahead and Freezer Tips
Want to prep ahead for your next gathering? You can make the brownie batter a day in advance and store it in the refrigerator. Just bring it back to room temperature before baking!
For freezing, wrap the baked brownies tightly in plastic wrap, then store in a freezer bag. They’ll last for about three months. Just thaw before indulging; you won’t regret it!
Common Mistakes to Avoid
- Overmixing: Seriously, fold your ingredients together gently. No one wants tough brownies!
- Not Checking for doneness: It’s all too easy to forget about the brownies. Use the toothpick test and keep it real.
- Ignoring Cooling Time: I know you want to dig in, but let them cool. It’ll save you from a crumbly mess!
Frequently Asked Questions (FAQ)
Q: Can I use other food colorings?
A: Absolutely! But gel colors produce the best results without altering the batter consistency.
Q: Can I add nuts to the brownies?
A: For sure! Walnuts or pecans would be great for that crunchy texture.
Q: How can I tell when my brownies are done?
A: A toothpick inserted in the center should come out with a few moist crumbs—not clean, as that means they’re overbaking.
Q: What if I don’t have cream cheese for the frosting?
A: You can use mascarpone cheese or even a simple buttercream frosting if you prefer!
Cooking Tools You’ll Need
- Mixing bowls
- Whisk
- Spatula
- 8×8-inch baking pan
- Parchment paper
- Measuring cups and spoons
Final Thoughts
So, there you have it—a heartfelt take on Red Velvet Brownies with Cream Cheese Frosting. I truly hope you enjoy baking them as much as I do. Every slice of these brownies is like taking a bite out of joy and comfort, making you feel all warm and cozy inside.
I’d love to hear about your own experiences with this recipe. Did you adapt it? Add your own twist? Come back and share your version with me! If you enjoyed this recipe, don’t forget to save it on Pinterest or share it with a friend! Happy baking!
This blog post aims to encapsulate the magic of cooking, blending rich narratives with handy tips, all while wrapping it in the irresistible allure of decadent desserts.

Red Velvet Brownies with Cream Cheese Frosting
Ingredients
Brownie Ingredients
- 1 ¼ cups all-purpose flour This forms the base of your treats, providing structure.
- ¼ cup unsweetened cocoa powder This adds that rich, chocolatey flavor.
- 1 cup granulated sugar Sweetness that balances all the cocoa.
- ½ cup unsalted butter, melted For a fudgy, moist texture.
- 2 large eggs Bind everything together.
- 1 tsp vanilla extract Flavor booster.
- 1 tbsp red food coloring (liquid or gel) For the signature hue.
- ¼ tsp salt Amplifies flavors.
Cream Cheese Frosting Ingredients
- 4 oz cream cheese, softened Provides a tangy, rich addition.
- 2 tbsp unsalted butter, softened For a creamy texture.
- 1 cup powdered sugar, sifted Sweetens the frosting while keeping it fluffy.
- ½ tsp vanilla extract Enhances the frosting flavors.
Instructions
Preparation
- Preheat your oven to 350°F (175°C). Line an 8×8-inch baking pan with parchment paper.
- In a medium bowl, whisk together the all-purpose flour, unsweetened cocoa powder, and salt. Set this bowl aside.
Mixing
- In a large bowl, combine melted butter and sugar, mixing until combined. Add eggs one at a time and mix well. Stir in vanilla extract and red food coloring until rich and glossy.
- Gradually add the dry mixture to the wet ingredients, folding gently until just combined.
Baking
- Pour the batter into the prepared pan, smoothing the top. Bake for about 20-25 minutes, until a toothpick comes out with a few moist crumbs.
- Let the brownies cool completely in the pan.
Frosting
- While the brownies cool, beat together the softened cream cheese and unsalted butter until smooth. Gradually mix in powdered sugar and stir in the vanilla extract.
- Once the brownies are cooled, spread the cream cheese frosting evenly over the top and slice into squares.


