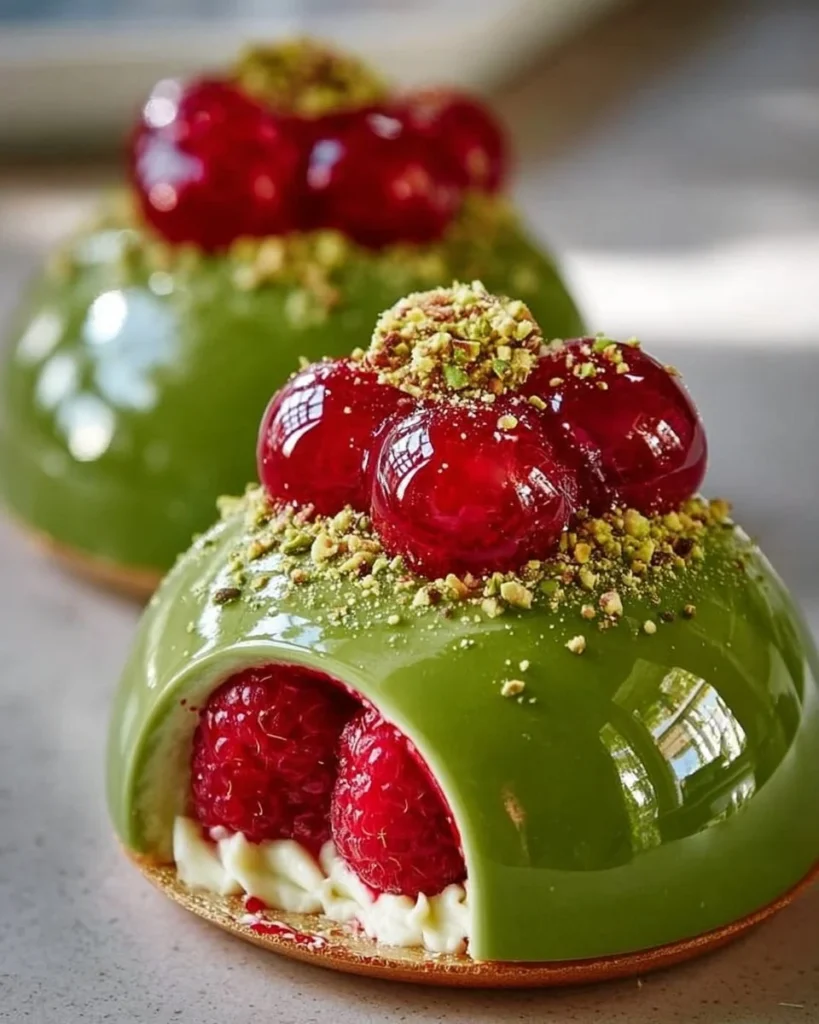

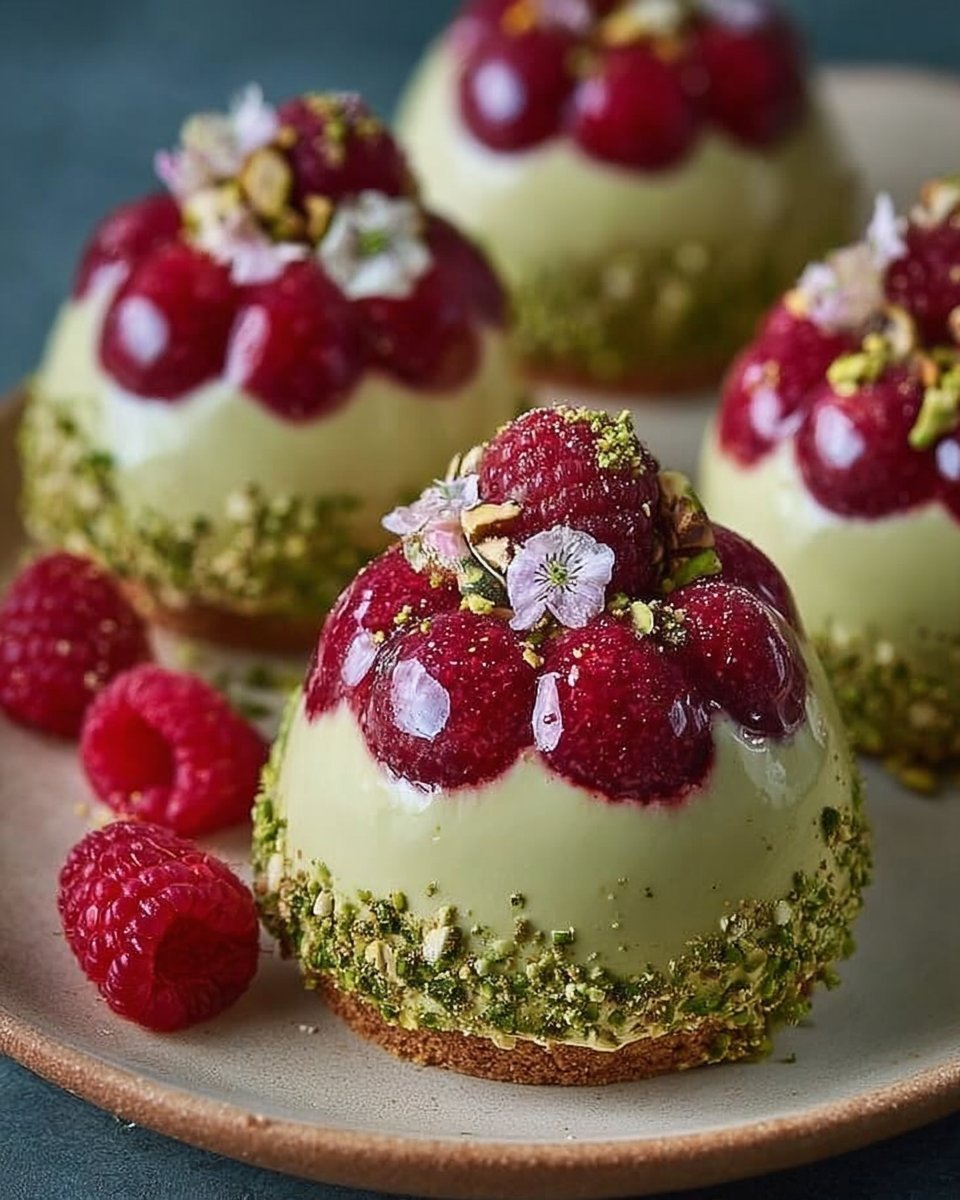
The Best Pistachio & Raspberry Cheesecake Domes
There are moments in the kitchen when everything clicks—the ingredients dance, the smells waft, and for a split second, you feel like a culinary wizard. One of those moments came when I first stumbled upon the enchanting notion of making Pistachio & Raspberry Cheesecake Domes. As soon as I saw that enticing picture, I knew I had to bring this delightful creation into my life.
Ah, the kitchen saga! Growing up, my culinary experiences were a mix of triumphs and absolute disasters—who could forget the time I accidentally set my kitchen towel on fire? Yikes. But this recipe carries such a gorgeous nostalgia for me; it reminds me of cozy family gatherings full of laughter, sweet indulgences, and—let’s be real—terrible kitchen fails. I remember my aunt attempting to make something fancy for a holiday dessert, and it ended up being more of a “sweet lump” than anything else.
But oh, these Pistachio & Raspberry Cheesecake Domes, they are not to be labeled as such! These beauties are a delightful mix of nutty, creamy, and fruity that can brighten anyone’s day. They are perfect for a special occasion or a cozy night in. Plus, they offer a unique twist on the classic cheesecake—hello, gorgeous pistachio flavor!
Why You’ll Love This Recipe
- Easy to Make: This isn’t a complicated dish that will have you furiously pounding your mixing bowl into submission. It’s easy enough to impress your friends without too much chaos.
- Comforting: The smooth pistachio and tangy raspberry make this dish feel like a warm hug in a bowl.
- Perfect Make-Ahead Treat: Who doesn’t love preparing something in advance and just waiting for the applause? Freezer-friendly and decadent!
- Picky Eater Approved: If you’ve got kiddos or friends who can be a tad picky, the delightful layer of raspberry will win them over.
- Glamorous Appeal: The presentation is exquisite; these domes are bound to get you all the “ooohs” and “aaahs”.
- Versatile: You can easily switch up the flavors, adding seasonal fruits or different nut pastes to keep it fresh.
What Makes This Recipe Special?
Honestly? The pistachio paste adds a depth of flavor that makes my heart sing! It’s rich, creamy, and oh-so-satisfying. The surprise raspberry center provides a pop of tang that contrasts beautifully with the cheesecake’s smoothness. Together, they create such a beautiful balance.
And let’s not forget the mirror glaze! It adds a fancy flair that’s almost too pretty to eat… almost. You’ll catch yourself staring at your creation in wonder before you devour it.
Ingredients
- 250g cream cheese, softened: You need this as the base for your cheesecake. Cream cheese brings that luscious, creamy texture that makes this dessert heavenly.
- 100g powdered sugar: The powdered form dissolves quickly and provides just the right sweetness without graininess.
- 100g pistachio paste: This is the star, folks! Just be sure to choose a good quality, as it makes a world of difference. I usually opt for my favorite brand, but there are lots out there, so experiment if you feel like it.
- 1 tsp vanilla extract: Because let’s be real, every dessert is better with a hint of vanilla.
- 200ml heavy cream, cold: Whipping this into stiff peaks gives your cheesecake fluffiness.
- 200g fresh raspberries: A delightful surprise inside. Fresh is always best, but frozen can work too—just thaw them before using.
- 50g sugar: To sweeten that raspberry center and make it just right.
- 1 tsp lemon juice: Brightens the raspberry flavor; don’t skip it!
- 1 tsp cornstarch, dissolved in 1 tbsp water: This is to thicken the raspberry center.
- 2 eggs: Essential for creating a light, sturdy cheesecake mixture. Don’t forget to beat them well for maximum fluffiness!
- 50g sugar: More sweetness for the sponge base.
- 50g sifted flour: We want that just-right texture, and flour is a must.
- ½ tsp baking powder: Helps the sponge rise and stay light.
- 200g white chocolate: Because everything is always better with white chocolate—just melts my heart.
- 100ml heavy cream: Again, for that heavenly texture, but this time for the glaze.
- 2 tbsp pistachio paste: A nice flavor boost for the glaze.
- Green food coloring (optional): A little splash of color never hurt anybody, right?
- Crushed pistachios: For that delicious crunch and gorgeous garnish!
- Fresh raspberries: As the stunning final touch.
Now, here’s a sweet tip: Don’t rush the process! Each layer is essential in bringing out the flavors and textures. And if you have defined flavor preferences or dietary restrictions, fear not! We’ll chat about substitutions later.
How to Make It Step-by-Step
Alright, folks, grab your apron. Cooking can get messy, but I promise it will be worth it!
Step 1: Make the Raspberry Center
I love beginning with the raspberry layer. It creates such a beautiful contrast in color against the creamy pistachio cheesecake. So, take a medium saucepan, and toss in your 200g of fresh raspberries, 50g of sugar, and 1 tsp of lemon juice.
Now, heat that medley over medium heat until everything gets soft. You’ll know it’s ready when the delightful smell wafts through your kitchen (seriously, you might consider building a throne in its honor). Once it’s softened, add the cornstarch slurry you mixed with 1 tablespoon of water to thicken it up. Keep cooking for a couple of minutes until it turns glossy and thickens to the desired consistency.
When ready, pour this luscious mixture into small silicone molds (think mini muffin-sized). Let them cool and pop them into the freezer until solid. This step is crucial—you want those raspberry centers to be nice and firm!
Step 2: Make the Cheesecake Filling
While the raspberry centers freeze, it’s time for the cheesecake filling. Combine 250g of softened cream cheese and 100g of powdered sugar in a mixing bowl. Use a hand mixer or stand mixer to beat this together—aim for that smooth, creamy texture that will make your taste buds rejoice.
Then, add in 100g of pistachio paste and 1 tsp of vanilla extract. Beat again until well combined. Seriously, take a moment to appreciate that vibrant green color.
In a separate bowl, take 200ml of cold heavy cream and whip it until stiff peaks form. This can be very satisfying—watching that cream transform right before your eyes, feeling like a total kitchen magician!
Now comes the gentle part—fold the whipped cream into the pistachio mixture. Go slow, so you keep that beautiful light fluffiness.
Step 3: Assemble the Domes
Grab those silicone dome molds! The assembly part is where the magic happens. Spoon some cheesecake filling into each mold, pressing it up the sides. Then, take those frozen raspberry centers and shove them right into the middle of the cheesecake layer. Top it off with more cheesecake filling to fully fill each dome. Pinch your lips together in concentration—you got this!
Smooth the tops with a spatula, and then pop those babies into the freezer until firm. This usually takes about 4 hours or overnight if you want to do it the lazy way (which I totally advocate!).
Step 4: Make the Sponge Base
Preheat your oven to 350°F (175°C). In a large mixing bowl, beat together 2 eggs with 50g of sugar until it’s pale and fluffy. It’s a bit of an arm workout, but just think about that delicious end goal!
Gently fold in the 50g of sifted flour and ½ tsp of baking powder. Try not to overmix. The less you fuss over it, the fluffier your sponge will become.
Spread this batter out into a thin layer on a lined baking tray, and pop it in the oven for about 8–10 minutes. You’ll want it to be lightly golden—watching it bake is like a suspenseful movie; don’t walk away, you might just miss the tender moment!
Let it cool, and then cut it into rounds that fit the bottom of your domes.
Step 5: Press-On the Sponge Base
Once your cheesecakes are frozen solid, it’s time to press those rounds of sponge onto the base of each dome. This gives it that nice grounding that every dessert deserves! Press firmly, then return to the freezer for a final freeze up—about 30 minutes should do the trick.
Step 6: Prepare the Mirror Glaze
Now, the fun part—the glaze! In a small saucepan, heat 100ml of heavy cream until it’s just simmering but not boiling. Pour it over 200g of chopped white chocolate and stir until the mixture is smooth and glossy. Oh, that sweet smell will have you daydreaming about dessert.
Stir in 2 tablespoons of pistachio paste and add green food coloring if you’re feeling adventurous. Allow this to cool until it’s slightly thick yet still pourable.
Step 7: Glaze and Decorate
Once those domes are completely firm, it’s time to play like a pastry chef! Unmold them carefully and place them on a wire rack over a tray (trust me, this prevents serious mess).
Pour the glaze over each dome, making sure it coats every nook and cranny. It doesn’t have to be perfect; a little drizzling adds character! Use a fork to help guide the glaze if it’s not spreading evenly.
The finishing touch? A sprinkle of crushed pistachios and a few fresh raspberries that will make everything pop.
Chill until you’re ready to serve, but be careful—these delightful treats might disappear faster than snacks at a family picnic.
Tips for Best Results
- Use room temperature cream cheese for a smoother filling.
- Ensure that your heavy cream is cold when whipping; it whips up better!
- Be gentle when folding in the whipped cream; you want to maintain that light texture.
- Invest in some quality silicone molds. They’ll make your life significantly easier.
Ingredient Substitutions & Variations
- If pistachios aren’t your thing, swap the paste for almond or hazelnut! You can also play around with flavors by incorporating different fruit purees into the cheesecake layer.
- For a berry mix, you could replace raspberries with blueberries or strawberries for a sweet twist.
- If you’re looking for a lower-calorie dessert, consider using low-fat cream cheese and whipped topping for the cheesecake filling.
Serving Suggestions
Pair these decadent Pistachio & Raspberry Cheesecake Domes with a cup of fresh mint tea or a light sparkling rosé. It’s the perfect finish to a cozy dinner! And let’s be real, a rom-com night with a bowl of these domes sounds like heaven.
Imagine curling up on the couch, clutching a warm blanket, and getting lost in a world of sweet, creamy goodness while the latest rom-com unfolds before you. Now, that’s a slice of life I’m ready to occupy!
How to Store and Reheat Leftovers
These domes can be stored in the freezer for several weeks—just be sure to wrap them well so they don’t get freezer burn. To defrost, just move them to the fridge a few hours before serving.
If you have any leftovers (which I doubt, honestly), you can simply let them sit out at room temperature for about 30 minutes to let them soften a bit before diving in.
Make-Ahead and Freezer Tips
Make the cheesecake filling and raspberry centers in advance and freeze them separately. You can assemble everything a day before you need it; just give it enough time to freeze completely before glazing.
Common Mistakes to Avoid
- Don’t overmix your cheesecake filling! It’ll turn out heavy instead of light and airy.
- Make sure not to skip the freezing step for the raspberry center—otherwise, it’ll be a messy surprise when you cut into the domes.
- Don’t rush the glaze cooling process. If it’s too hot, it’ll slide right off instead of forming that lovely coating we’re after.
Frequently Asked Questions (FAQ)
-
Can I use other nuts for the paste?
Absolutely! Almonds or hazelnuts can bring a lovely flavor too. -
How long do these domes last?
If stored properly, they can last in the freezer for up to a month. -
Can I make these dairy-free?
You could try using dairy-free cream cheese and coconut cream instead of heavy cream for a dairy-free version. -
What do I do if my glaze is too thick?
Simply warm it up slightly to achieve your desired pourable consistency. -
Can I add more fruit to the filling?
Of course! Feel free to fold in some fresh fruits or fruit puree to customize it to your liking.
Cooking Tools You’ll Need
- Mixing bowls
- Hand or stand mixer
- Silicone molds
- Saucepan
- Baking tray
- Wooden spoon or spatula
- Whisk
Final Thoughts
In the grand scheme of life, nothing beats the joy of sharing a homemade treat with friends and family. Every bite of these Pistachio & Raspberry Cheesecake Domes represents a labor of love, patience, and, let’s admit it, a touch of chaos.
So, what are you waiting for? Roll up your sleeves, gather your ingredients, and get ready to create something utterly special. And if it doesn’t turn out perfectly, remember that it’s just another adventure in the kitchen—and those are always the best kind!
If you enjoyed this recipe, don’t forget to save it on Pinterest or share it with a friend!
Pistachio & Raspberry Cheesecake Domes
Ingredients
For the Raspberry Center
- 200 g fresh raspberries Fresh is always best, but frozen can work too—just thaw them before using.
- 50 g sugar To sweeten the raspberry center.
- 1 tsp lemon juice Brightens the raspberry flavor.
- 1 tsp cornstarch, dissolved in 1 tbsp water Used to thicken the raspberry center.
For the Cheesecake Filling
- 250 g cream cheese, softened Brings a luscious, creamy texture.
- 100 g powdered sugar Provides sweetness without graininess.
- 100 g pistachio paste Star ingredient for rich flavor.
- 1 tsp vanilla extract Enhances dessert flavor.
- 200 ml heavy cream, cold Whipped into stiff peaks for fluffiness.
- 2 eggs eggs Creates a light, sturdy cheesecake mixture.
For the Sponge Base
- 50 g sugar To sweeten the sponge base.
- 50 g sifted flour Provides the desired texture.
- ½ tsp baking powder Helps the sponge rise.
For the Glaze
- 200 g white chocolate Adds richness to the glaze.
- 100 ml heavy cream Used to make the glaze smooth.
- 2 tbsp pistachio paste Flavor boost for the glaze.
- green food coloring (optional) For a splash of color.
- crushed pistachios For garnish.
- fresh raspberries For decoration.
Instructions
Make the Raspberry Center
- In a medium saucepan, combine 200g of fresh raspberries, 50g of sugar, and 1 tsp of lemon juice. Heat over medium until soft.
- Add the cornstarch slurry and cook until glossy and thickened. Pour into molds and freeze until solid.
Make the Cheesecake Filling
- Combine 250g of cream cheese and 100g of powdered sugar in a bowl. Beat until smooth.
- Add 100g of pistachio paste and 1 tsp of vanilla extract. Mix well.
- Whip 200ml of heavy cream to stiff peaks and fold into the pistachio mixture gently.
Assemble the Domes
- Spoon cheesecake filling into silicone molds, insert raspberry centers, and top with more cheesecake filling.
- Freeze the domes until firm for about 4 hours or overnight.
Make the Sponge Base
- Preheat oven to 350°F (175°C). Beat 2 eggs with 50g of sugar until pale.
- Fold in 50g of sifted flour and ½ tsp of baking powder. Spread on a baking tray and bake for 8-10 minutes.
Press-On the Sponge Base
- Once cheesecakes are frozen, cut sponge rounds and press them on the base of each dome.
- Freeze again for about 30 minutes.
Prepare the Mirror Glaze
- Heat 100ml of heavy cream until just simmering, then stir into 200g of chopped white chocolate until smooth.
- Mix in 2 tbsp of pistachio paste and food coloring if desired. Let it cool until thick but pourable.
Glaze and Decorate
- Unmold the domes and place on a wire rack. Pour the glaze over each dome.
- Sprinkle with crushed pistachios and fresh raspberries for decoration.


