

Easy Orange Velvet Cake with Yellow Buttercream Frosting
There’s something extraordinarily joyful about baking. It’s the way the kitchen fills with a warm, inviting aroma and transforms even the grayest of days into something bright and cheerful. Just imagine the sun peeking through the clouds as you whip together a delightful Orange Velvet Cake with Yellow Buttercream Frosting. I have a fond memory of discovering this recipe. It was a rainy Saturday afternoon. I had a rare quiet moment in my bustling household, and I felt this sudden urge to create something both delicious and fun. I stumbled upon this vibrant cake recipe and thought, "Why not brighten up my day—and the days of everyone around me?"
Let me tell you, baking this cake was a fulfilling experience. The zesty burst of oranges combined with the whimsical frosting turned my kitchen into a sunny paradise! Honestly, baking is also a wonderland of “oops” moments. One time, I accidentally mistook salt for sugar and oh boy, did that cake go to waste! But this time? Everything came together beautifully, leaving behind a fragrant echo of citrus and sweetness. If you’re like me and have a love for baking (and some hilarious kitchen mishaps), then you’re in for a treat.
The beauty of this recipe lies not only in its charming color but also in how deeply comforting it is to eat. Each moist slice feels like a hug wrapped in sunshine, perfect for any occasion—from birthdays to cozy family dinners. Whether you’re hosting a gathering or simply indulging in some self-care, this cake instantly uplifts your spirits. That buttery yellow frosting is truly the cherry on top, making each bite feel like pure bliss. So, let’s dive into why you’ll love making this cake and all the joy it brings!
Why You’ll Love This Recipe
-
Flavor Explosion: The combination of fresh orange juice and zest makes the cake absolutely burst with flavor. It honestly feels like you’re inviting a slice of summer into your mouth, no matter the season!
-
Kid-Approved: If you have picky eaters in your house, don’t fret! The vibrant colors and delicious taste are bound to win them over. Everyone loves a fun layer cake, and kids are naturally drawn to the bright hues.
-
Make Ahead Winner: This cake is an excellent option for meal prep as it keeps well in the fridge. You can whip it up a day or two in advance and frost it just before serving.
-
Versatile Decoration: With the basic yellow buttercream, you can get oh-so-creative! Throw on some fresh fruits, edible flowers, or sprinkles to jazz it up and cater it to occasions.
-
Non-Intimidating: Easy enough for novice bakers but impressive enough to wow anyone at a dinner party. Plus, if you’ve ever made scrambled eggs, you can totally handle this cake.
-
A Piece of Sunshine: This cake just makes you feel good. It’s like a slice of happiness that can brighten any dull day!
What Makes This Recipe Special?
As I said before, this Orange Velvet Cake isn’t just about the delightful taste—it transports you to sunny days filled with laughter. That orangey zest takes the usual cake experience and elevates it to gourmet status, all while being surprisingly simple. The creaminess of the buttercream frosting complements the cake’s moist crumb beautifully, balancing flavors and textures in every bite. You’ll notice bits of zest, adding a delicate hint of citrus that keeps you coming for more.
I love baking because it reminds me of my childhood when weekends were spent with my grandmother creating baked wonders. She trusted me with the “important” tasks of zesting and whisking, even when it was a definite mess. I still sometimes find a bit of flour in my hair from those joyful days! So, when I’m in the kitchen recreating recipes like this one, I can’t help but smile and channel those cherished memories.
Ingredients
For this luscious cake, you’ll need the following essential ingredients:
For the Cake
-
2 ¾ cups (345 g) all-purpose flour: The base of your cake, giving it structure and form. Make sure to spoon the flour into your measuring cup and level it off for accurate measurements—no one likes a dense cake!
-
1 ½ teaspoons baking powder: This is your leavening agent, ensuring your cake rises beautifully.
-
½ teaspoon baking soda: Just a little pinch goes a long way to enhance the fluffiness of the cake.
-
¼ teaspoon salt: It enhances all the sweet flavors and balances out the cake.
-
1 cup (225 g) unsalted butter (at room temperature): Seriously, don’t skip this! Softened butter is key to getting that light and fluffy texture.
-
1 ¾ cups (350 g) granulated sugar: Sugar does the magic here, ensuring a sweet, tender crumb.
-
4 large eggs (at room temperature): Eggs provide moisture and richness. Room temperature eggs incorporate better, trust me!
-
1 tablespoon fresh orange zest: This little burst of citrus will awaken your taste buds and elevate every slice.
-
½ cup (120 ml) fresh orange juice: Freshly squeezed is best—it unlocks fabulous flavors compared to the bottled stuff.
-
1 cup (240 ml) buttermilk (or milk + 1 tablespoon vinegar): This ingredient provides moisture and tanginess, making your cake melt-in-your-mouth tender.
-
¼ cup (60 ml) vegetable oil: Oil ensures a moist and tender crumb. It’s in my recipe because butter is busy doing its creamy dance.
-
1 teaspoon vanilla extract: It adds warmth and depth, rounding out all those lovely flavors.
-
A few drops of orange food coloring (optional): This is purely for aesthetics, but who doesn’t love a vibrant cake?
For the Yellow Buttercream Frosting
-
1 cup (230 g) unsalted butter (at room temperature): Just like with the cake, using soft butter here is a must!
-
4 cups (480 g) powdered sugar: This is where the frosting gets its sweetness and body.
-
3 tablespoons (45 ml) milk or cream: This adds creaminess and a silky texture.
-
1 teaspoon vanilla extract: Again, vanilla makes everything better, doesn’t it?
-
A pinch of salt: To balance all that sweetness.
-
A few drops of yellow food coloring: Get creative! The yummier the cake looks, the more fun it is to eat.
How to Make It Step-by-Step
Let’s roll up those sleeves and get baking! Here’s a detailed, step-by-step guide to creating your very own Orange Velvet Cake:
Step 1: Prepare Your Oven and Pans
Preheat your oven to 170°C (340°F). Trust me, this step is crucial. And while it’s warming up, grab those 20 cm cake pans, grease them with some butter or cooking spray, and line the bottoms with parchment paper. This will prevent any sticky disasters—because we don’t want your cake to defy gravity!
Step 2: Mix the Dry Ingredients
In a medium bowl, whisk together the flour, baking powder, baking soda, and salt. I recommend giving it a thorough whisk; it helps aerate the flour, making your cake lighter in texture.
Step 3: Cream the Butter and Sugar
In a large mixing bowl, cream together the butter and sugar until it’s light and fluffy. This should take about 5 minutes, so while you’re mixing, the sweet smell of butter might just make you a little weak in the knees. Don’t skimp on this! A fluffy mixture leads to a well-aerated batter.
After achieving that dreamy, whipped state, add the eggs one at a time. Beat after each addition until fully incorporated. "What a process!” I thought the first time I tried this, and it really was! Next, stir in the orange zest and vanilla extract, which helps to make everything come together beautifully.
Step 4: Prepare Your Liquid Mixture
In a separate bowl, combine the fresh orange juice, buttermilk (or the milk-vinegar combo), and vegetable oil. Give it a gentle whisk, and revel in that citrusy aroma—it really is something special.
Step 5: Combine Everything
Now the fun begins! Gradually add the dry ingredients to the butter mixture, alternating with the liquid mix. I like to start and end with the dry ingredients to keep the batter nice and light. Use a spatula to fold everything together just until it’s smooth. Oh! And if you’re feeling fancy and want the cake to be extra vibrant, add those drops of food coloring now.
Step 6: Bake Your Layers
Divide the batter evenly among your prepared cake pans. Bake for 25–30 minutes, or until a toothpick inserted into the center comes out clean. You’re going to love the heavenly scent wafting through your home right about now!
Once done, let the cakes cool in the pans for about 10 minutes before transferring them to a wire rack to cool completely. This is the perfect time to clean up those mixing bowls. This can be the not-so-fun part of baking, but I promise it’s worth it!
Step 7: Make Your Buttercream Frosting
While your layers cool down, let’s get started on that fluffy buttercream! In a large bowl, beat the softened butter on medium speed for 3–4 minutes until it’s light and fluffy. You might be tempted to skip this step; I did once, and let me tell you, the results weren’t great!
Gradually add in the powdered sugar and mix until combined. This can get a little messy, so don’t forget the kitchen towel shields! Pour in the milk, vanilla, and a pinch of salt, and then turn the speed to high for 3–5 more minutes. The buttercream should be light and creamy. If you like, add those drops of yellow food coloring for a cheerful tint!
Step 8: Assemble the Cake
Now for the fun part—time to assemble! Ensure your cake layers are completely cooled to avoid any meltdown issues (trust me!). If the tops are domed, you might want to carefully flatten them with a serrated knife first.
Put the first layer on your serving plate and spread a generous amount of yellow buttercream on top. Add another layer and repeat; this is where that magnificent design comes into play. Once all layers are stacked, frost the whole cake! I like to use a spatula to create a wavy texture for a whimsical look.
Step 9: Serve and Enjoy!
Honestly, step back and admire your creation! Doesn’t it just scream happiness? Now slice, serve, and watch people enjoy every single bite, knowing you made something extraordinary.
Tips for Best Results
-
Room Temperature Ingredients: Make sure all ingredients like butter and eggs are at room temperature for the best results. (I know, I know; it’s annoying to wait sometimes, but it really makes a difference!)
-
Don’t Overmix: When combining ingredients, be careful not to overmix, or the cake could turn out dense. Just mix until everything is incorporated and smooth.
-
Cool Completely: Patience is essential! Ensure the cakes are totally cool before frosting; otherwise, your buttercream could turn into a gooey mess.
Ingredient Substitutions & Variations
There are always ways to customize recipes, right? Here are some ideas to mix things up:
-
Gluten-Free Version: You can use a gluten-free flour blend instead of all-purpose flour to make this cake gluten-free. It will still deliver that velvety texture!
-
Citrus Varieties: Change up the flavor with lemon or lime juice and zest. It would give you a refreshing twist on this classic recipe.
-
Buttermilk Substitute: If you can’t find buttermilk, mixing milk plus a tablespoon of vinegar or lemon juice works just fine!
Serving Suggestions
When it comes to serving this stunning Orange Velvet Cake, the options are endless!
-
Pair it with a lovely cup of herbal tea or a refreshing iced tea. There’s something blissful about sipping tea while indulging in cake.
-
Looking for something fancier? A scoop of vanilla ice cream served alongside the cake would take things to a whole new level of delicious.
-
For a lively brunch option, serving this cake would be a showstopper alongside a full English breakfast or just a simple bowl of fresh fruits.
And let me tell you, curling up on the couch with a slice of this cake and a rom-com is total perfection!
How to Store and Reheat Leftovers
If you find yourself with leftover cake (which is a rarity in my house!), you’ll want to store it properly.
-
Cake Storage: Wrap the cake tightly in plastic wrap to seal in moisture, and keep it in the refrigerator. It’ll stay fresh for about 4–5 days.
-
Frosting: If you have extra buttercream, you can freeze it in an airtight container for up to 3 months. Just thaw it in the fridge overnight when you want to use it again!
-
Reheating: If you prefer a warm piece of cake, pop it in the microwave for about 15 seconds to get it cozy again. Just be careful not to overheat it!
Make-Ahead and Freezer Tips
This recipe can be perfect for busy days!
-
Make Ahead: You can bake the cake layers a day in advance and frost the cake just before your gathering.
-
Freezing: Freeze the unassembled cake layers for up to 3 months. Just ensure they’re well-wrapped to prevent freezer burn!
Common Mistakes to Avoid
Baking is an art, and I’ve made plenty of mistakes along the way! Here are a few to avoid:
-
Not Measuring Properly: Baking is all about precision—too much flour or sugar can throw off the entire recipe. Invest in a good kitchen scale if you can!
-
Pulling Cakes Too Early: Trust me; letting those cakes cool completely is essential to avoid disaster. Patience pays off!
-
Rushing the Mixing: Skip the temptation to just whip everything together in a hurry. Follow the steps, and you’ll be rewarded with a beautiful, fluffy cake.
Frequently Asked Questions (FAQ)
1. Can I make this cake ahead of time?
Absolutely! You can bake the layers a day ahead and frost just before serving.
2. What if I don’t have buttermilk?
Mixing regular milk with a tablespoon of vinegar or lemon juice works perfectly as a substitute.
3. Can I freeze the cake?
Yes! Freeze the layers before frosting for up to 3 months—just be sure to wrap them tightly.
Cooking Tools You’ll Need
Here’s a quick rundown of some tools that’ll make your baking experience easier:
- Mixing bowls (both large and medium)
- Measuring cups and spoons
- Whisk
- Electric mixer
- 20 cm cake pans (if you haven’t already!)
- Spatula for frosting
Final Thoughts
Baking the Orange Velvet Cake with Yellow Buttercream Frosting wasn’t just about creating a delicious treat—it was a neat little reminder of how heartfelt cooking can be. The bright colors, the sweet citrus aroma, and the joy it brings—as I sliced into it, I felt connected to my past and future in the kitchen. If you enjoyed this recipe, don’t forget to save it on Pinterest or share it with a friend!
Now, get in that kitchen and let the baking magic unfold!❤️
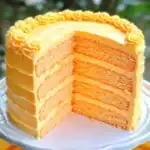
Orange Velvet Cake with Yellow Buttercream Frosting
Ingredients
For the Cake
- 2 ¾ cups 2 ¾ cups all-purpose flour Spoon the flour into your measuring cup and level it off.
- 1 ½ teaspoons 1 ½ teaspoons baking powder Leavening agent for the cake.
- ½ teaspoon ½ teaspoon baking soda Enhances the fluffiness of the cake.
- ¼ teaspoon ¼ teaspoon salt Enhances sweetness and balances flavors.
- 1 cup 1 cup unsalted butter (at room temperature) Key for a light and fluffy texture.
- 1 ¾ cups 1 ¾ cups granulated sugar Ensures a sweet, tender crumb.
- 4 large 4 large eggs (at room temperature) Provides moisture and richness.
- 1 tablespoon 1 tablespoon fresh orange zest Adds a burst of citrus flavor.
- ½ cup ½ cup fresh orange juice Freshly squeezed is best.
- 1 cup 1 cup buttermilk (or milk + 1 tablespoon vinegar) Provides moisture and tanginess.
- ¼ cup ¼ cup vegetable oil Ensures a moist crumb.
- 1 teaspoon 1 teaspoon vanilla extract Adds warmth and depth.
- a few drops a few drops of orange food coloring (optional) For aesthetics.
For the Yellow Buttercream Frosting
- 1 cup 1 cup unsalted butter (at room temperature) Soft butter is essential.
- 4 cups 4 cups powdered sugar Gives sweetness and body to the frosting.
- 3 tablespoons 3 tablespoons milk or cream Adds creaminess.
- 1 teaspoon 1 teaspoon vanilla extract Enhances flavor.
- a pinch a pinch of salt Balances sweetness.
- a few drops a few drops of yellow food coloring For a cheerful look.
Instructions
Preparation
- Preheat your oven to 170°C (340°F). Grease 20 cm cake pans and line the bottoms with parchment paper.
- In a medium bowl, whisk together the flour, baking powder, baking soda, and salt.
- In a large mixing bowl, cream together the butter and sugar until light and fluffy, about 5 minutes.
- Add the eggs one at a time, beating after each addition. Stir in the orange zest and vanilla extract.
- In a separate bowl, combine the fresh orange juice, buttermilk, and vegetable oil.
- Gradually add the dry ingredients to the butter mixture, alternating with the liquid mixture until just combined.
- Divide the batter among prepared cake pans and bake for 25-30 minutes or until a toothpick comes out clean.
- Let cakes cool in the pans for 10 minutes, then transfer to a wire rack to cool completely.
Buttercream Frosting
- In a large bowl, beat the softened butter until light and fluffy, around 3-4 minutes.
- Gradually add powdered sugar and mix until combined, then add the milk, vanilla, and a pinch of salt. Beat on high speed for 3-5 minutes until creamy.
Assembly
- Ensure cake layers are completely cooled. Level the tops if domed.
- Spread frosting on the first layer, add another layer and repeat until all layers are stacked.
- Frost the whole cake and decorate as desired.
Serving
- Slice, serve, and enjoy your delicious Orange Velvet Cake!


