
Easy Lemon Pizza: A Delightful Twist on Comfort Food
There are moments in the kitchen that are simply magical, filled with laughter, mishaps, and the comforting aroma of something delicious popping out of the oven. One such moment for me was the day I stumbled upon the idea of making Lemon Pizza. Yes, you heard that right—lemon pizza—a zesty twist on the classic that makes even the dullest of weeknights feel special.
I still remember my first attempt vividly. I had a fancy vision in my mind of a perfectly golden crust, bubbling cheese, and that unmistakable bright pop of citrus. The sun was streaming in through my kitchen window, illuminating the chaos I had created. Flour dust was everywhere, and I may—or may not—have had a minor spat with my stand mixer. Honestly, it felt like one of those cooking challenges you see on TV, and if I hadn’t laughed at myself, I would have cried. But by the time the buzzer rang, and I pulled that lemon-spiked beauty out of the oven, I realized I had created something truly special.
This isn’t just a recipe; it’s a reminder that cooking is about experimentation, fun, and a lot of heart. Whether you’re whipping it up for an easy weeknight dinner or enjoying it on a cozy Sunday afternoon, this Lemon Pizza hits all the right notes. It’s a beautiful blend of healthy comfort food that’s bound to leave a mark in your recipe book—for all the right reasons.
So, what makes Lemon Pizza so comforting and unique? Let’s dive in and explore this zesty delight together, and believe me, you’ll want to add this gem to your repertoire of budget-friendly recipes!
Why You’ll Love This Recipe
- Unique flavor profile: The combination of tangy lemon with creamy cheeses creates a flavor explosion.
- Simple ingredients: You likely have most of these pantry staples already—making it easy for last-minute cooking.
- Perfect for picky eaters: The fresh herbs and melty cheese are family-approved, even for those who might hesitate before trying something new.
- Great for meal prep: This recipe keeps well in the fridge, making it an ideal choice for quick family meals.
- Versatile topping options: Feeling spicy? Add some red pepper flakes! Want something richer? Top it off with more cheese! The choices are endless.
- A great conversation starter: Walk into a gathering with a Lemon Pizza in hand, and trust me, it will steal the spotlight.
Honestly, it feels like a hug in a bowl.
What Makes This Recipe Special?
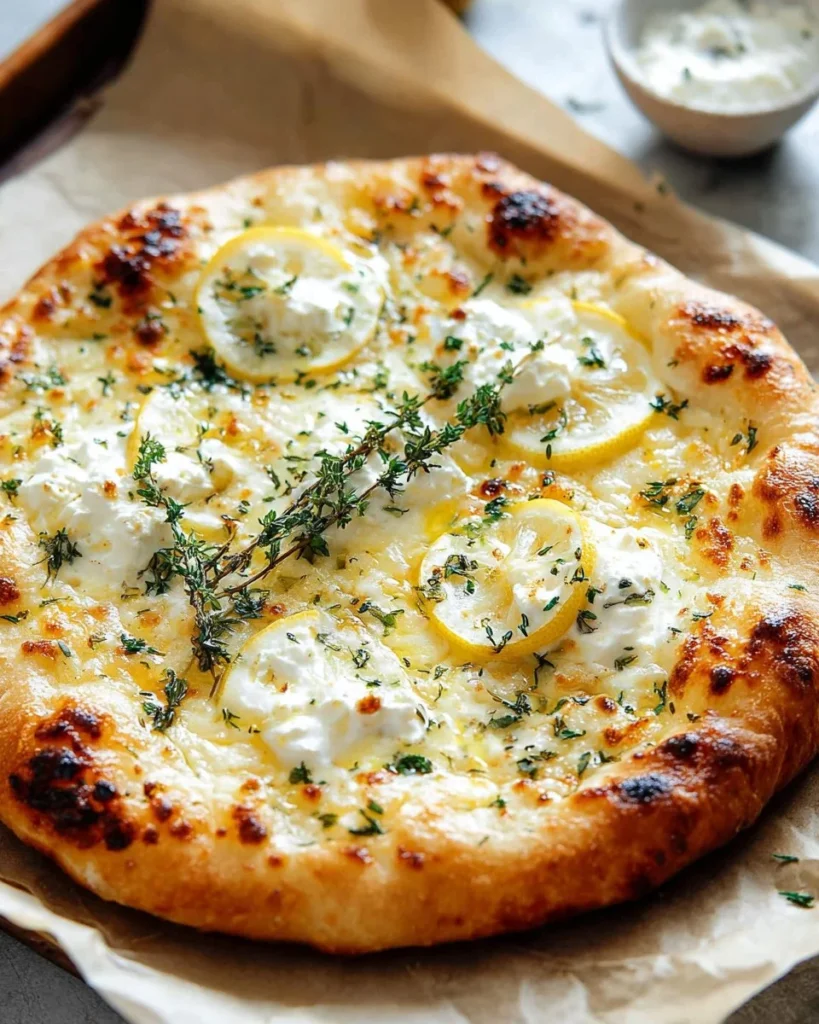
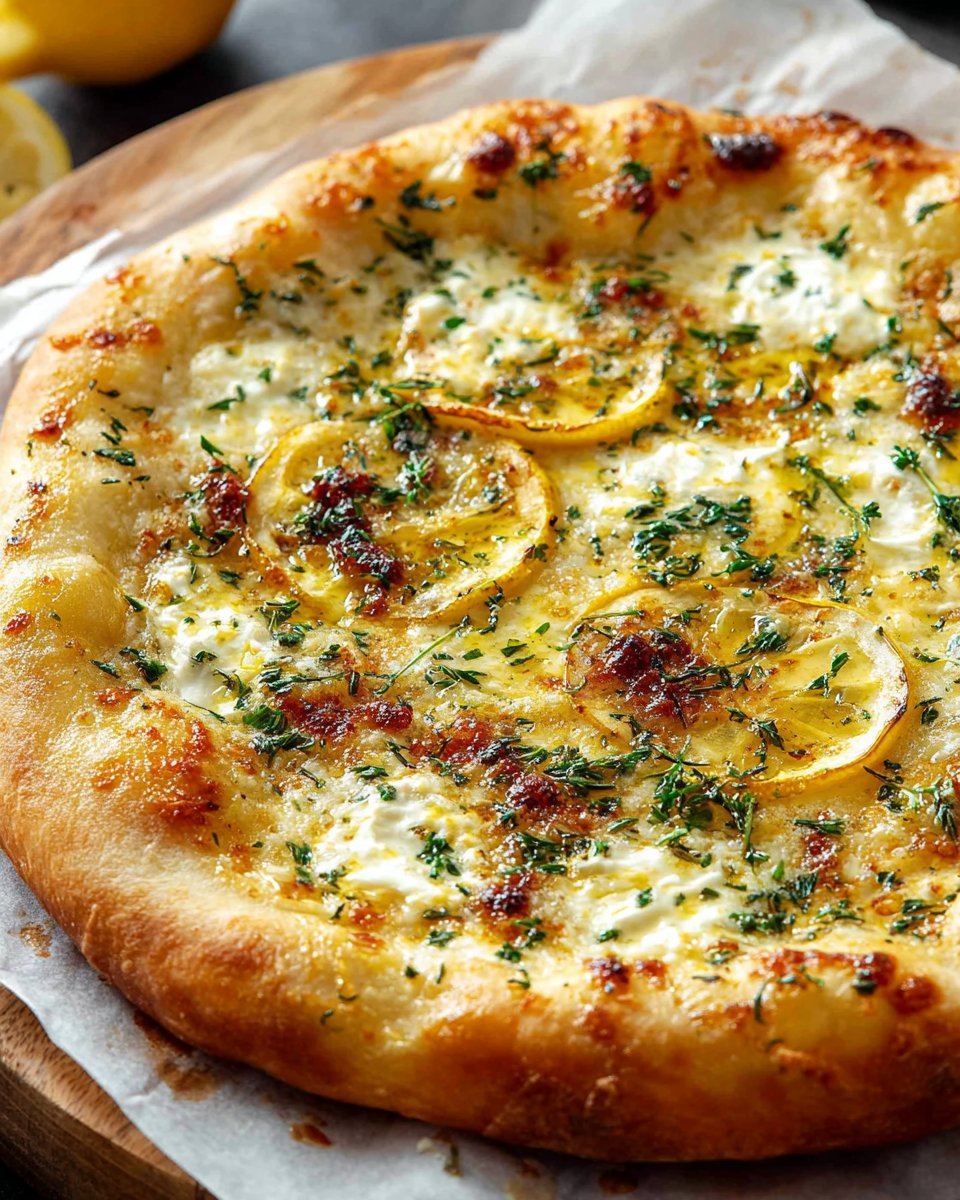
Lemon Pizza stands out because of its refreshing take on a universally loved dish. The bright zest of lemon pairs beautifully with the creamy textures of ricotta, mozzarella, and Parmesan, resulting in a combination that’s both indulgent and light. The addition of fresh thyme brings a subtle earthiness that rounds out the lemon’s brightness. This isn’t just pizza; it’s a culinary adventure.
The first time I took a bite, I was quite surprised. The lemon zest made the cheese utterly sing. It was a vibrant, refreshing contrast to what I expected with pizza. The honey drizzle on top added a sweet finish that was simply genius. Who knew something so simple could bring so much joy?
Now, let’s chat about the ingredients that make this creation possible.
Ingredients
- 2 cups all-purpose flour: The backbone of the crust. Go for all-purpose for a perfect balance of chewiness and crispiness.
- 1 teaspoon salt: Brings out the flavors and balances the sweetness.
- 1 tablespoon olive oil: Adds richness to the dough and creates a golden crust.
- 1/2 cup warm water: Activates the yeast for that lovely rise.
- 1 teaspoon active dry yeast: The magical ingredient that makes the dough rise and become fluffy.
- 1 tablespoon sugar: Feeds the yeast, helping it do its job.
- 1 tablespoon lemon zest: The star of the show, providing that bright, aromatic flavor.
- 1 tablespoon lemon juice: Adds acidity and enhances the citrusy notes of the dish.
- 1/4 cup ricotta cheese: Creamy and slightly sweet, giving the pizza its delightful creaminess.
- 1/2 cup mozzarella cheese: For that gooey, melty goodness we all know and love.
- 1/4 cup Parmesan cheese: Imparts a rich, nutty flavor that complements the other cheeses beautifully.
- 1 tablespoon fresh thyme: Adds a fresh, herbal note that pairs well with lemon.
- 1 tablespoon olive oil (for drizzling): A finishing touch that enhances the flavors.
- 1 tablespoon honey: A drizzle that balances the lemon’s acidity with sweetness.
- 1/2 teaspoon red pepper flakes (optional): For those who want to add a kick.
While I’m wholeheartedly in love with this recipe, there are a few things to keep in mind. Avoid adding too much lemon juice—balance is key! Also, if you’re feeling adventurous (which you should be!), swap in some seasonal toppings like sautéed mushrooms or roasted asparagus.
How to Make It Step-by-Step
Let’s get cooking!
-
Activate the Yeast: In a medium bowl, combine the warm water, sugar, and active dry yeast. Stir gently and let it sit for about 5 minutes, or until the mixture becomes frothy. If it doesn’t froth, your yeast may be expired—always check the date!
-
Mix the Dry Ingredients: In a separate large bowl, mix together the all-purpose flour and salt. This step is crucial for ensuring that the dough has a cohesive flavor from the start.
-
Bring It All Together: Once your yeast mixture is frothy, add it to the flour and salt mixture. Add the olive oil and mix until a dough begins to form. At this point, it’s going to look pretty shaggy, but don’t worry—this is just the beginning.
-
Knead the Dough: Turn the dough out onto a lightly floured surface. Knead it for about 8-10 minutes. It should be smooth, elastic, and bounce back when you poke it. This is a great workout for those days you can’t hit the gym—bonus!
-
Let It Rise: Place the kneaded dough into a lightly oiled bowl and cover it with a clean kitchen towel. Let it rise in a warm place for 1 to 1.5 hours, or until it doubles in size. I usually tuck mine away in the oven (turned off, of course), and that works wonders!
-
Prepare the Cheese Mixture: While the dough is rising, let’s get that zesty topping ready. In a small bowl, mix together the ricotta cheese, mozzarella cheese, and Parmesan cheese. Stir in the lemon zest and lemon juice until everything is well-combined. Trust me; this mixture will be incredibly satisfying to taste along the way.
-
Preheat the Oven: Once the dough has risen, preheat your oven to 475°F (245°C). If you have a pizza stone, place it inside the oven. This ensures that you get that lovely crust.
-
Shape the Dough: Punch the dough down to release any trapped air bubbles—it’s oddly satisfying, honestly. Then turn the dough out onto a floured surface and roll it into a thin round shape, about 12 inches in diameter. You know, don’t stress too much about making it perfectly round; rustic textures have their charm.
-
Add the Toppings: Transfer the rolled-out dough onto a piece of parchment paper (or a pizza peel if you’re fancy). Spread the cheese mixture evenly over the surface of the dough, leaving a small border around the edges for a crust. Then, sprinkle fresh thyme over the cheese mixture. Here’s where your house will smell divine!
-
Bake It Up: Carefully slide the parchment paper with the pizza onto the preheated pizza stone or baking sheet in the oven. Bake for 10-12 minutes, or until the crust is golden and the cheese is bubbling and lightly browned. This is the moment when the entire house fills with that irresistible smell, drawing everyone in.
-
Finishing Touches: Remove the pizza from the oven and drizzle the top with a tablespoon of olive oil and a tablespoon of honey. If you want a bit of heat, sprinkle red pepper flakes over the pizza. This will make it feel fancy—like you’re dining out!
-
Cool and Serve: Allow the pizza to cool for a couple of minutes before slicing and serving. I always find that the first slice tends to fall apart, but hey, it just means I get to have the first taste without the fuss.
Y’all, this pizza is so worth every bit of patience and chaos from the prep. You’ll want to grab a slice with a side of your favorite rom-com playing in the background—that’s perfection if you ask me!
Tips for Best Results
- Flour Variety: If you’re feeling adventurous, try using whole wheat flour for a different flavor and added nutrients. It might require a little more water, so keep an eye on your dough.
- Herb Substitutions: If you’re not a thyme fan, lemon balm or even basil can be fantastic substitutes. It’s all about what tickles your taste buds!
- Resting the Dough: The longer you let the dough rest, the better it develops flavor. If you can spare it, let it chill in the fridge overnight for an even tastier experience.
Ingredient Substitutions & Variations
- Dairy-Free Option: If you want to skip the cheese, give a cashew cream a try. Just soak cashews and blend them with lemon juice for a creamy topping that’s plant-based and delicious!
- Pesto Base: Instead of the cheese mix, why not try a pesto sauce? It adds a completely different layer of flavor and pairs well with the lemon zest.
- Seasonal Toppings: Feel free to add seasonal veggies when you’re piling on the toppings. Roasted zucchini or cherry tomatoes could make fantastic additions.
Directions
- Activate yeast.
- Mix dry ingredients.
- Combine wet and dry ingredients.
- Knead and let rise.
- Prepare cheese mixture.
- Preheat oven.
- Shape dough and add toppings.
- Bake and enjoy!
If you’re a beverage lover, I recommend pairing this pizza with a crisp white wine or sparkling water with lemon for a refreshing touch!
How to Store and Reheat Leftovers
Storing leftover Lemon Pizza is a breeze. Just place any uneaten portions in an airtight container in the fridge. It should last for about four days—if it lasts that long! When you’re ready to enjoy a slice, simply pop it in the oven at 350°F for about 5-7 minutes until warmed through. I’ve tried microwaving it, but the crust just doesn’t have that same crunch—so oven is the way to go!
Make-Ahead and Freezer Tips
You can make the dough ahead of time and then freeze it! Simply wrap the uncooked dough in plastic wrap and pop it in an airtight bag before putting it in the freezer. When you’re ready to make your pizza, just thaw it out in the fridge overnight, and you’ll be good to go!
Common Mistakes to Avoid
- Too Much Water: When combining the dough, avoid adding too much water too quickly. Go slow to ensure the proper texture—nothing worse than a soggy crust!
- Not Preheating: Always preheat that oven! If you place your pizza in a cold oven, it may not rise as beautifully, and you’ll miss out on that golden crispiness.
Frequently Asked Questions (FAQ)
1. Can I add more toppings?
Absolutely! Just be mindful not to overload it, as this could make the crust soggy.
2. What can I use if I don’t have fresh herbs?
Dried herbs work—just be careful with the amount since dried herbs are more potent.
3. Is it okay to use gluten-free flour?
Yes! Just ensure you’re using a reliable mix that has been specifically created for baking, as the results can vary greatly.
4. Can I prepare the dough in advance?
You can. Just allow it to rise, punch it down, and then stash it in the fridge until you’re ready to use it within a couple of days.
Cooking is a journey full of discovery! Learning something new is what makes it all worthwhile, and through mishaps and successes, think of how far you’ve come.
Cooking Tools You’ll Need
- Mixing bowls
- Measuring cups and spoons
- Rolling pin
- Pizza stone or baking sheet
- Parchment paper or pizza peel
Final Thoughts
As I reflect on my culinary adventure with Lemon Pizza, it feels like more than just a recipe; it encapsulates a joyful experience in the kitchen. Cooking shouldn’t be about perfection but rather embracing the process—flour dust, laughter, and all!
I encourage you to take this recipe and make it your own. Play around with flavors, get the kids involved, or even host a fun pizza night with friends. If you enjoyed this recipe, don’t forget to save it on Pinterest or share it with a friend! Let’s spread the joy of cooking together. Happy eating!

Lemon Pizza
Ingredients
Dough Ingredients
- 2 cups all-purpose flour The backbone of the crust.
- 1 teaspoon salt Balances the sweetness.
- 1 tablespoon olive oil Adds richness to the dough.
- 1/2 cup warm water Activates the yeast.
- 1 teaspoon active dry yeast Makes the dough rise.
- 1 tablespoon sugar Feeds the yeast.
Topping Ingredients
- 1 tablespoon lemon zest Provides bright flavor.
- 1 tablespoon lemon juice Enhances citrusy notes.
- 1/4 cup ricotta cheese Adds creaminess.
- 1/2 cup mozzarella cheese Gooey melty goodness.
- 1/4 cup Parmesan cheese Rich, nutty flavor.
- 1 tablespoon fresh thyme Adds herbal note.
- 1 tablespoon olive oil (for drizzling) Finishing touch.
- 1 tablespoon honey Balances acidity with sweetness.
- 1/2 teaspoon red pepper flakes (optional) For added heat.
Instructions
Preparation
- In a medium bowl, combine the warm water, sugar, and active dry yeast. Stir gently and let it sit for about 5 minutes until frothy.
- In a separate large bowl, mix together the all-purpose flour and salt.
- Once the yeast mixture is frothy, add it to the flour and salt mixture along with the olive oil. Mix until a shaggy dough forms.
- Turn the dough out onto a lightly floured surface and knead for about 8-10 minutes until smooth and elastic.
- Place the kneaded dough in a lightly oiled bowl, cover with a clean kitchen towel, and let it rise in a warm place for 1 to 1.5 hours until doubled in size.
Topping Preparation
- While the dough is rising, mix the ricotta, mozzarella, Parmesan, lemon zest, and lemon juice in a small bowl until well combined.
Baking
- Preheat the oven to 475°F (245°C) and place a pizza stone inside if available.
- Once the dough has risen, punch it down and roll it out on a floured surface into a thin round, about 12 inches in diameter.
- Transfer the rolled-out dough onto parchment paper, spread the cheese mixture evenly, and sprinkle fresh thyme on top.
- Carefully slide the pizza onto the preheated pizza stone or baking sheet. Bake for 10-12 minutes until the crust is golden and the cheese is bubbly.
- Remove from the oven and drizzle with olive oil and honey. Optionally sprinkle with red pepper flakes.
- Allow to cool for a couple of minutes before slicing and serving.


