
Easy Berry Midnight Velvet Slice – Indigo Temptation Recipe
There’s something wonderfully nostalgic about baking, especially when it involves a delightful dessert that tinges the kitchen with sweet aromas and echoes warm memories. I often find myself floating back in time, to my grandmother’s kitchen where her priceless collection of mismatched aprons would sway slightly as she whisked and folded fluffy cake batters with a passion I could never quite replicate. One particular recipe that has made its way into my heart—and of course, my kitchen—is the Berry Midnight Velvet Slice, affectionately dubbed Indigo Temptation.
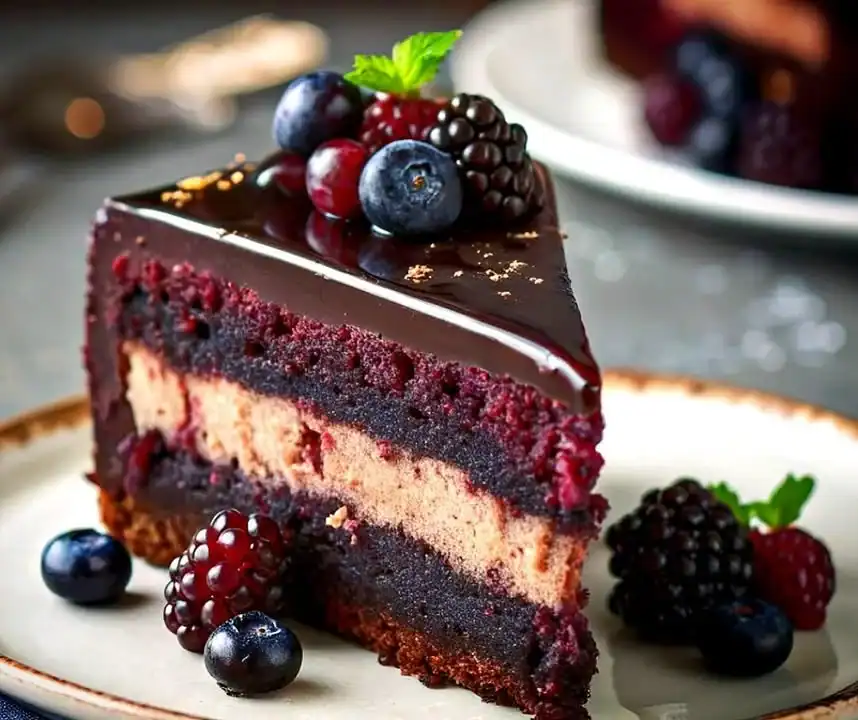
This dessert is a luscious layered cake that combines rich chocolate, velvety vanilla cream, and a tart berry layer that sings of summer bliss. Honestly, who can say no to chocolate and berries? Just thinking about it brings back the sun-drenched afternoons spent with family, laughing over dessert and sharing stories that could make anyone believe in magic. Are you drooling yet? This recipe is my go-to when I want to bring a little joy into my home (and trust me, it works like a charm!).
Picture this: It’s a rainy Sunday afternoon, cozy blankets wrap around you like a warm hug, and you’re craving something special. This recipe isn’t just about the dessert; it’s about the experience—the warmth of your kitchen, the sounds of mixing and pouring, and that first warm slice melting in your mouth. Each bite of this Berry Midnight Velvet Slice feels like a hug in a bowl, perfect for sharing or savoring alone. And let’s be real, who doesn’t need a little bit of comfort food to lift their spirits?
So, put on your favorite playlist and prepare to create something that will not only impress guests but also evoke some of that sweet nostalgia. Trust me; whatever chaos unfolds in the kitchen, it’s all part of the adventure. Let’s dive into this deliciously messy journey!
Why You’ll Love This Recipe
- Layered Heaven: With its chocolate base, creamy vanilla filling, and vibrant berry topping, every bite is a new adventure in flavor.
- Family Approved: This is a crowd-pleaser! Even the pickiest eaters will be drawn to its silky chocolate and comforting textures.
- Meal Prep Wins: It slices beautifully, making it a brilliant choice for dessert prep—perfect for any occasion, whether it’s a simple weeknight dinner or a fancy gathering.
- Amazing Leftovers: If there are leftovers, you’ve already won. It tastes just as heavenly cold the next day (or at midnight!).
- Impressive Presentation: The mirror glaze gives it a luxurious finish that looks pretty darn impressive, making you the star of any dessert table.
- Comforting and Cozy: Seriously, with each ingredient, it wraps you in warmth and nostalgia. Perfect for when you want something to feel like a hug.
What Makes This Recipe Special?
Honestly, each layer has its own little touch of uniqueness. The Berry Midnight Velvet Slice combines rich cocoa and sugar to create a chocolate base that fills the kitchen with the best aroma. Meanwhile, the creamy vanilla layer adds a tender whisper of sweetness that balances everything out perfectly, making it ideal for those of us who crave both chocolate and cream. And the berry layer? Oh, it’s a burst of fruity goodness that serves as the tart contrast every great dessert needs.
This dessert is also about the unexpected. You might think you’re just making a cake, but then you add the berry layer, and suddenly it transforms into something stunningly beautiful. My first attempt at this recipe resulted in a gooey disaster—I didn’t let the layers cool enough before stacking! Oops! Lessons learned, right? But with a little patience and a few trials, I crafted this version that I can proudly share with you.
Ingredients
- 1 1⁄2 cups (190 g) flour: This is the foundation of our cake, and while it seems straightforward, it provides the perfect structure.
- 3⁄4 cup (75 g) cocoa powder: The soul of the cake! Use a good quality cocoa for that rich chocolate flavor.
- 1 1⁄2 cups (300 g) granulated sugar: Sweetness! It creates balance, but don’t be shy to adjust according to your taste.
- 1 teaspoon baking powder: This adds a lightness that keeps your cake fluffy.
- 1/2 teaspoon baking soda and 1/2 teaspoon salt: Essential for controlling flavors and helping the cake rise properly.
- 2 large eggs: Acts as the binding agent. Look for farm-fresh eggs if you can!
- 3⁄4 cup (180 ml) milk: Adds moisture—adjust your dairy preferences here if needed.
- 1/2 cup (120 ml) vegetable oil: Each bite should be moist, and oil does just that while cutting down on the heaviness.
- 3⁄4 cup (180 ml) hot water or coffee: The secret to rich chocolate flavor without the weight—coffee amplifies the taste.
- 1 teaspoon vanilla extract: Never skimp! This adds a warm, inviting note to your cake.
- 400 ml milk: For the creamy vanilla layer; again, choose your favorite kind—almond or oat works too!
- 3 tablespoons cornstarch and 1 tablespoon flour: These create stability in the vanilla layer, helping it set perfectly.
- 1/2 cup (100 g) granulated sugar for the cream: Sweetening up the vanilla cream makes it the delight it deserves to be.
- 1 teaspoon vanilla extract or bean: A bit of extra flavor; if using a bean, the little specks elevate it visually and taste-wise.
- 1 tablespoon butter: Adds richness—don’t skip it, please!
- 100 ml cream (chilled): For the dreamy texture in the vanilla cream layer.
- 150 g blueberries and 100 g blackberries: Fresh flavors that sing of summer; use frozen if that’s what you have!
- 2 tablespoons sugar, 1 teaspoon lemon juice: Elevates the sweetness and gives depth to the berries.
- 1 teaspoon cornstarch (dissolved in water): Thickens the berry mix to prevent it from oozing everywhere.
- 150 g powdered sugar for the mirror glaze: This makes the glaze glossy and stunning—presentation matters!
- 100 ml water and 100 g glucose syrup or honey for sweetness: That slight sweetness plus a perfect consistency.
- 75 g cocoa powder for the glaze: Ensures it retains that shimmery chocolate appeal.
- 100 ml cream: To mix in for a smooth glaze.
- 5 g gelatin (1 sheet or 1 teaspoon powder): We want that luxurious finish, right? Gelatin helps set the glaze and gives it the bounce-back quality we love.
Oh, and a word of caution—never, I mean never, try to hurry the cooling process unless you want an avalanche of layers collapsing. Patience, my friend!
How to Make It Step-by-Step
Now, let’s get our hands messy and dive into making this heavenly dessert. Expect some delights and disasters; kitchen adventures are never straight paths!
Step 1: Mixing the Cake Batter
Start off by preheating your oven to 350°F (175°C). Trust me; you want your oven to be nice and toasty. Grab two 9-inch round cake pans and grease them, or line them with parchment paper—this helps prevent the cake from sticking.
In a large mixing bowl, sift together the flour, cocoa powder, baking powder, baking soda, and salt. Give it a good mix; this combines the leavening agents with the dry ingredients, ensuring your cake rises beautifully.
In another bowl, whisk together the eggs, milk, vegetable oil, and vanilla extract. Honestly, just the smell of vanilla at this stage makes you feel like a baking wizard. Gradually add the hot water or coffee into the mixture, stirring as you go—this is what makes the cake incredibly moist. Once blended, add this psychedelic mix to the flour mixture and mix gently until just combined. Don’t overdo it; a few lumps are perfectly okay!
Now, divide the batter evenly between your prepared cake pans and bake for 25-30 minutes. You can test for doneness with a toothpick; it should come out clean or with a few moist crumbs attached. While those beauties rise and bake, the smell will envelop your home in a comforting embrace!
Step 2: Preparing the Berry Layer
While the cake is baking, it’s time to tackle that berry layer! In a saucepan over medium heat, toss in your washed blueberries, blackberries, sugar, and a splash of lemon juice. The brilliance of this step is witnessing those beautiful berries bursting and releasing their juice. Stir occasionally until it thickens (about 5-7 minutes) and then dissolve a teaspoon of cornstarch in a bit of water before adding it to the simmering berries. Once the berry mix gets that delightful syrupy texture, remove it from the heat and let it cool—it should be thick but not jelly-like.
Step 3: Crafting the Vanilla Cream Layer
Next, let’s whip up the creamy layer that adds the sweet contrast to our cake. In another saucepan, combine milk, cornstarch, flour, and sugar. Stir continuously over medium heat. There’s something soothing about watching the ingredients come together, thickening to a custard-like consistency. When it starts to bubble, remove it from the heat, and whisk in your butter until it melts into creamy perfection. Let this cool to room temperature before gently folding in the chilled cream. Trust me; this vanilla cream layer is going to be the stuff dreams are made of!
Step 4: Making the Mirror Glaze
Now, for the pièce de résistance—the shiny mirror glaze! Have your gelatin soaking in cold water while you heat up water, glucose syrup, and cocoa powder in a saucepan. After it boils, lower the heat and add the cream while mixing it gently. When the mixture reaches 60°C (140°F), add the soaked gelatin and stir until dissolved. Oh, this will be the moment you feel like a true pastry chef! After you’ve mixed everything nicely, strain it through a sieve into a jug to remove any lumps—smoothness is key to that gorgeous shiny surface.
Step 5: Layering It All Up
With everything ready and cooled, it’s layering time! Here’s how it should go down:
- Start with a chocolate layer on the bottom of a serving platter.
- Spread a generous layer of vanilla cream over it—this is where the magic begins.
- Next, spoon on that berry layer that’s cooled and thickened. You want to see it peek out between layers; it makes it look even more spectacular!
- Repeat with another layer of chocolate cake followed by vanilla cream.
Now, pop this beauty in the fridge to set for at least 1-2 hours. It’s the perfect opportunity to have a cup of tea and check your social media feeds, maybe even do a little bit of self-reflecting on whether or not you’ll eat the whole cake yourself later!
Step 6: Pouring the Mirror Glaze
Once your cake is set and chilled, it’s time to pour that glossy mirror glaze over—honestly, this is the moment of truth! Start by placing the cake on a wire rack with a tray underneath to capture the drips. Pour the glaze right in the middle and let it elegantly flow to the edges—watching it cascade is practically hypnotic!
After it sets for a few minutes, sprinkle on some blueberry pearls (if you’re fancy like that) for extra flair. Once set, this cake is truly a showstopper!
Tips for Best Results
- Make sure your ingredients are at room temperature before starting; this helps them combine more seamlessly.
- Don’t rush the baking process; let the cake cool down thoroughly before layering to prevent a soggy disaster!
- If you notice lumps in your glaze, don’t panic. Straining will help achieve that velvety smooth finish.
Ingredient Substitutions & Variations
- Add a splash of orange or almond extract to the vanilla layer for an unexpected flavor twist.
- Use any berries you love, or even make it seasonal with cherries or strawberries!
- If you want to go keto, try swapping regular sugar for erythritol and use coconut cream in place of regular cream.
Serving Suggestions
This decadent dessert pairs beautifully with a dollop of freshly whipped cream or a scoop of vanilla ice cream. If you’re feeling extra cozy, this is perfection served alongside a hot cup of cocoa or your favorite herbal tea. Cozy movie nights become instant highlights when you slide a generous slice on a plate, wrapped in that warmth of sweet memories and delightful flavors!
How to Store and Reheat Leftovers
Let’s be real; who doesn’t love a midnight slice of cake? If you have any leftovers, you can store them in an airtight container in the fridge for about 3-4 days. You don’t need to reheat; it’s actually more delicious when enjoyed cold! Just slice and enjoy anytime cravings hit—midnight snack, anyone?
Make-Ahead and Freezer Tips
This dessert can be made a day in advance. In fact, it gets even better as the layers meld together overnight! If you want to prepare it ahead of time for a gathering, you can assemble it without the glaze and refrigerate. Just glaze it right before serving to keep that shiny finish intact.
Planning to freeze it? Wrap individual slices tightly in foil and then in freezer bags. They’ll last up to three months if you can resist the temptation!
Common Mistakes to Avoid
- Overmixing your batter may lead to a denser texture—mix just until combined!
- Forgetting to let layers cool can result in a gooey mess—patience is key with this recipe.
- Don’t skip the straining step for your glaze; those little lumps could ruin the shine!
Frequently Asked Questions (FAQ)
Can I use a different type of fruit in this recipe?
Absolutely! Swap for your favorite fruits—think strawberries, raspberries, or even tropical options like mango!
How do I know when my cake is done baking?
Insert a toothpick in the center; if it comes out clean (or with just a few crumbs), you’re good to go!
Can I make this dessert gluten-free?
Yes! Simply substitute standard flour with a gluten-free blend.
Cooking Tools You’ll Need
- Mixing bowls
- Whisk
- Measuring cups and spoons
- Rubber spatula
- Saucepan for cooking
- Toothpicks for testing
- Baking pans and wire rack
Final Thoughts
This Berry Midnight Velvet Slice – Indigo Temptation is so much more than just a dessert. It’s a recipe that bridges generations, evokes beautiful memories, and most importantly, it creates new ones. It calls out for a cozy evening amongst friends or an intimate moment spent savoring life’s sweetest things—desserts included!
If you enjoyed this recipe or have your own story to share about baking it, I’d love to hear from you! Whether it’s a kitchen mishap, a triumphant “nailed it” moment, or just a warm memory, please share in the comments.
And hey, if you found this post delightful, don’t forget to save it on Pinterest or share it with a friend! Happy baking!
Berry Midnight Velvet Slice
Ingredients
For the Cake
- 1.5 cups 1 1⁄2 cups (190 g) flour Provides the perfect structure.
- 0.75 cups 3⁄4 cup (75 g) cocoa powder Use a good quality cocoa for rich chocolate flavor.
- 1.5 cups 1 1⁄2 cups (300 g) granulated sugar Sweetness can be adjusted to taste.
- 1 teaspoon 1 teaspoon baking powder Adds lightness to the cake.
- 0.5 teaspoon 1/2 teaspoon baking soda Essential for helping the cake rise.
- 0.5 teaspoon 1/2 teaspoon salt Controls flavor.
- 2 large 2 large eggs Acts as the binding agent.
- 0.75 cups 3⁄4 cup (180 ml) milk Adjust according to dairy preferences.
- 0.5 cups 1/2 cup (120 ml) vegetable oil Keeps cake moist.
- 0.75 cups 3⁄4 cup (180 ml) hot water or coffee Enhances chocolate flavor.
- 1 teaspoon 1 teaspoon vanilla extract Adds warmth to the cake.
For the Vanilla Cream Layer
- 400 ml 400 ml milk Choose your favorite type.
- 3 tablespoons 3 tablespoons cornstarch Provides stability.
- 1 tablespoon 1 tablespoon flour Aids in setting the vanilla layer.
- 0.5 cups 1/2 cup (100 g) granulated sugar Sweetens the vanilla cream.
- 1 teaspoon 1 teaspoon vanilla extract or bean Adds flavor.
- 1 tablespoon 1 tablespoon butter Adds richness.
- 100 ml 100 ml cream (chilled) For dreamy texture.
For the Berry Layer
- 150 g 150 g blueberries Fresh flavors.
- 100 g 100 g blackberries Fresh flavors.
- 2 tablespoons 2 tablespoons sugar Elevates sweetness.
- 1 teaspoon 1 teaspoon lemon juice Adds depth to berries.
- 1 teaspoon 1 teaspoon cornstarch (dissolved in water) Thickens the berry mix.
For the Mirror Glaze
- 150 g 150 g powdered sugar Makes the glaze glossy.
- 100 ml 100 ml water Base for glaze.
- 100 g 100 g glucose syrup or honey Adds sweetness.
- 75 g 75 g cocoa powder Retains chocolate appeal.
- 100 ml 100 ml cream For mixing glaze.
- 5 g 5 g gelatin (1 sheet or 1 teaspoon powder) Helps set the glaze.
Instructions
Mixing the Cake Batter
- Preheat your oven to 350°F (175°C). Grease two 9-inch round cake pans or line them with parchment paper.
- In a large mixing bowl, sift together flour, cocoa powder, baking powder, baking soda, and salt.
- In another bowl, whisk eggs, milk, vegetable oil, and vanilla extract. Gradually add hot water or coffee to the mixture.
- Combine the wet ingredients with dry ingredients and mix gently until just combined. Divide the batter into prepared pans and bake for 25-30 minutes.
Preparing the Berry Layer
- In a saucepan over medium heat, combine blueberries, blackberries, sugar, and lemon juice. Cook until thickened (about 5-7 minutes).
- Dissolve cornstarch in water and add to the berry mix until it reaches a syrupy texture.
Crafting the Vanilla Cream Layer
- In a saucepan, mix milk, cornstarch, flour, and sugar. Stir continuously until thickened.
- Remove from heat and whisk in butter. Let cool and fold in chilled cream.
Making the Mirror Glaze
- Soak gelatin in cold water. In a saucepan, heat water, glucose syrup, and cocoa powder until it boils.
- Lower heat, add cream, mix gently, and then stir in dissolved gelatin until smooth.
- Strain the mixture into a jug to remove lumps.
Layering It All Up
- Place the first chocolate layer on a serving platter, top with vanilla cream, then berry layer. Repeat with another layer.
- Chill in fridge for 1-2 hours.
Pouring the Mirror Glaze
- Place the cake on a wire rack. Pour the glaze over the center and let it flow to the edges.
- Sprinkle on blueberry pearls if desired and allow to set.


