
The Best Easy White Forest Cake: A Delicious Memory Lane
Ah, cake! It holds a special place in my heart, just like it does for so many of us. There’s something about the allure of baking a cake that takes me back to my childhood. I remember those cozy afternoons in the kitchen, whisking flour into a delightful cloud of sweet surprises. Growing up, the highlight of birthdays wasn’t just the presents; it was that first slice of cake, revealing layers of flavor, light frostings, and often a special spice of nostalgia. I couldn’t help but smile as the scent of baked goods would waft through the house, filling the air with sweetness and warmth.
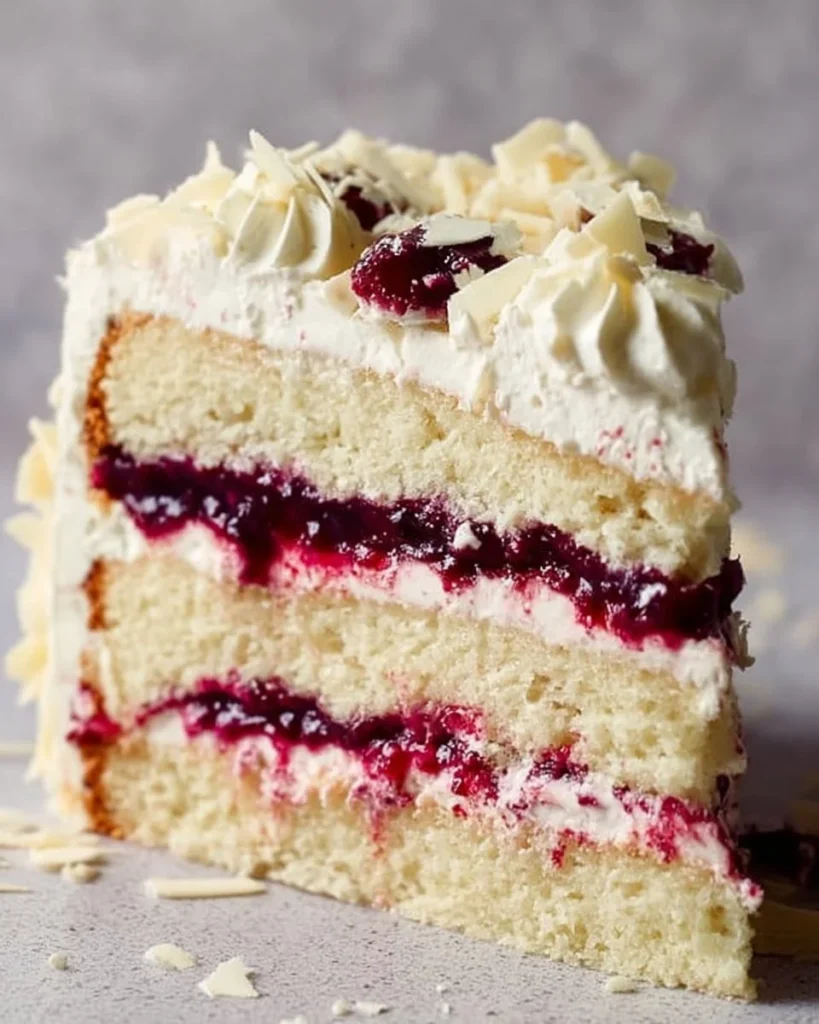
One cake that always stood out for me is the enchanting White Forest Cake. Sure, it’s a playful cousin of the famed Black Forest, where dark cherries dive into a rich chocolate base, but I promise you, this one—a fluffy white cake layered with cherries and luscious whipped cream—packs its own charm. It’s like that friend who shows up fashionably late and steals the show without even trying!
I stumbled onto this recipe during one of those all-too-frequent kitchen meltdowns. You know the kind—you’re racing against the clock to impress a friend, and chaos ensues. There I was, frantically flipping through my cookbooks, and then I saw it like a beacon. “White Forest Cake” jumped off the page, promising an easy yet sophisticated dessert that could save the day. Seven layers of fluffy, fluffy goodness, and guess what? I could decorate it with roughly shredded white chocolate! I figured, even if the frosting slid around like a party crasher, the taste would forgive my less-than-perfect skills.
For this little creation, I needed to be all about cozy vibes. Picture crisp autumn leaves against a bright blue sky; that’s how this cake makes me feel—warm, inviting, with the promise of good times ahead as we gather around the kitchen table. So, let’s dive into the world of cake-making chaos and embrace our inner bakers, shall we?
Why You’ll Love This Recipe
-
Ease: Even if you’re a novice baker like I was, this cake won’t give you the kind of existential crisis that turning your kitchen into a science lab does.
-
Comforting Quirk: The mix of fluffy cake, creamy whipped frosting, and tart cherries feels like a warm hug. Seriously, it’s the “cozy sweater” of cakes.
-
Perfectly Shareable: Bake this for a gathering, and you’ll be the star of the evening.
-
Leftover Magic: Assuming there are leftovers (which may be unlikely), this cake stays delicious for days.
-
Picky-Eater Approved: If you’ve got children at home or friends with limited palates, this cake is a solid win—who can resist whipped cream and cherries?
-
Nostalgia Central: It’s a cake that evokes memories of those special moments, whether with family or friends, making any gathering feel extra special.
What Makes This Recipe Special?
There’s a unique blend of flavors in the White Forest Cake that really gets the taste buds going. First, the tender crumb of the cake itself whispers elegance, while the heavenly whipped cream levels up the lusciousness. And oh, the cherries! They bring a bright, fruity burst that counterbalances the sweetness. Grated white chocolate sprinkled on top is like a fairy-tale ending that leaves you wanting more!
And speaking of the cherries, you can use fresh ones, like I typically do when they are in season. But during the colder months, I often lean toward good-quality jarred cherries. You’ll still get that pop of flavor without sacrificing the joy of crafting a lovely dessert.
Ingredients
-
1 1/2 cups all-purpose flour: The foundation of our cake. It gives structure without being too dense.
-
1 1/2 teaspoons baking powder: This little agent guarantees our cake rises beautifully, leading to that airy texture we all crave.
-
1/2 teaspoon baking soda: Combined with our acidic buttermilk, it helps give the batter that extra lift.
-
1/4 teaspoon salt: Just a pinch to balance out the sweetness.
-
1/2 cup unsalted butter, softened: This is where the magic begins! Butter means flavor, and I promise you won’t regret indulging in it.
-
1 cup granulated sugar: Sweetness amplified. Who can resist?
-
2 large eggs: These enhance richness and moisture. Gospel: Always use room-temperature eggs for optimal mixing.
-
1 teaspoon vanilla extract: It brings a nostalgic aroma that dances around the kitchen.
-
1/2 cup buttermilk: It’s a game-changer for moistness and flavor. If you don’t have any, you can make a substitute with regular milk and a little lemon juice.
-
1 cup whipped cream: The fluff factor! I recommend making your own, but store-bought can do in a pinch.
-
1/2 cup white chocolate, grated: Because why not bring a little decadence?
-
1/2 cup cherries, pitted and sliced: The star of our cake—use ones in syrup if fresh isn’t an option.
-
Powdered sugar for dusting: Just a little touch makes it look fancy—like you totally meant for this to be fancy all along.
Tip: Always measure your flour correctly! Spoon it into the measuring cup and level it off for the best results. Trust me, I learned this the hard way after a “flour avalanche” incident once. That was not my finest hour!
How to Make It Step-by-Step
Let’s put on our aprons and dive into the sweet chaos of baking!
1. Preheat and Prepare
Start off by preheating your oven to 350°F (175°C). Okay, while that’s heating up, get your 6-inch round cake pan and grease the sides. Then flour it. My first attempt? Let’s just say the cake didn’t want to leave the pan. It was more of a ‘thanks for the space’ kind of vibe. None of that this time!
2. Mix the Dry Ingredients
In a bowl, combine that fluffy 1 1/2 cups of all-purpose flour, baking powder, baking soda, and salt. Give it a whisk! Picture yourself being totally on-point with your mixing skills. It should be a well-mixed dry powder with no lumps lurking around. Grab that bowl and set it aside for now.
3. Cream the Butter and Sugar
In a separate bowl, add the softened butter and granulated sugar. Cream them together until light and fluffy. Honestly, it’s nearly magic how butter and sugar transform when mixed. Trust the process! You’re looking for a light yellow mixture that makes you want to dive head-first into the bowl. Up next—eggs.
4. Introduce the Eggs and Vanilla
Beat in the eggs one at a time. With each addition, feel free to do a little happy dance. This is an essential bonding moment for your cake! Next, add in the tablespoon of vanilla extract. The smell that arises is pure heaven; you might catch yourself daydreaming of dessert before it’s even baked.
5. Alternate with the Dry Ingredients and Buttermilk
Now it’s time to alternate adding the dry mix and the buttermilk. Start with a scoop of dry, then a splash of buttermilk, and repeat. Mix it until just combined. Here’s a secret: don’t overmix! It’s easy to get carried away, but think of it as treating your batter gently.
6. Pour and Bake
Pour that luscious batter into your greased and floured cake pan. Spread it evenly; it should look smooth. Bake for about 25-30 minutes. The aroma will waft around your kitchen, and I guarantee you’ll have a dance party waiting for the timer to buzz. Pro tip: insert a toothpick in the center. If it comes out clean, your cake is done!
7. Cool it Down
Let the cake cool in the pan for about 10 minutes. Then, bravely turn it out onto a wire rack to cool completely. I remember the first time I attempted to do this, and my cake shattered like a dream on the floor. Oops! Lesson learned: patience is key, my friend.
8. Layer It Up
Once your cake is totally cool, it’s time to split it in half. Be gentle and take your time; a serrated knife works wonders here. Between the layers, spread that luxurious whipped cream and top it with your sliced cherries. I like to pile them on like I’m building a cherry fortress—getting carried away has never tasted so good!
9. Frost the Outside
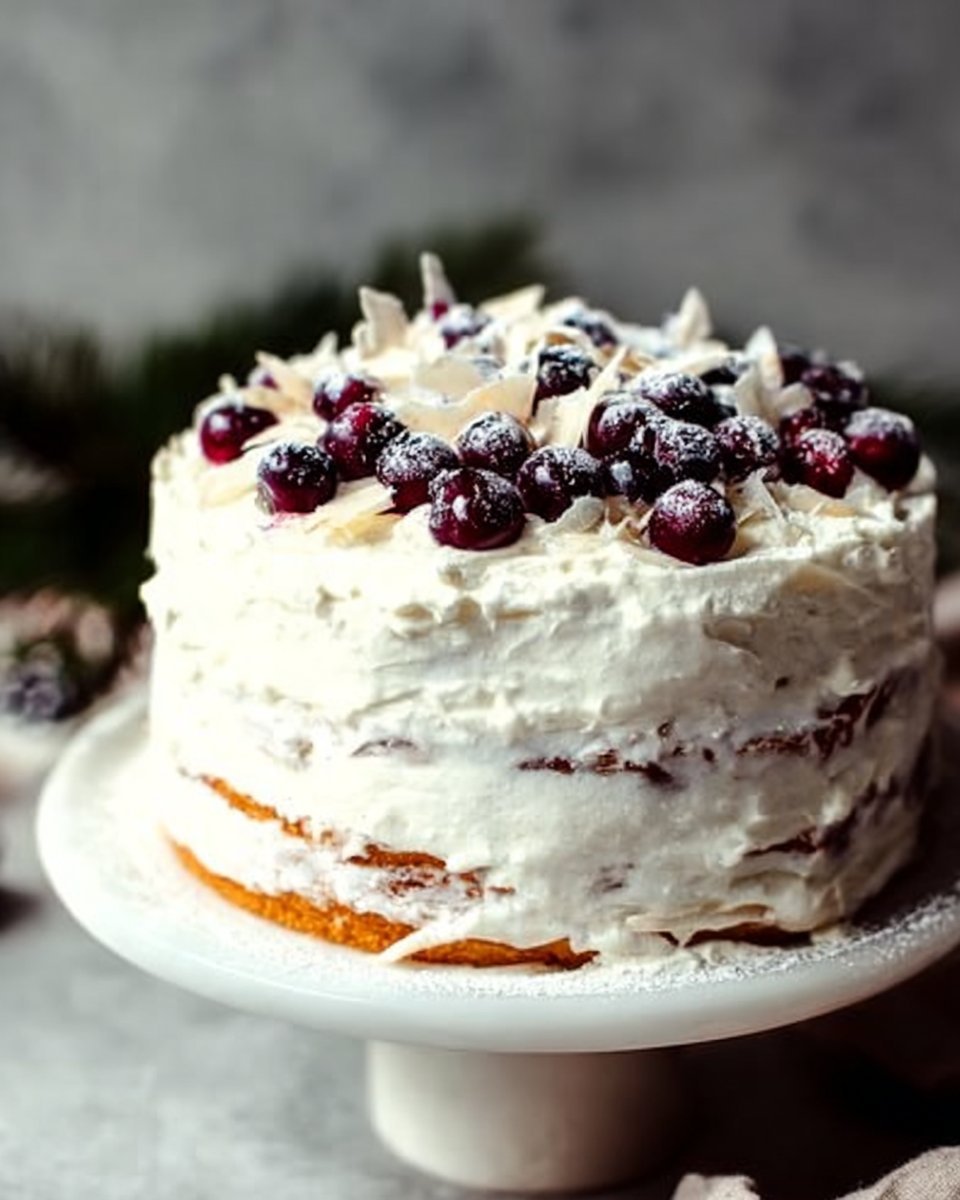
Once the layers are stacked, slather whipped cream on the outside, smoothing it out as you go. Don’t fret about perfection; embrace those little imperfections. It’s a homemade cake after all! Grab your grated white chocolate and sprinkle it generously over the top. Now we’re talking!
10. Dust and Serve
Finally, grab that powdered sugar and dust it lightly on top, just to make it look extra fancy. Who can resist the allure of a little sugar snow? Your cake is complete! Go on, take a moment to admire your handiwork.
Tips for Best Results
-
Make It Even Better: If you want a fruitier twist, try swapping the cherries with strawberries or raspberries for a seasonal vibe.
-
Temperature Check: Making sure all your ingredients (especially the butter and eggs) are at room temperature helps create a more uniform batter.
-
No Whipped Cream: If you’re feeling super creative, try using mascarpone cheese folded into whipped cream for a richer texture.
Ingredient Substitutions & Variations
Don’t have buttermilk? Mix regular milk with 1 tablespoon of vinegar or lemon juice and let it sit for about 5-10 minutes—voilà, instant buttermilk!
Got a smaller crowd? Feel free to cut the recipe in half for a single-layer, 4-inch cake.
If you want to switch it up even more, think about a vanilla bean cake instead of a traditional white cake. Infusing some almond extract can also send your taste buds on a delightful journey!
Directions
- Preheat your oven to 350°F (175°C). Grease and flour a 6-inch round cake pan.
- In a mixing bowl, combine flour, baking powder, baking soda, and salt.
- In another bowl, cream the softened butter and granulated sugar until light and fluffy. Beat in the eggs one at a time and add vanilla.
- Gradually mix in the dry ingredients, alternating with buttermilk, until just combined.
- Pour the batter into the prepared cake pan and spread evenly.
- Bake for 25-30 minutes, or until a toothpick inserted in the center comes out clean.
- Let the cake cool in the pan for 10 minutes, then transfer it to a wire rack to cool completely.
- Once cool, split the cake in half and layer whipped cream and cherries in between.
- Spread whipped cream on the outside and top with grated white chocolate.
- Dust with powdered sugar before serving.
Pairing Ideas (Drinks, Sides, etc.)
Imagine sipping a warm cup of tea next to a slice of this delightful cake. Tea isn’t your thing? A light white wine or sparkling lemonade could pair beautifully and elevate the sweetness just right. Trust me; the blend is heavenly!
Want to go the extra mile? A side of fresh fruit salad can lighten the experience, making it perfect for a summer gathering or a birthday bash. This cake is great to enjoy alongside any cozy rom-com or the spirited laughter of friends. I mean, what’s better than that mix?
How to Store and Reheat Leftovers
If you have any cake left (big if!), it’s best stored in an airtight container in the fridge. I’ve made the big mistake of leaving it out, only to find it dry and sad the following day. A chilled slice of White Forest Cake brings a different kind of sweetness—like your dessert is actually giving you a little wink from the fridge.
To reheat, I wouldn’t recommend the microwave, as it can ruin that fluffy texture. Instead, let it come to room temperature on its own. It’ll be like receiving a hug from your past self.
Make-Ahead and Freezer Tips
You can bake the cake layers ahead of time—just store them in the fridge (or even freeze them) unfilled or iced. When you’re ready to assemble your masterpiece, simply pull out the layers, let them thaw, and whip up your cream frosting. Simple and stress-free!
Common Mistakes to Avoid
-
Overmixing: It can lead to a dense cake. Keep that mixing light and gentle!
-
Ignoring Cake Cool Time: Cutting into a warm cake can lead to crumbles and chaos. Remember patience!
-
Not Measuring Accurately: Baking is like science; precision matters! Avoid scooping too much flour or sugar.
Frequently Asked Questions (FAQ)
Q: Can I use a different size pan?
A: Absolutely! Just adjust the baking time accordingly. If you’re using a larger pan, the cake may bake faster, so keep an eye on it.
Q: Is there a way to make this cake gluten-free?
A: You can substitute the all-purpose flour with a gluten-free blend that measures like regular flour.
Q: How long will this cake last?
A: In the fridge, it’ll stay fresh for up to a week—if it makes it that long!
Q: Can I freeze the cake?
A: Yes! The layers can be frozen before assembling for up to three months. Thaw and frost when you’re ready!
Cooking Tools You’ll Need
- Mixing bowls (multiple sizes)
- Whisk
- Measuring cups and spoons
- Rubber spatula
- 6-inch round cake pan
- Electric mixer (hand or stand)
- Wire rack for cooling
- Serrated knife for slicing
Final Thoughts
Baking this White Forest Cake is more than just a recipe for me; it’s an experience, a ritual of warmth, laughter, and the unexpected surprises that come with pushing through kitchen chaos. The memories created while baking are not just about the end product but the joy of ‘creating’ something delicious, even when everything doesn’t go according to plan.
I can’t wait for you to try baking this. I hope it adds a sprinkle of joy to your moments, just like it does to mine. And if you ever find yourself in a whirlwind of flour and frosting, remember—you’ve got this!
If you enjoyed this recipe, don’t forget to save it on Pinterest or share it with a friend!
White Forest Cake
Ingredients
Cake Ingredients
- 1.5 cups all-purpose flour The foundation of our cake. It gives structure without being too dense.
- 1.5 teaspoons baking powder This little agent guarantees the cake rises beautifully.
- 0.5 teaspoons baking soda Helps give the batter that extra lift.
- 0.25 teaspoons salt Balances out the sweetness.
- 0.5 cups unsalted butter, softened Butter adds flavor to the cake.
- 1 cups granulated sugar Provides sweetness to the cake.
- 2 large eggs Enhances richness and moisture; use room-temperature for optimal mixing.
- 1 teaspoon vanilla extract Adds a nostalgic aroma.
- 0.5 cups buttermilk For moisture; can make a substitute with milk and lemon juice.
Frosting and Topping
- 1 cups whipped cream For layering and frosting.
- 0.5 cups white chocolate, grated For decoration.
- 0.5 cups cherries, pitted and sliced The star ingredient; can use fresh or jarred.
- to taste tablespoons powdered sugar For dusting before serving.
Instructions
Preparation
- Preheat your oven to 350°F (175°C) and grease and flour a 6-inch round cake pan.
- In a bowl, whisk together flour, baking powder, baking soda, and salt. Set aside.
- In a separate bowl, cream the softened butter with granulated sugar until light and fluffy.
- Add eggs one at a time and mix until combined, then stir in the vanilla extract.
- Alternate adding the dry mixture with the buttermilk, mixing until just combined.
- Pour the batter into the prepared cake pan and bake for 25-30 minutes.
- Let the cake cool for 10 minutes in the pan, and then transfer to a wire rack to cool completely.
Assembly
- Once the cake is completely cool, slice it in half horizontally.
- Layer whipped cream and cherries between the two cake layers.
- Frost the outside of the cake with whipped cream and decorate with grated white chocolate.
- Dust with powdered sugar before serving.


