

The Best Triple Chocolate Mousse Cake Recipe
Introduction
Oh, there’s nothing quite like the heady embrace of chocolate in all its forms, especially when it comes to a dessert as divine as the Triple Chocolate Mousse Cake. I mean, who wouldn’t want to indulge in layers of dark, milk, and white chocolate mousse, all sitting atop a luscious chocolate cake? As I sat curled up in my cozy kitchen one rainy evening, the scent of cocoa wafting through the air, I was reminded of how this recipe became my guilty pleasure and a regular show-stopper at every family gathering.
Let’s just say my first attempt at this cake was a bit of a “what on earth was I thinking?” moment. Imagine, if you will, me confidently whipping up what I thought would be the pièce de résistance for my sister’s birthday party, only for the cake to deflate like a sad balloon halfway through baking—oops! It ended up as a “chocolate pudding” layer cake instead. But hey, every failure is just an opportunity for a fabulous comeback, right? And that’s what got me striving for perfection in my next attempt!
As I foamed over chocolate goo and dared to declare, “This is going to be amazing!” to my skeptical family, the warm kitchen felt like a hug in a bowl. Candles flickered and the lovely music filled the air, making the house feel like a chocolate-scented sanctuary. That moment of triumph when I pulled everything together—and the delighted faces biting into the light, airy mousse layers later that evening—made every chaotic step leading up to it worthwhile.
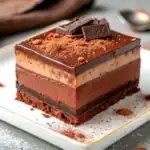
The best part? This recipe is not just your traditional cake; it’s a triple threat. This cake features a decadent chocolate cake with three different mousse layers that meld beautifully to create a dessert that’s not only heavenly but also visually stunning. When I finally perfected it, it became more than just a cake; it became my cherished recipe filled with memories, laughter, and a hefty dose of chocolate bliss.
Why You’ll Love This Recipe
-
Over-the-Top Chocolatey Goodness: If you’re a true chocolate lover, this cake is your dream come true. Seriously, how can you resist three kinds of chocolate?
-
Impressive Dessert: Wow your family and friends with those gorgeous mousse layers. They’ll think you spent hours crafting this beauty, while you know the secret is in the technique!
-
Great for Any Occasion: Birthdays, holidays, or Tuesday nights—this cake fits the bill. It transforms any ordinary day into something special.
-
Make-Ahead Friendly: Prepare the cake in advance (you’ll thank yourself later), and chill it overnight. Just remember to hide it from everyone else in the fridge until the big reveal!
-
Picky-Eater Approved: Chocolate is a universal language. Even the fussy eaters at your dinner table won’t be able to resist a slice.
-
Layer upon Layer of Joy: The combination of textures—from the moist chocolate cake to the fluffy mousses—makes every bite an experience.
What Makes This Recipe Special?
There’s something uniquely comforting about a cake that carries multiple layers of flavors and textures. Each ingredient plays an important role. The moist chocolate cake serves as the perfect canvas for the rich, velvety mousses that each add their own sweet spin to the dessert. I remembered my grandmother always saying, “good things take time.” And when I bake this cake, I feel her wisdom wash over me—it’s all worth it for that first delicious slice.
Now that you know why this cake is a must-try, let’s gather what we need!
Ingredients
- 1 cup (125 g) all-purpose flour
- 1/2 cup (60 g) cocoa powder
- 1 teaspoon baking powder
- 1/2 teaspoon baking soda
- 1/2 cup (100 g) granulated sugar
- 1/2 cup (100 g) brown sugar
- 2 large eggs
- 1/2 cup (120 ml) vegetable oil
- 1/2 cup (120 ml) buttermilk
- 1/2 cup (120 ml) hot water or hot coffee
- 100 g dark chocolate
- 1/2 cup cream (for dark chocolate mousse)
- 100 g milk chocolate
- 1/2 cup cream (for milk chocolate mousse)
- 100 g white chocolate
- 1/2 cup cream (for white chocolate mousse)
- Grated chocolate, curls, or cocoa powder (for decoration)
These ingredients each have a specific role, making the cake rich and decadent. The granulated and brown sugar combination creates a lovely sweetness with depth. I’ve found that using freshly sifted cocoa powder not only enhances the chocolate flavor but also helps prevent clumps. And, oh, that hot coffee? A game-changer! It elevates the chocolate flavor, deepening its richness—trust me; your taste buds will thank you.
Now, some quick tips—stay away from any expired ingredients, especially cocoa. A couple of years ago, I used old cocoa and it tasted… well, I guess “vintage” is one way to describe it. And honestly, I’d stick to quality chocolate. It makes a world of difference.
How to Make It Step-by-Step
Alright, let’s dive into the step-by-step process because I can almost taste that chocolate now!
-
Preheat Your Oven: First thing’s first, preheat the oven to 350°F (175°C). This is non-negotiable. Trust me; you don’t want to bake a cake in an oven that hasn’t warmed up properly. Grease an 8-inch round cake pan and line it with parchment paper. Seriously, don’t skip the parchment—it’s the ultimate insurance policy against a cake that won’t come out of the pan.
-
Sift the Dry Ingredients: In a mixing bowl, sift together 1 cup of flour, 1/2 cup of cocoa powder, 1 teaspoon of baking powder, and 1/2 teaspoon of baking soda. Sometimes I can skip sifting—shh, don’t tell anyone—but for this recipe, it’s crucial to get that light, fluffy texture.
-
Mix the Wet Ingredients: In another bowl, beat together 2 large eggs, 1/2 cup of granulated sugar, and 1/2 cup of brown sugar until smooth and creamy. Add 1/2 cup of vegetable oil and 1/2 cup of buttermilk, mixing until well incorporated. One year, I was in a rush and used milk instead of buttermilk. Don’t do that! Buttermilk gives the cake its nice, moist texture (and trust me, you’ll want that).
-
Combine and Mix: Gradually add the dry ingredients to the wet ingredients until just combined. Then, slowly mix in 1/2 cup of hot water or coffee. Honestly, this part is where the magic happens—watch the batter come alive!
-
Bake the Cake: Pour the rich batter into your prepared pan and let it bake for about 25-30 minutes. I always set a timer because the smell will lure you in! To test for doneness, poke it with a toothpick; it should come out clean. Once done, let the cake cool completely in the pan before removing it.
-
Prepare the Mousses: This is the fun part! For each mousse layer, melt the respective chocolate (dark, milk, and white) in separate bowls. Feel free to use the microwave in short bursts—chocolate can be temperamental if you walk away for too long.
-
Whip the Cream: For each mousse layer, whip 1/2 cup of cream in another bowl until soft peaks form. Fold that dreamy whipped cream into the melted chocolate until well combined. The mousse should be airy yet thick. I can’t tell you how many times I’ve forgotten the folding part and wound up with a chocolate disaster.
-
Layer It Up: Once the cake has cooled completely, slice it carefully into layers with a serrated knife. I often use a simple dental floss trick—it’s so much cleaner! Spread a layer of dark chocolate mousse onto your first layer of cake, add another layer, and repeat with the milk and white chocolate mousse layers. This is where you can let your creativity shine!
-
Chill, Chill, Chill: Place the entire cake in the refrigerator to set for at least 2-3 hours, preferably overnight if you can resist the urge to dig in. The waiting is torture, but the reward will be oh-so-worth it!
-
Decorate: Just before serving, you can decorate with grated chocolate, chocolate curls, or a sprinkle of cocoa powder. I like to go a little wild with the curls—they add a touch of flair!
Tips for Best Results
-
Patience pays off! Allow the mousse layers to set properly. If you rush, you might end up with a messy slice.
-
If your cake layers are uneven, trim them after cooling for a neat look.
-
Use quality chocolate—I can’t stress this enough! This cake deserves the good stuff.
-
Don’t lose your temper if the mousse isn’t “fluffy enough.” It’s all about technique. Take a deep breath and fold gently!
Ingredient Substitutions & Variations
Got dietary restrictions? No problem!
-
Gluten-Free Option: Use a gluten-free flour blend for a delicious alternative. Just make sure your cocoa powder is also gluten-free.
-
Dairy-Free Version: Swap the cream for coconut cream and use dairy-free chocolate. It will still be luscious!
-
Nutty Twist: Add some finely chopped nuts (like hazelnuts or almonds) to the mousse layers for extra texture.
-
Flavor Upgrades: Feel free to play with flavors by adding a touch of espresso powder to the batter or a splash of vanilla extract in the mousse for depth.
Serving Suggestions
This Triple Chocolate Mousse Cake is fine on its own, but if you’re feeling extra indulgent, why not add a dollop of whipped cream or a scoop of vanilla ice cream on the side? It’s like a luxurious chocolate hug! And a cozy movie night? Yep, this cake and a romantic comedy are a match made in heaven.
How to Store and Reheat Leftovers
You might not have any leftovers (trust me, it’s that good!), but if you do, store any remaining cake slices in an airtight container in the fridge for up to 3 days. As for reheating, honestly, I recommend enjoying it cold. The mousse texture is best that way!
Make-Ahead and Freezer Tips
This cake can easily be made up to a day in advance—just keep it well-covered in the fridge. For long-term storage, consider freezing individual slices. Wrap each slice tightly in plastic wrap and put them in a freezer-safe container. They should last up to a month! When you’re ready to indulge, just let them thaw in the fridge overnight.
Common Mistakes to Avoid
-
Don’t skip letting the cake cool! Trying to add mousse on a warm cake is a recipe for disaster.
-
Pay attention to your folding technique. Overmixing can deflate all that lovely whipped cream you just worked so hard on!
-
Measure your ingredients accurately. Baking is a science—too much or too little can throw everything off.
Frequently Asked Questions (FAQ)
Can I use coffee instead of hot water?
Absolutely! Coffee enhances the chocolate flavor and adds richness.
What if my mousses don’t set?
Make sure you whipped your cream to soft peaks! If it’s too runny, refrigerate longer till it thickens up.
Can I make this recipe without eggs?
Yes! You can replace each egg with 1/4 cup of applesauce or a flax egg as a binding agent.
Cooking Tools You’ll Need
- Mixing bowls
- Cake pan (8-inch round)
- Whisk
- Electric mixer or hand whisk
- Sprial knife or serrated knife for slicing the cake
- Rubber spatula
- Sifter
Final Thoughts
This Triple Chocolate Mousse Cake is more than just a dessert; it’s a celebration of all things chocolatey, a canvas for memories made with family and friends. It has become a signature in my home where laughter echoes during every scoop. Each bite encapsulates those beautiful moments that speak to the heart.
So, go ahead and try out this recipe! Maybe you’ll even have a funny kitchen fail or two along the way, but rest assured, it’ll just be another story to add to your culinary adventures. If you enjoyed this recipe, don’t forget to save it on Pinterest or share it with a friend!
Triple Chocolate Mousse Cake
Ingredients
For the Chocolate Cake
- 1 cup all-purpose flour Sifted for best results
- 1/2 cup cocoa powder Freshly sifted recommended
- 1 teaspoon baking powder
- 1/2 teaspoon baking soda
- 1/2 cup granulated sugar
- 1/2 cup brown sugar
- 2 large eggs
- 1/2 cup vegetable oil
- 1/2 cup buttermilk Do not substitute with regular milk
- 1/2 cup hot water or hot coffee Coffee enhances chocolate flavor
For the Mousses
- 100 g dark chocolate Melted
- 1/2 cup cream (for dark chocolate mousse) Whipped to soft peaks
- 100 g milk chocolate Melted
- 1/2 cup cream (for milk chocolate mousse) Whipped to soft peaks
- 100 g white chocolate Melted
- 1/2 cup cream (for white chocolate mousse) Whipped to soft peaks
For Decoration
- to taste Grated chocolate, curls, or cocoa powder Use for topping
Instructions
Preparation
- Preheat the oven to 350°F (175°C). Grease an 8-inch round cake pan and line it with parchment paper.
- In a mixing bowl, sift together the flour, cocoa powder, baking powder, and baking soda.
- In another bowl, beat together eggs, granulated sugar, and brown sugar until smooth. Add in vegetable oil and buttermilk, mixing until well incorporated.
- Gradually add the dry ingredients to the wet ingredients until just combined, then slowly mix in hot water or coffee.
- Pour the batter into the prepared pan and bake for about 25-30 minutes. Let the cake cool completely in the pan before removing.
Prepare the Mousses
- Melt the dark, milk, and white chocolates in separate bowls.
- Whip the cream for each mousse until soft peaks form. Fold whipped cream into the melted chocolate for each layer until well combined.
Layer the Cake
- Slice the cooled cake into layers and spread the dark chocolate mousse on the first layer, followed by another layer of cake, then milk chocolate mousse, and finally, white chocolate mousse.
- Chill the assembled cake in the refrigerator for at least 2-3 hours, preferably overnight.
Decorate
- Decorate with grated chocolate, chocolate curls, or a sprinkle of cocoa powder before serving.


