
Easy Chocolate Swirl Cake That Feels Like a Hug
Introduction
Picture this: It’s a rainy Sunday afternoon, and I’m cozied up in my kitchen, the golden light filtering through the window in the most comforting way. I can hear the gentle pitter-patter of raindrops outside, which somehow makes staying indoors feel like the best choice I’ve ever made. I’ve made my way around a few chaotic kitchen moments, and I have a special craving calling my name—an irresistible Chocolate Swirl Cake.
This isn’t just any cake, folks. Oh no! This is a recipe that dances through generations in my family. My grandmother always made this cake when we had gatherings, and the rich chocolatey aroma that wafted through the air was enough to knock the grumpiness right out of anyone. I’d often find myself stealing spoonfuls of the cake batter (oops!), picturing how marvelous it would be to dive headfirst into a chocolate wonderland, vibrant with swirls dancing like a beautiful ballet.
The first time I tried to make this cake by myself, let’s just say it did not go as planned. Spoiler alert: The flour explosion in my kitchen was on par with an amateur science experiment! But with a little persistence, I found my groove, and now this recipe is my go-to for cozy nights and rainy afternoons. There’s something so reassuring about baking this cake; it’s almost like being wrapped in a warm blanket and sipping hot cocoa at the same time.
So, what makes it special, you ask? Well, it’s not just the mix of chocolate and vanilla swirling together harmoniously. This dessert is a warm hug after a long day; it’s a slice of nostalgia served with coffee or cold milk. It’s utterly comforting, and let me tell you—once you’ve cut into that tender slice of chocolate-swirled heaven, you’ll understand why this cake always finds its way back to my kitchen. Get ready for a fun ride, because we’ll be baking together!
Why You’ll Love This Recipe
- Easy Recipe: Seriously, this is a breeze! You won’t need a culinary degree to whip this cake up.
- Picky Eater Approved: Chocolate and vanilla? What’s not to love? Trust me, this is a surefire hit even for the ones who claim they don’t like cake.
- Perfect for Any Occasion: Whether it’s a casual weeknight treat or an elegant dessert for guests, this cake fits right in.
- Satisfies Cravings: It’s the best of both worlds with rich chocolate and fluffy vanilla, creating that cozy meal experience we all crave.
- Great Leftovers: If somehow you have any left (good luck!), it tastes just as good the next day, especially with coffee in the morning.
- Meal Prep Wins: It’s great for prepping ahead of time; just store it properly, and you’ll always have a slice of happiness ready to go.
What Makes This Recipe Special?
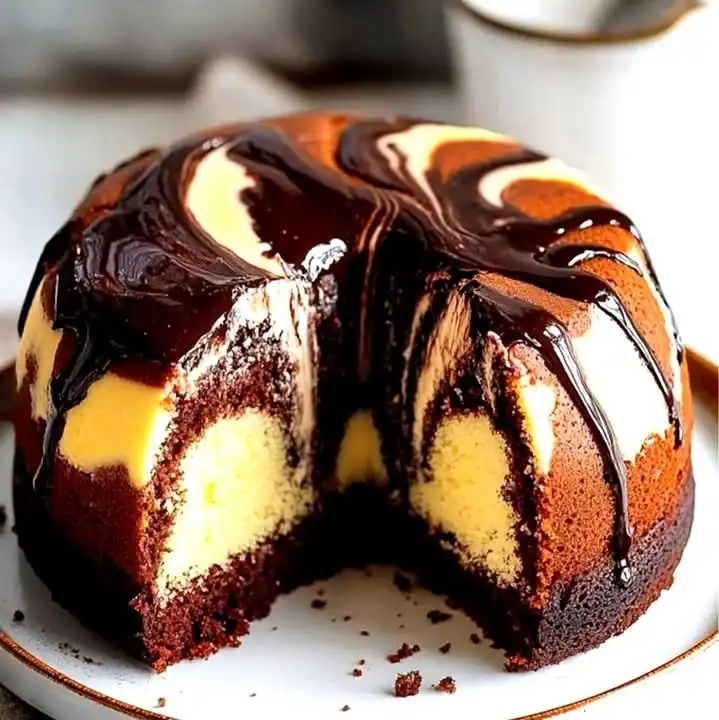
The magic of making Chocolate Swirl Cake stems from that beautiful contrast of flavors intertwined within its tender crumb. Imagine the luscious swirl of rich cocoa contrasting with the light vanilla base. When baking, the scent that envelops the kitchen? Honestly, it’s worth every minute spent waiting by the oven.
This cake tells a story of comfort, warmth, and simple joys. It’s a beautiful way to bond with loved ones—one that allows you to reminisce, laugh over kitchen mishaps, and share this delightful piece of sweetness, giving everyone a reason to smile. And let’s face it, during those chaotic weeknight dinners, nothing says “I love you” like homemade cake beckoning from the counter.
Ingredients
- 2 1⁄2 cups (310 g) all-purpose flour: The foundation of our cake! It gives structure and ensures that the cake holds up beautifully.
- 1 1⁄2 tsp baking powder: This little champ helps the cake rise, ensuring a light and fluffy outcome—because nobody wants a dense cake.
- 1/2 tsp baking soda: Works in tandem with the baking powder to create that perfect airy texture.
- 1/2 tsp salt: Enhances all other flavors without making it taste salty. It’s like a backstage pass for flavor.
- 1 cup (225 g) unsalted butter, softened: Honestly, there’s nothing like butter to add richness and moisture—you’ll love how it transforms every bite.
- 1 1⁄2 cups (300 g) granulated sugar: It sweetens the cake and creates a fantastic texture, so please don’t skimp!
- 4 large eggs: They bind everything together, adding structure while keeping the cake tender.
- 1 tbsp vanilla extract: A splash of vanilla makes a world of difference; it’s like your cake’s best friend.
- 1 cup (240 ml) buttermilk (or milk + 1 tbsp vinegar): This adds moisture, tenderness, and a tasty tang.
- 1/2 cup (45 g) unsweetened cocoa powder: The star of our chocolate swirl; it gives deep cocoa flavor and that gorgeous swirl.
- 1/2 cup (120 ml) hot water: Helps dissolve the cocoa powder for a smooth chocolate batter—trust me, no clumps here!
- 1/4 cup (50 g) sugar (optional): A little extra sweetness if you’re feeling indulgent!
When picking your ingredients, I often reach for unsalted butter because it gives me more control. Remember to have everything at room temperature for the best results! And if you’re thinking about substituting buttermilk with regular milk, a tip: just mix milk with vinegar like I do; it’s foolproof!
How to Make It Step-by-Step
Alright, gather your ingredients, and let’s get ready to dive into some serious baking!
Step 1: Prep Your Workspace
Before you even think about mixing anything, let’s set the scene. Preheat your oven to 350°F (175°C). And don’t forget to grease and flour your bundt or loaf pan—trust me, the last thing you want is a beautiful cake that refuses to leave the pan!
Step 2: Mix the Dry Ingredients
In a mixing bowl, whisk together the flour, baking powder, baking soda, and salt. Whisk it well—this is your chance to mix those flavors before anything else happens. The more you mix, the better your cake will rise.
Step 3: Cream Butter and Sugar
In a separate large bowl, beat the softened butter and sugar together until it’s light and fluffy—about 2-3 minutes. This is where the magic starts. Just imagine that creamy texture, as you breathe in the sweetness. (Honestly, is there a better smell than mixing butter and sugar?)
Step 4: Add Eggs and Vanilla
Beat in the eggs, one at a time, mixing well after each addition. Then pour in that glorious vanilla extract. Oh my, the aroma will be heavenly!
Step 5: Alternate Dry Ingredients with Buttermilk
Now, we’ll go old school! Alternately add the dry ingredients and buttermilk to your butter mixture. Start with the flour, then buttermilk, mixing gently until combined—just don’t overdo it; you want it to be light and fluffy!
Step 6: Make Chocolate Batter
In a small bowl, whisk together cocoa powder and hot water until you have a smooth consistency. If you choose to add some sugar here, go ahead! This is where you’ll make those chocolate dreams come alive.
Once smooth, mix 1 1⁄2 cups of the vanilla batter with your chocolate mixture. It’ll look sooo good, and trust me, you’ll want to taste it (but try not to eat it all!).
Step 7: Swirl It Up
Now comes the fun part! Pour half of the vanilla batter into your prepared pan, followed by spooning in the chocolate batter. With a knife or skewer, gently swirl the two together—nothing too crazy! Just enough to give it that beautiful marbled effect. Top it off with the remaining vanilla batter, then swirl a bit more. We’re creating edible art here!
Step 8: Bake It Up
Pop that beauty in the oven and bake for 50-60 minutes, or until a toothpick comes out clean when checked in the center. The smell wafting through your home? Pure magic.
Step 9: Cooling Down
Once done, let it cool in the pan for about 10-15 minutes, then carefully transfer it to a wire rack. Watch out for the melted chocolate goodness sticking in the pan! Let it cool completely because we want that perfect slice.
Step 10: Finishing Touches
If you’re feeling fancy, dust it with powdered sugar or drizzle melted chocolate on top. Just picture that! Then slice into it and dive right in!
Tips for Best Results
You’d think a cake would be simple, right? But it’s the little tweaks that make all the difference:
- Room Temperature Ingredients: Always bring your butter and eggs to room temperature. They mix better and create that light texture we crave.
- Don’t Overmix: I know it’s tempting to beat that batter until it’s smooth, but that’s a quick route to a dense cake. Gentle folding is the way to go!
- Use Quality Ingredients: Seriously, good butter and pure vanilla extract can change everything, so splurge a little if you can.
- Cooling in the Wire Rack: This prevents the bottom from getting soggy, giving you that perfect end cake you desire.
Ingredient Substitutions & Variations
Feeling adventurous? Here are a few tweaks for you:
- Buttermilk Swap: Don’t have any? Mixing regular milk with vinegar or lemon juice works wonders.
- Gluten-Free Version: Use a 1:1 gluten-free baking mix in place of all-purpose flour.
- Nutty Additions: Add some chopped walnuts or pecans to the batter for texture.
- Fruity Swirls: Toss in some berries or cherries for a fruity twist to the chocolate and vanilla. Who says you can’t play around?
Serving Suggestions
Nothing really pairs as well with Chocolate Swirl Cake as a steaming cup of freshly brewed coffee or a glass of cold milk. Seriously, it’s like a match made in heaven! You could even snuggle up with a good book or watch a romantic comedy for that ultimate cozy moment.
And if you’re feeling a bit more indulgent, a scoop of vanilla ice cream on the side? Absolute perfection.
How to Store and Reheat Leftovers
Storing leftovers is a breeze! Just place your cake in an airtight container, and it’ll keep fresh at room temperature for about 3-5 days. If you’d like to keep it longer, stick it in the fridge; it lasts up to a week.
For reheating, the microwave works wonderfully—just a 10-15 seconds blast should bring back that cozy warmth without turning your cake into rubber!
Make-Ahead and Freezer Tips
Of course, you can make this ahead of time! Just bake the cake, allow it to cool completely, and then wrap it tightly in plastic wrap before placing it in the freezer. It keeps for about 2-3 months. When you’re ready to indulge, bake it; let it thaw in the fridge overnight for a soft and delightful treat!
Common Mistakes to Avoid
Now that you’re ready to bake, here are a few pitfalls to be aware of:
- Skipping The Weighing: Trust me, measuring flour by scooping straight from the bag can lead to way too much flour and a dry cake. Spoon and level it instead!
- Not Prepping The Pan Properly: Skipping greasing/flouring can result in a sad, stuck cake. Please don’t let that happen!
- Not Waiting to Cool: I know you’re excited, but cutting into a warm cake could lead to crumbling mess. Seriously, waiting is worth it!
Frequently Asked Questions (FAQ)
1. Can I use a different pan?
Absolutely! While bundt pans are my go-to for this cake, you can use loaf pans, cake pans, or even mini ones!
2. How do I avoid a dry cake?
Don’t overmix and ensure you’re measuring everything correctly. Buttermilk is your friend; it keeps the cake moist!
3. Can I add frosting?
If you really want to go all-out, cream cheese frosting pairs especially well with the chocolate and vanilla swirl.
4. Can I reduce sugar?
Certainly! You can cut sugar in the recipe as much as you’d like (cutting it by 1/4 cup is usually manageable) if you prefer less sweetness.
5. What if I want an even richer chocolate flavor?
You can always add a bit of chocolate chips to the batter for that extra chocolate burst.
Cooking Tools You’ll Need
- Mixing bowls
- Whisk
- Measuring cups and spoons
- Rubber spatula
- Electric mixer
- Bundt or loaf pan
- Toothpick (for testing doneness)
Final Thoughts
So that’s it! Your very own Chocolate Swirl Cake is just a few steps away, ready to be enjoyed with family and friends. This cake encapsulates so many memories for me, reminding me that baking can be messy—and that’s perfectly okay. Embrace the quirks, the spills, and the joyous moments spent in the kitchen.
I’d love to hear how yours turns out! So, if you enjoyed this recipe, don’t forget to save it on Pinterest or share it with a friend! Happy baking, everyone, and may your kitchen be filled with love and delicious smells!
Chocolate Swirl Cake
Ingredients
Dry Ingredients
- 2.5 cups 2 1⁄2 cups all-purpose flour The foundation of our cake! It gives structure.
- 1.5 tsp 1 1⁄2 tsp baking powder Helps the cake rise for a light and fluffy outcome.
- 0.5 tsp 1/2 tsp baking soda Works with baking powder for perfect texture.
- 0.5 tsp 1/2 tsp salt Enhances flavors without making it taste salty.
Wet Ingredients
- 1 cup 1 cup unsalted butter, softened Adds richness and moisture.
- 1.5 cups 1 1⁄2 cups granulated sugar Sweetens and creates fantastic texture.
- 4 large 4 large eggs Binds ingredients and keeps the cake tender.
- 1 tbsp 1 tbsp vanilla extract Adds essential flavor.
- 1 cup 1 cup buttermilk (or milk + 1 tbsp vinegar) Adds moisture and tenderness.
- 0.5 cup 1/2 cup unsweetened cocoa powder Provides deep cocoa flavor.
- 0.5 cup 1/2 cup hot water Helps dissolve cocoa for a smooth batter.
- 0.25 cup 1/4 cup sugar (optional) Extra sweetness if desired.
Instructions
Preparation
- Preheat your oven to 350°F (175°C) and grease and flour your bundt or loaf pan.
- In a mixing bowl, whisk together the flour, baking powder, baking soda, and salt.
- In a separate bowl, beat the softened butter and granulated sugar until light and fluffy.
- Add the eggs one at a time, mixing well after each addition, then stir in the vanilla extract.
- Alternately add the dry ingredients and buttermilk to the butter mixture until well combined.
Chocolate Batter
- In a small bowl, mix cocoa powder with hot water until smooth.
- Fold 1 1⁄2 cups of the vanilla batter into the chocolate mixture.
Assembling the Cake
- Pour half of the vanilla batter into the prepared pan, then spoon in the chocolate batter.
- Gently swirl the two batters with a knife, then top with remaining vanilla batter and swirl again.
Baking
- Bake for 50-60 minutes, or until a toothpick inserted in the center comes out clean.
Cooling and Serving
- Let the cake cool in the pan for 10-15 minutes, then transfer to a wire rack to cool completely.
- If desired, dust with powdered sugar or drizzle with melted chocolate before slicing.


