
Introduction
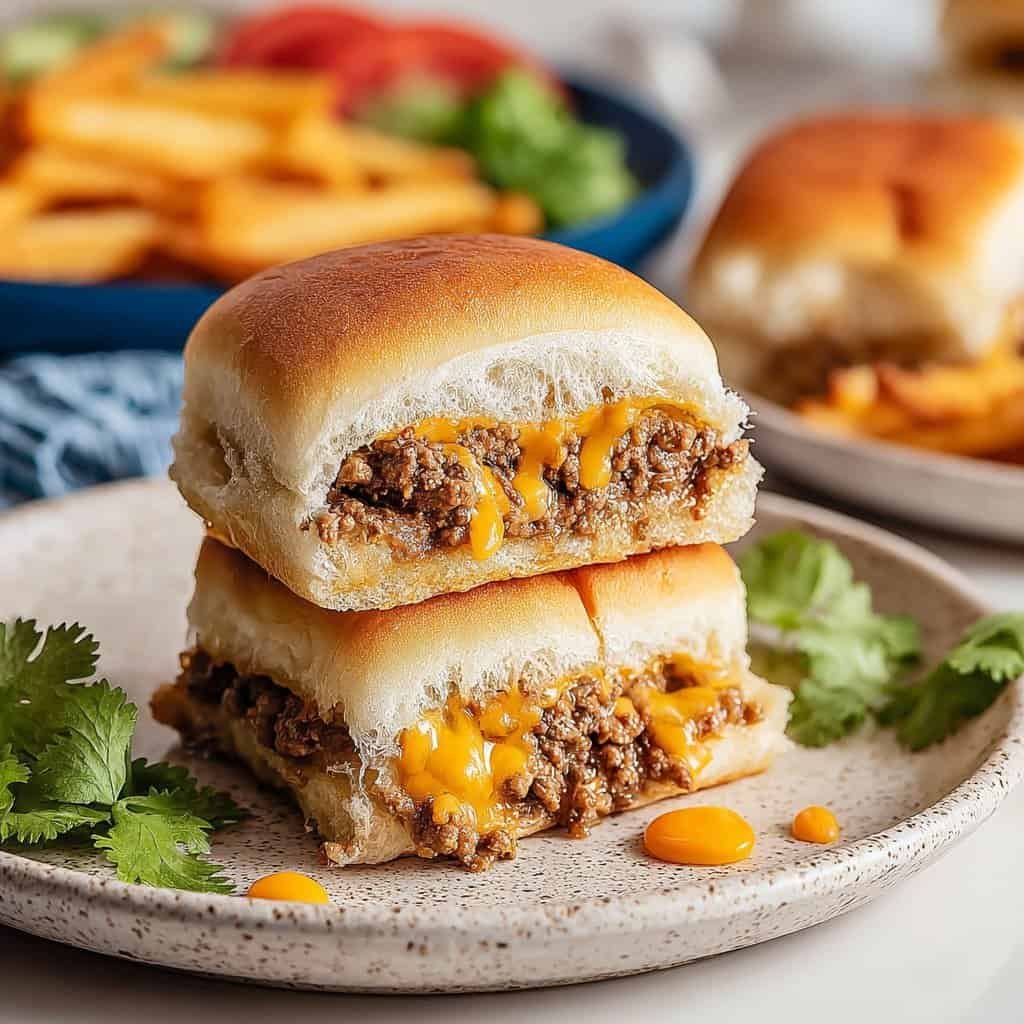
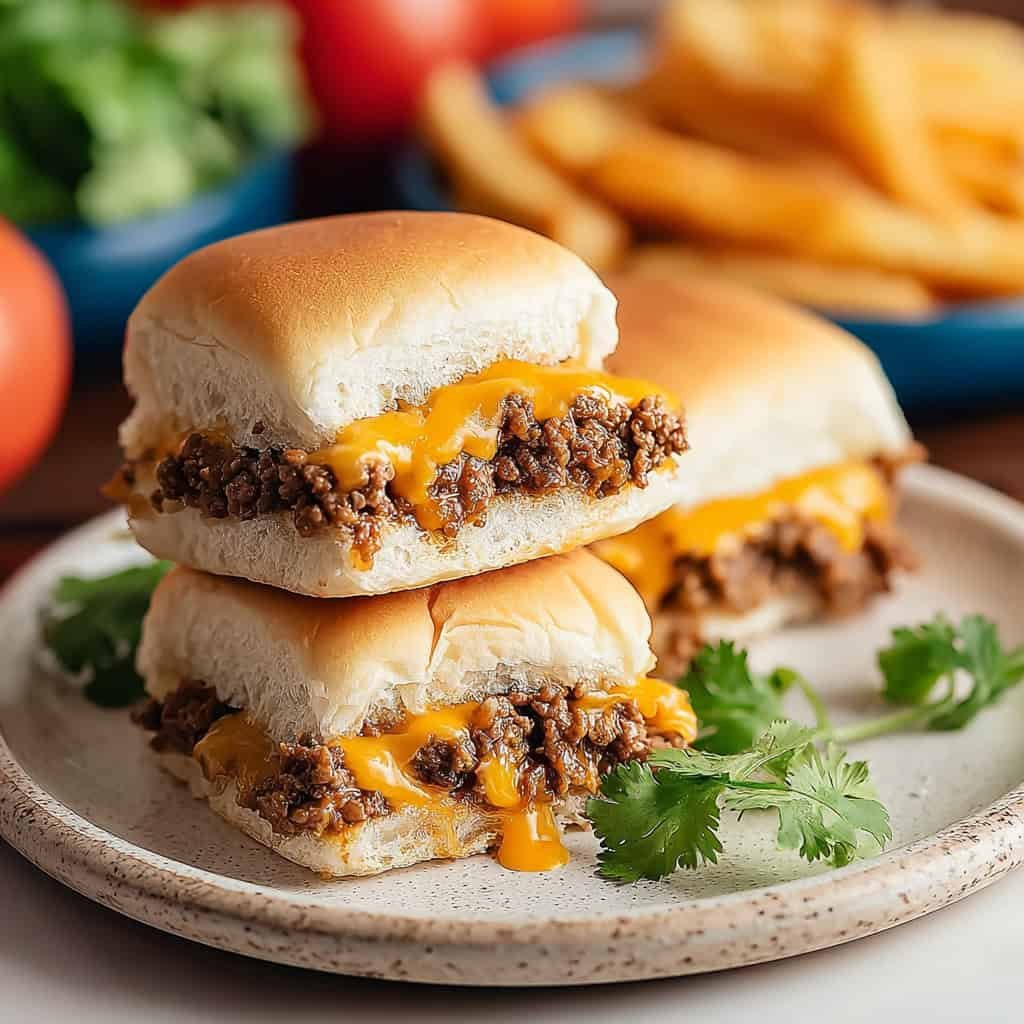
The first time I made these Taco Sliders, I swore I was “just making snacks.” Forty minutes later my kitchen smelled like a taqueria had hugged a bakery—warm toasted buns, sizzling beef with that cumin-chili perfume, melted cheese stretching like holiday lights. Honestly, I was aiming for low-effort easy weeknight dinners, because the day had been a circus and I wanted something fun, fast, and totally devourable. These little sandwiches delivered. Big time.
To be real, I didn’t expect sliders to hit all my favorite comfort notes. But the moment I pulled the pan from the oven and that buttery garlic brush glistened on top, I heard the soft “crack” of golden buns and the bubbly hiss of cheese. It felt like the perfect mash-up of healthy comfort food energy with a party personality. The whole tray looked like a Pinterest board come to life—exactly the kind of thing that turns quick family meals into high-five moments and makes budget-friendly recipes feel like a celebration instead of a compromise.
These are customizable in the best way. I’ve made them mild for kids, fiery for game day, and veggie-heavy for friends who want lighter bites alongside their high macro meals. They fit neatly into a Sunday reset with best meal prep plans, and they reheat like a dream for meal prep microwave lunches when you’re sprinting between work and soccer practice. If you’re doing a protein meal plan or trying to balance high protein high carb low fat meals, there’s a version here with lean turkey or beans that checks a lot of boxes without losing any fun. And for nights when your brain suggests ready made protein meals, these sliders scratch that same itch but taste fresh and homemade.
Also, oops story: I once forgot to toast the bottom buns before piling on the meat. Sog city. We ate them anyway (obviously), but I’ve never skipped that quick pre-toast since. A tiny step that saves your sanity—file this under “mistakes that make you wise.”
So yes, add these to your lineup. They’re the answer when you want something festive that doesn’t demand a culinary degree. They feel like a hug, smell like taco night, and disappear faster than you can say “pass the salsa.” And if you’re cooking for two and mixing in healthy meal plans for two style living, leftover sliders are strangely romantic at midnight. Don’t ask me how I know.
Why You’ll Love This Recipe
- Minimal effort, maximum payoff. One pan, simple prep, huge flavor.
- Crowd-pleaser energy for parties, potlucks, and casual dinners.
- Flexible for high protein meals goals—swap in turkey, chicken, or beans.
- Cozy texture contrast: buttery tops, melty cheese, saucy taco filling.
- Make-ahead friendly for best dinner prep meals and busy weeknights.
- Reheats beautifully—perfect for premade lunch meals that don’t taste premade.
What Makes This Recipe Special?
It’s the structure. Sliders baked as a unit means all that taco goodness stays put, the cheese binds everything together, and you can slice the whole pan like a sheet cake. The quick tomato sauce simmer with taco seasoning keeps the beef juicy (goodbye dry crumbles), and that buttery garlic-onion brush over the buns turns the top into a glossy, fragrant lid. The flavors are classic, but the technique turns good meal prep plans into a standing ovation.
I also love how these sliders play nice with all the toppings. You can bake some inside for gooey cohesion, then pile fresh crunch on top for contrast. It’s the best of both worlds—like best high protein ready meals met your favorite taco truck and decided to stay for dinner. If you’re dabbling in a keto meal plan, you can ditch the buns for lettuce “boats” and spoon the hot filling over, still using the same skillet technique. Or fold the taco meat into a veggie-rich mix for low calorie high nutrition meals that don’t feel like a sad compromise.
Ingredients
Let’s talk about the building blocks and how to make each one work hard for you. These choices keep sliders juicy, flavorful, and weeknight-proof.
Olive Oil: A small slick to bloom the aromatics and help the beef brown evenly. If you’re chasing low fat meal delivery vibes at home, you can reduce or skip it with a good nonstick skillet.
Ground Beef (85–90% lean): That sweet spot between rich and not greasy. It sears well, stays succulent after baking, and satisfies anyone tracking a protein eating plan. For leaner options, ground turkey or chicken works; for plant-forward nights, try black beans or a seasoned plant crumble.
Finely Diced Onion: Flavor backbone. Sweated in oil to soften and sweeten, it disappears into the meat so even onion-skeptics rarely notice. Dice it small for an even bite.
Taco Seasoning: Use your favorite packet or mix your own with chili powder, cumin, paprika, garlic powder, onion powder, oregano, a pinch of sugar, salt, and pepper. Homemade gives you sodium control and lets you adjust heat for kids.
Tomato Sauce: A quick simmer with seasoning turns crumbles into saucy, spoonable taco filling that clings to the buns. It’s the insurance policy against dryness and a neat way to sneak in extra lycopene for your healthy eating for two goals.
Slider Buns (savory, not sweet): Choose sturdy yet soft rolls. Savory buns keep the taco profile clean; Hawaiian-style buns are fine but skew sweeter. If you do choose sweet, bump the chili and lime a touch to keep flavors balanced.
Shredded Cheese (Colby Jack or Mexican Blend): Melts beautifully, acts as edible glue, and adds creamy richness. Cheddar or pepper jack also play great here. We’re talking easy high protein high calorie meals comfort in the best way.
Melted Butter + Garlic Powder + Onion Powder + Salt: The finishing brush that perfumes the whole tray and gives a golden sheen. It’s like garlic bread and taco night shook hands.
Fresh Cilantro: A bright, herbal finish. If cilantro tastes soapy to you, sub chopped parsley and a squeeze of lime.
Optional Toppings: Shredded lettuce for crunch; sour cream for cool creaminess; salsa or pico for brightness; guacamole for richness; jalapeños for heat. Pile high or keep it simple—your call.
Pro Tips & Warnings:
- Seed juicy toppings (like tomatoes) if adding before the bake; excess moisture is the enemy of crisp bottoms.
- Do not skip pre-toasting the bottom buns—this is your shield against sogginess.
- If you use very lean meat, add a splash more tomato sauce to keep the filling plush.
- Taste the meat before assembling. Season aggressively now; you won’t get another chance later.
How to Make It Step-by-Step
1) Heat the oven and prep the pan.
Preheat to 375°F and lightly grease a 9×13 baking dish. I like to line with parchment for easy lift-out, but it’s optional. The smell of a warming oven does half the emotional work for me—instant cozy.
2) Soften the onions.
Warm the olive oil in a large skillet over medium heat. Add the diced onion and cook until translucent and tender, about 3 minutes. You’ll hear a soft sizzle and see the edges turn glossy. That’s your flavor base humming to life.
3) Brown the beef.
Add the ground beef and break it up with a spatula. Let it sit for a minute to sear, then continue cooking until browned. Drain excess grease if needed. This is where the kitchen smells like taco night at your favorite spot.
4) Season and sauce.
Stir in the taco seasoning and tomato sauce. Bring to a gentle simmer and cook 5–7 minutes until thickened and saucy. The bubbles should be lazy, not splashy. Taste and adjust salt, pepper, or heat. If you’re going for high carb high protein low fat meals, keep it lean and bold with spices rather than extra fats.
5) Split and pre-toast buns.
Slice the slider buns in half horizontally. Nestle the bottoms into the dish and pop into the oven for about 5 minutes. This tiny step builds a barrier that keeps your buns sturdy under all that juicy filling. I learned the hard way—another “oops” saved for posterity.
6) Layer the first cheese blanket.
Scatter half the shredded cheese over the toasted bottoms. It softens into a sticky layer that helps the meat stay put. Think of it as delicious glue.
7) Add the taco filling.
Spoon the saucy beef evenly over the cheese. Spread to the edges so every bite is generous. If you want baked-in tomatoes or onions, you can sprinkle a little now (seeded tomatoes only, please).
8) More cheese, more joy.
Top with the remaining cheese. This melts down into the meat and up into the top buns—your luscious, melty middle.
9) Crown with the top buns.
Set the top halves on, gently pressing so everything sticks together. Already looking like a party tray, right?
10) Mix the butter brush.
Stir melted butter with garlic powder, onion powder, and a pinch of salt. Brush it generously over the tops. The sound of brush on bread? Weirdly satisfying.
11) Bake covered, then uncovered.
Cover with foil and bake 10 minutes to melt the cheese and heat through. Remove the foil and bake an additional 5–7 minutes until the tops are golden and lightly crisp.
12) Garnish and serve.
Let the sliders rest 3–5 minutes (cheese calm-down period), then scatter cilantro and set out toppings: shredded lettuce, sour cream, salsa or pico, guacamole, jalapeños. Slice along the bun lines and serve hot.
Encouragement to Improvise:
Use ground turkey and add a spoon of Greek yogurt to the meat for moisture. Go beans and corn for a plant-heavy option that fits a vegan meal prep plan if you swap the cheese for your favorite meltable alt. Add a squeeze of lime, a dusting of chili-lime seasoning, or a handful of scallions. Make it yours, and make it often.
Tips for Best Results
- Toast the bottoms. It’s the difference between crisp-tender slider foundations and mushy regret.
- Let the meat get saucy, not watery. Simmer until thick; watery filling leaks into the bread.
- Season in layers. Taste the filling; cheese and buns are mild and will dull shy seasoning.
- Brush generously. The butter-garlic glaze is your flavor fireworks and that bakery-case sheen.
- Rest before slicing. Two to five minutes lets the cheese set just enough for clean squares.
- Balance hot and fresh. Bake some toppings inside, then add crisp lettuce and cool salsa after. It’s a textural duet that keeps bites exciting and aligns with best meals to prep for parties.
Ingredient Substitutions & Variations
- Protein swap: Ground turkey or chicken keeps it lighter for low calorie premade meal delivery vibes at home. Black beans or lentils create a hearty vegetarian pan.
- Spice path: Mild for kids, or add jalapeños and hot sauce for a crowd that craves heat.
- Cheese remix: Pepper jack for tangy warmth, sharp cheddar for bite, or a Mexican blend for the classic stretch.
- Bean boost: A layer of refried beans under the meat adds creaminess and extra fiber—great for no prep healthy lunches leftovers.
- Tex-Mex flair: Sprinkle corn and green chiles into the meat, or finish with a drizzle of crema and lime zest.
- Chorizo vibes without pork: Use beef chorizo or turkey chorizo for smoky depth with the right spices.
- Lettuce-wrap option: Skip buns and spoon meat into romaine boats for a high protein keto meal plan moment.
Serving Suggestions
Serve the sliders hot from the oven with bowls of shredded lettuce, diced tomatoes, pico or salsa, sliced jalapeños, guacamole, and sour cream. Add lime wedges for that bright squeeze. For a fuller spread, pair with tortilla chips and warm queso, a simple corn salad, or cilantro-lime rice. This is the kind of platter that turns a Tuesday into a mini-fiesta and fits neatly into healthy boxed meals style hosting when you want it all ready to grab and go. Movie night plus sliders plus sparkling water? Perfection.
Pairing Ideas (Drinks, Sides, etc.)
- Drinks: Iced tea with lemon, sparkling water with lime, or a fruity mocktail.
- Sides: Mexican rice, charred corn salad, black-bean and avocado salad, or roasted sweet potatoes dusted with chili-lime seasoning.
- Something sweet after: Cinnamon-sugar churro bites, mango sorbet, or brownies for the chocolate-is-always-right crowd.
How to Store and Reheat Leftovers
Slide any leftovers into an airtight container and refrigerate up to 3 days. For best results, wrap individual sliders in foil and reheat in a 350°F oven for 10–12 minutes until warmed through and tops re-crisp. The microwave works for speed—30–45 seconds per slider—but the buns will soften more. I like to add a fresh lettuce leaf and pico after reheating to bring back the “fresh” vibes. Leftovers make stellar premade lunch meals for work and tuck neatly into a healthy eating for two routine without extra cooking.
Make-Ahead and Freezer Tips
Assemble the sliders up to a day in advance, cover tightly with foil, and refrigerate. Bake right before serving. If you want to freeze, assemble but do not brush with butter yet; wrap the whole pan well and freeze up to 1 month. Thaw overnight in the fridge, brush with butter mixture, and bake as directed. This hack is clutch when you’re planning for ready meals for 2 nights or a big game-day spread alongside other best meal prep healthy favorites.
Common Mistakes to Avoid
- Skipping the bottom-bun toast. It’s five minutes that prevents sogginess.
- Watery filling. Reduce until thick; excess liquid will seep into the bread.
- Overloading wet toppings pre-bake. Save lettuce, extra salsa, and sour cream for after.
- Under-seasoning the meat. Your buns and cheese are mellow—season boldly.
- Slicing too soon. Give it a tiny rest for neater squares and molten (not runaway) cheese.
Frequently Asked Questions (FAQ)
How do I keep the buns from getting soggy?
Pre-toast the bottom buns and simmer the filling until thick. Add wetter toppings like salsa and lettuce after baking.
Can I make the sliders ahead?
Yes. Assemble up to a day ahead, cover, and chill. Bake just before serving. They’re perfect for best dinner prep meals when you want hands-off hosting.
What meat works best?
Ground beef is classic and juicy. Ground turkey or chicken are great lean options, and black beans or plant crumbles keep it vegetarian while supporting high protein pre made meals goals.
Are they spicy?
They can be. Use mild taco seasoning for kids, medium for a balanced crowd, or add jalapeños and hot sauce if you love heat.
Can I freeze them?
Freeze assembled, unbaked sliders (without the butter brush). Thaw, butter, bake. Texture stays great, and it’s helpful for best meals to prep weekends.
Do I have to use savory buns?
Savory rolls keep the taco profile classic. Hawaiian-style buns work but add sweetness; balance with extra lime and spice.
Can I add veggies inside?
Absolutely. Finely diced bell peppers, corn, or green chiles fold in easily. Just keep moisture in check so your bottoms stay crisp.
Cooking Tools You’ll Need
- 9×13 baking dish
- Large skillet
- Spatula and wooden spoon
- Cutting board and chef’s knife
- Measuring cups and spoons
- Pastry brush for the butter glaze
- Foil for the first bake
Final Thoughts
There’s a moment when you lift the foil and the steam curls up carrying garlic-butter perfume, and you think, “Wow, that was easy.” That’s the joy of Taco Sliders. They pack the spirit of taco night into something you can slice and serve with one hand while high-fiving yourself with the other. They fit the chaos of busy weeks, they flatter quick family meals, and they sit happily next to your salad if you’re following a protein eating plan or juggling high protein microwave meals and want a homemade win.
Make them for game day, birthdays, Tuesdays, or that strange hour when everyone is hungry and no one wants to commit to a full spread. They’re reliable, playful, and wildly satisfying. And if you’re cooking for a small household, they tuck neatly into your week as reheat-friendly lunches—like your own version of ready made protein meals but fresher, hotter, and way more fun.
If you enjoyed this recipe, don’t forget to save it on Pinterest or share it with a friend!

Taco Sliders
Ingredients
- 1 tbsp olive oil
- 1 lb ground beef (85–90% lean)
- 1/2 cup finely diced onion
- 1 packet taco seasoning (or 2 tbsp homemade)
- 1/2 cup tomato sauce
- 12 slider buns (savory)
- 1 1/2 cups shredded Colby Jack or Mexican blend cheese
- 2 tbsp unsalted butter, melted
- 1 tsp garlic powder
- 1/2 tsp onion powder
- 1/4 tsp salt
- 2 tbsp fresh cilantro, chopped (for garnish)
- 1/2 cup shredded lettuce (optional, for serving)
- 1/2 cup diced tomatoes (optional, for serving)
- 1/4 cup diced red onion (optional, for serving)
- 1/4 cup sour cream (optional, for serving)
- 1/4 cup salsa or pico de gallo (optional, for serving)
- 1/4 cup guacamole (optional, for serving)
- sliced jalapeños (optional, to taste)
Instructions
- Preheat the oven to 375°F (190°C). Lightly grease a 9×13-inch baking dish.
- In a large skillet over medium heat, heat the olive oil. Add the diced onion and cook until softened, about 3 minutes.
- Add the ground beef and cook, breaking it up with a spatula, until browned. Drain excess grease if needed.
- Stir in the taco seasoning and tomato sauce. Simmer 5–7 minutes, stirring occasionally, until thickened and saucy. Taste and adjust seasoning.
- Slice the slider buns in half horizontally. Place the bottom halves in the prepared baking dish and toast in the oven for 5 minutes to help prevent sogginess.
- Sprinkle half of the shredded cheese over the toasted bottoms. Spoon the taco meat evenly over the cheese, then top with the remaining cheese.
- Place the top halves of the buns on the sliders.
- In a small bowl, mix the melted butter with garlic powder, onion powder, and salt. Brush the mixture over the tops of the buns.
- Cover the dish with foil and bake for 10 minutes. Remove the foil and bake an additional 5–7 minutes, until the tops are golden and the cheese is melted.
- Remove from the oven and let rest 3–5 minutes. Garnish with chopped cilantro. Serve warm with optional toppings such as shredded lettuce, diced tomatoes, red onion, sour cream, salsa, guacamole, and jalapeños.


