
Introduction
Every July, my kitchen turns into a tiny firework factory—minus the fire, plus the sprinkles. These Red, White & Blue Dirt Cups are my secret weapon when everyone’s hungry, the grill is still heating, and I need a dessert that screams “party” without breaking a sweat. They’re a bright, creamy, crunchy little celebration in a cup. And honestly, they perfectly balance that chaotic summer rhythm where you’re juggling quick family meals on the patio and still craving a sweet bite that feels like healthy comfort food for the soul. Bonus: they’re wildly easy, so they fit right in with budget-friendly recipes when you’ve already splurged on the burger bar.
The first time I made these, I used a flimsy whisk, misread the milk measurement, and turned my pudding into glorious vanilla soup. Oops. I tried to fix it by adding more whipped topping, which gave me pillow-soft clouds that refused to hold layers. Still tasty, but not exactly Instagram material. The second time, I chilled my mixing bowl, whisked like I meant it, and spooned the pudding into clear cups with the seriousness of an artist. Suddenly those stripes snapped into focus—red like sparklers, white like fluffy clouds, blue like the evening sky right before the fireworks start.
The smells were pure nostalgia: sweet vanilla and buttery cookie crumbs. I could hear the gentle crush of cookies in the zip-top bag (so satisfying), the little tap-tap as sprinkles hit the top, and someone—always someone—sneaking a spoonful from the “test cup.” The whole scene just feels like summer at its most relaxed. Kids helping. Adults pretending not to fight over the last cup. Music in the background. It’s simple, but it hits that cozy spot.
What I love most is how forgiving these are. You don’t need an oven. The ingredients are straightforward. And if your red turns pink or your blue leans teal? Still adorable. If your layers are a little wonky, call it a “tie-dye effect” and move on. These cups love a backyard grill night, a block party, a pool day, or honestly any dinner that started as easy weeknight dinners and ended with a spontaneous dessert. They’re a “fun first, perfect later” kind of treat—and they always disappear.
Why You’ll Love This Recipe
- No-bake, no-stress. You’ll have a party-ready dessert while the grill preheats.
- Kid-approved and adult-beloved. That crunchy-cookie-meets-silky-pudding thing is magic.
- Make-ahead friendly. Chill the cups and pull them out when the fireworks start.
- Customizable colors and toppings. Go bold with gel colors, keep it pastel, or add fresh berries for a juicy pop.
- Minimal equipment. A whisk, a couple bowls, and clear cups so the layers shine.
- Feels like a hug in a cup. Creamy, cool, nostalgic—summer comfort with a festive twist.
What Makes This Recipe Special?
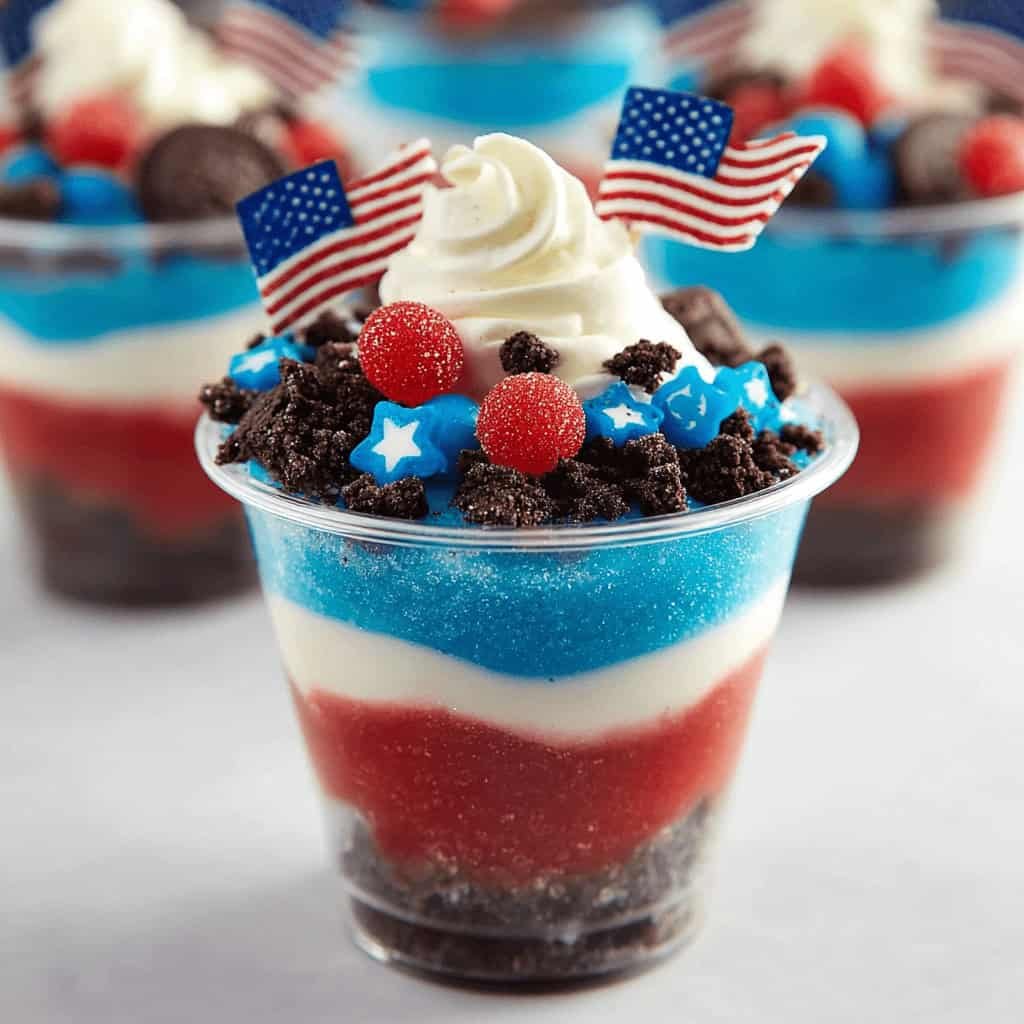
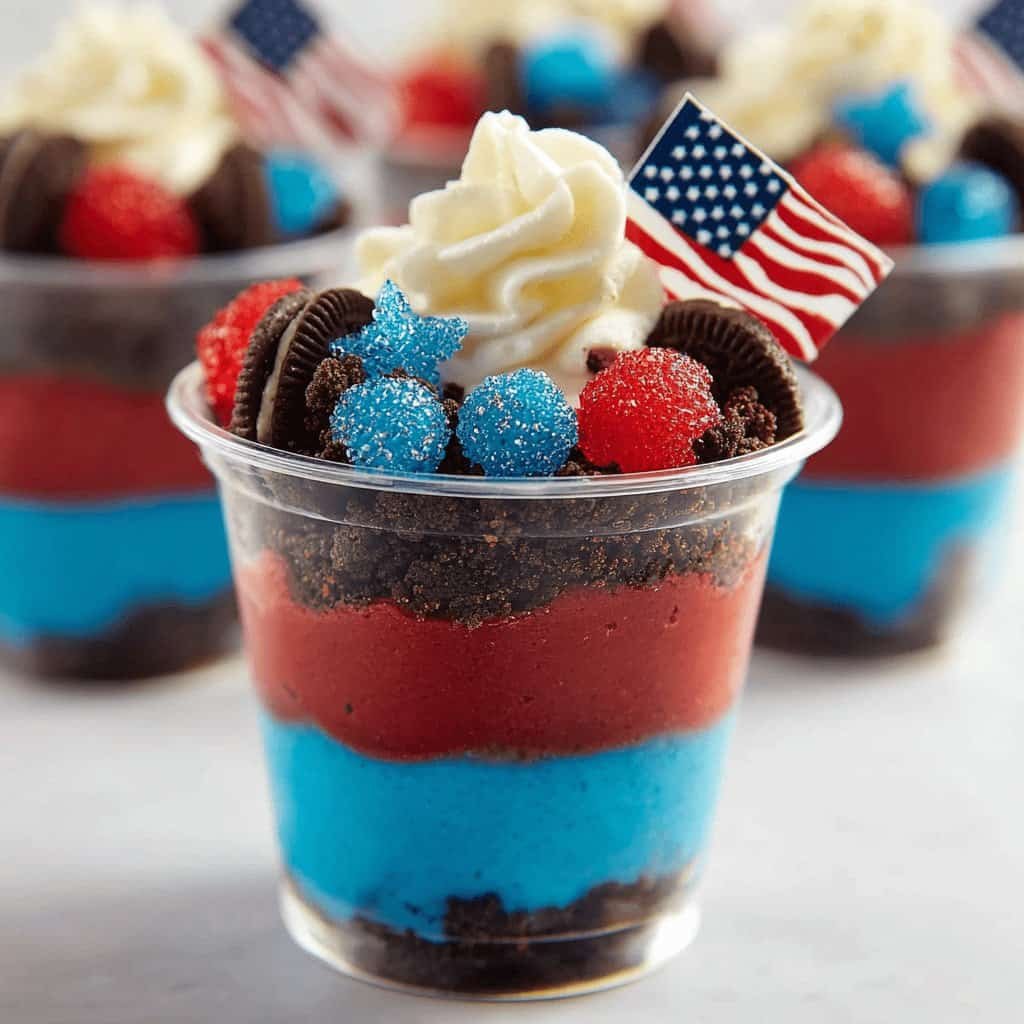
These dirt cups take classic nostalgia and dress it up for summer holidays. The trick is folding whipped topping into the pudding to create a mousse-like texture that holds clean layers without being heavy. I also use golden sandwich cookies for a buttery “shortbread” vibe that plays beautifully with the vanilla base. Clear cups are non-negotiable—seeing those stripes is half the fun. And if you want that vibrant, fireworks-bright color, use gel food coloring and a light hand. It gives you intense red and blue without thinning the pudding.
Another little hack: chill your mixing bowl and whisk before you start. Cold tools help the pudding set quickly and stay fluffy. If you’ve ever made trifle and watched the layers slouch (hi, it’s me), you’ll appreciate this tiny, wildly effective step. And yes, fresh berries are optional, but highly recommended. Blueberries and chopped strawberries bring a natural pop and a juicy contrast to the creamy layers.
Ingredients
- Instant vanilla pudding mix: Start with the classic (3.4 oz box). Instant is key—it sets fast and stays smooth. If you use cook-and-serve pudding, your timing changes and so does the texture.
- Cold milk: Cold, cold, cold. The temperature helps the pudding thicken quickly. Whole milk gives richness; 2% works; plant-based milks vary—some won’t set as firmly. If using almond milk, start with slightly less, then add if needed.
- Whipped topping (like Cool Whip), thawed: This folds into the pudding to create that fluffy, mousse-like feel. If you’re using homemade whipped cream, whip to firm peaks so it won’t deflate in the bowl.
- Cream cheese (optional): Softened cream cheese adds a cheesecake-style thickness and tang. It makes the layers extra luxurious. If using, beat it smooth first before folding in the pudding mixture so you don’t get tiny lumps.
- Food coloring: Gel coloring gives bold red and blue without watering down the pudding. Start with a toothpick’s worth and build. Liquid drops can work—just add slowly.
- Golden Oreos or vanilla sandwich cookies: The buttery-vanilla crumb is mellow and complements the red/white/blue layers. If you prefer a classic “dirt” look, chocolate sandwich cookies are a fun twist (the stripes will pop differently against the darker crumb).
- Fresh berries: Blueberries and chopped strawberries bring color and freshness. They also soften slightly in the cold cups—so good.
- Red, white, and blue sprinkles or candy decorations: The confetti moment. Stars, jimmies, M&M’s—go wild.
- Clear plastic cups or jars: The transparency matters. I like 9–10 oz cups for generous servings, or 2–3 oz mini cups for a dessert board.
Notes, tips, and tiny warnings:
Use a sturdy zip-top bag or a food processor to crush the cookies—go for sandy crumbs with some little pebbles for texture. Don’t overdo the food coloring; it’s festive, not face paint. If you add cream cheese, make sure it’s fully softened so it blends silky-smooth. And if you’re swapping in dairy-free milk and topping, check that your pudding mix sets with that milk—brands vary. Always keep the ingredients halal-friendly (most pantry brands are, but check your labels), and if you’re using a particular food coloring, opt for plant-based or kosher-certified varieties when in doubt.
How to Make It Step-by-Step
- Chill your tools. Pop your mixing bowl and whisk (or beaters) in the fridge for 10–15 minutes. It’s a tiny step, but it makes the pudding thicken faster and helps the whipped topping stay fluffy. I learned this after a very melty batch that slouched like a sleepy golden retriever.
- Whisk the pudding. In the chilled bowl, combine instant vanilla pudding mix and cold milk. Whisk for a full 2 minutes. You’ll feel it thicken under the whisk and see the surface shift from glossy to slightly matted. If it’s still thin, give it another 30 seconds. Don’t panic—instant pudding is forgiving.
- Fold in the fluff. Gently fold in the thawed whipped topping. If you’re using cream cheese, beat it until smooth first, then fold it into the pudding before the whipped topping. The goal is airy, not soupy. If you accidentally overmix and it loosens, pop the bowl in the fridge for 5–10 minutes to firm up.
- Divide and color. Split the pudding mixture into three bowls. Leave one plain (white). Tint one bowl red and the other blue. Start small with gel colors and stir thoroughly—sweep the sides and bottom so there are no streaks. If you over-dye and the color gets too intense, add a spoonful of the white pudding back in to soften it.
- Crush the cookies. Toss cookies in a zip-top bag and gently roll with a rolling pin or glass. You want a mix of fine crumbs and small chunks for crunch. The sound is oddly satisfying—like a tiny thunderstorm in a bag.
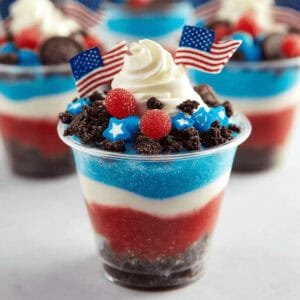
- Layer like an artist. In clear cups, add a spoonful of cookie crumbs (tap the cup so the crumbs settle). Spoon in red pudding and smooth the top with the back of the spoon. Add more cookie crumbs. Then white pudding, more crumbs, then blue pudding. If you want super-clean lines, transfer each color to a piping bag or a zip-top bag with the corner snipped and pipe the layers.
- Top and sparkle. Sprinkle with the remaining cookie crumbs and decorate with chopped strawberries, blueberries, and festive sprinkles or candy stars. I like a few blueberries tucked along the side of the cup so they show through the clear walls—instant “wow.”
- Chill. Refrigerate the cups for at least 1 hour. The colors settle, the crumbs mingle with the pudding just enough, and everything becomes spoonable perfection. You’ll see faint condensation on the cups when they’re just right—cool but not icy.
Real-life oops moments and fixes:
If your layers blend, switch to piping and chill for 10 minutes between colors. If the pudding seems loose, whisk in 1–2 tablespoons of dry pudding mix (if you have extra) or chill longer. If the cookies get too powdery, toss in a few fresh chunks for texture. And if you accidentally eat half the topping berries while “garnishing,” same.
Make it your style:
Prefer a marbled effect? Swirl the colors gently with a skewer before topping with crumbs. Want a cheesecake vibe? Use the cream cheese and skip one of the cookie layers so the creaminess shines. Going for a dessert board? Make mini cups and line them up like a flag. It’s irresistible.
Tips for Best Results
- Chill your bowl, whisk, and cups. Cold tools = cleaner layers and sturdier texture.
- Use gel food coloring for vibrant tones without thinning the pudding.
- Pipe the layers if you want crisp stripes. It’s neater than spooning and faster once you get into a rhythm.
- Fold, don’t stir aggressively. Overmixing knocks out the air and loosens the pudding.
- Keep berries dry. Pat strawberries and blueberries with paper towels before garnishing so they don’t bleed color into the pudding.
- Serve in clear cups. It’s a show, and the stripes are the star.
Ingredient Substitutions & Variations
If you’re dairy-free, use a dairy-free whipped topping and a plant-based milk that sets well with your chosen pudding brand—start with less milk than the box calls for, then adjust. For gluten-free, use gluten-free sandwich cookies and confirm your pudding mix is gluten-free. Want classic “dirt”? Swap in chocolate sandwich cookies and chocolate pudding, then keep the red and blue layers for holiday flair.
Feeling fancy? Add a thin stripe of crushed freeze-dried strawberries under the red layer for an intense fruity pop. A splash of vanilla bean paste in the white pudding is dreamy. Not into food coloring? Do a berry-forward version with strawberry puree for “red,” vanilla for “white,” and blueberry compote for “blue.” For a caramel note, drizzle a tiny thread of caramel sauce over the cookie layers—just a whisper so it doesn’t overwhelm.
Serving Suggestions
These cups are happiest at cookouts and backyard hangouts. I love serving them after a platter of grilled chicken, corn on the cob, and a big green salad—summer classics that keep the focus on fun. If you’re mapping out the whole day with best meal prep plans and good meal prep plans, these are your low-effort, high-cheer finale. They’re also the perfect “bring-a-dish” dessert when you’ve already handled easy weeknight dinners all week and need a no-fuss win.
Emotionally speaking? This dessert plus sparklers plus a light breeze equals instant nostalgia. Add a rom-com on the couch and a second spoon, and you’ve got cozy fireworks inside and out.
Pairing Ideas (Drinks, Sides, etc.)
- Drinks: Sparkling lemonade, iced tea, strawberry limeade, or a fizzy berry mocktail. Coffee after sunset is also excellent with the creamy vanilla notes.
- Savory sides beforehand: Grilled chicken skewers, classic potato salad, watermelon-feta mint salad.
- Other desserts: Mini berry hand pies, sugar cookies with star sprinkles, or a bowl of chilled cherries.
- Party board: Go mini with 2–3 oz cups arranged on a large tray, surrounded by extra berries and tiny flags.
How to Store and Reheat Leftovers
There’s no reheating (hooray). Cover each cup tightly with plastic wrap or lids and refrigerate for up to 3 days. The cookie crumbs will soften slightly by day two, giving a cake-like layer I secretly love. Keep the cups away from strong-smelling foods in the fridge so they don’t pick up odors. If the berries release a little juice on top, just dab gently with a paper towel and add a few fresh ones before serving.
Make-Ahead and Freezer Tips
You can assemble these up to 24–48 hours ahead. For the best texture, add fresh berries and sprinkles right before serving so they stay crisp and bright. I don’t recommend freezing—pudding and whipped topping can separate after thawing and turn grainy. If you need a longer head start, mix the pudding base, color it, and store each color covered in the fridge for up to a day. Assemble the cups the morning of your party.
Common Mistakes to Avoid
- Using warm milk. It won’t set the pudding properly and you’ll chase firmness the rest of the day.
- Heavy hand with liquid food coloring. Too much thins the pudding. Use gel or go drop by drop.
- Skipping the chill. The hour in the fridge is when the layers firm, the crumbs settle, and everything becomes spoonable magic.
- Soggy toppings. Wet berries bleed color—pat them dry.
- Overmixing. Fold the whipped topping in gently to keep things fluffy.
Frequently Asked Questions (FAQ)
Can I make these without food coloring?
Absolutely. Keep the layers white and rely on strawberries and blueberries for the festive color, or use natural tints like strawberry puree and blueberry compote folded gently into the pudding.
Will homemade whipped cream work?
Yes—whip to firm peaks and fold gently. It’s lighter and less stable than store-bought topping, so chill the cups well and serve the same day if possible.
Are these gluten-free?
They can be. Choose gluten-free sandwich cookies and confirm your pudding mix is gluten-free.
Can I assemble in one big bowl instead of cups?
For sure. A clear trifle bowl looks gorgeous with bold stripes. Spoon carefully to keep the layers clean.
How do I get sharp, defined stripes?
Pipe the layers using zip-top bags, smooth lightly with a small offset spatula, and chill briefly between colors.
Cooking Tools You’ll Need
- Mixing bowl (chilled, if possible)
- Whisk or hand mixer
- 3 medium bowls for coloring
- Zip-top bags or piping bags (optional, for neat layers)
- Rolling pin or heavy glass for crushing cookies
- Clear plastic cups or jars (9–10 oz, or minis for party trays)
- Small offset spatula or spoon for smoothing layers
Final Thoughts
There’s something beautifully unfussy about these Red, White & Blue Dirt Cups. They feel like summer—cool, creamy, and just a little bit messy. I’ve made them for backyard parties, neighborhood potlucks, and a very last-minute “movie night under the stars” when I wanted dessert but refused to turn on the oven. Every time, they’re gone by the time the first firework hits the sky.
If you’re deep in meal planning chicken for the grill, balancing best dinner prep meals, or figuring out no prep healthy lunches for the week, consider these your dessert that asks almost nothing of you—just a whisk, a few bowls, and a handful of sprinkles. I love that they play nicely with all kinds of menus, whether you’re on a protein meal plan through the week or leaning into low calorie high nutrition meals for balance. And while they’re not part of high protein meals or high macro meals, they do something just as important: they bring joy. Bright, sweet, chilled joy in a cup.
If you enjoyed this recipe, don’t forget to save it on Pinterest or share it with a friend!
P.S. If you’re here planning your whole holiday spread, you might also like browsing ideas for best meal prep healthy, meal prep microwave lunches, vegan meal prep plan, no prep keto meals, hello fresh low calorie menu, or even low fat meal delivery options for the busy days ahead—then circle back to these cups when it’s time to celebrate.
Red, White & Blue Dirt Cups
Ingredients
- 1 box (3.4 oz) instant vanilla pudding mix
- 2 cups cold milk
- 1 container (8 oz) whipped topping, thawed
- 4 oz cream cheese, softened (optional)
- 12 vanilla sandwich cookies (e.g., Golden Oreos), crushed
- red gel food coloring
- blue gel food coloring
- 1/2 cup fresh blueberries
- 1/2 cup chopped strawberries
- red, white, and blue sprinkles (optional)
Instructions
- Chill a large mixing bowl and whisk for 10 minutes to help the pudding set quickly.
- In the chilled bowl, whisk instant vanilla pudding mix with cold milk for 2 minutes until thickened.
- If using cream cheese, beat it in a separate bowl until smooth, then fold into the pudding until fully combined.
- Fold in the thawed whipped topping gently until the mixture is light and fluffy.
- Divide the pudding mixture evenly into three bowls: leave one white, tint one red, and tint the last blue. Stir each until fully colored.
- Crush the vanilla sandwich cookies in a zip-top bag with a rolling pin (or pulse in a food processor) to fine crumbs with some small chunks.
- Assemble in clear cups: add a layer of cookie crumbs, then red pudding; add more crumbs, then white pudding; more crumbs, then blue pudding.
- Top each cup with remaining cookie crumbs, blueberries, chopped strawberries, and sprinkles if using.
- Refrigerate for at least 1 hour before serving to let the layers set.


