
Introduction
The first time I truly fell for roasted onions, I was cleaning out the fridge on a Tuesday—half a bag of yellow onions, a too-loud podcast, and the kind of tired that makes you want easy weeknight dinners. I sliced the onions into chunky wedges, tossed them with oil, and slid them into a hot oven while I warmed up leftover chicken and brown rice. Forty minutes later, the kitchen smelled like a tiny bistro: sweet, toasty, a little earthy. The edges crackled; the centers went silky. I burned my fingers sneaking the first piece (oops), but I swear that soft, caramelized bite tasted like healthy comfort food and pure redemption after a chaotic day.
To be real, roasted onions are one of those budget-friendly recipes that don’t look like much on paper—four ingredients, maybe five if you’re feeling fancy—but they make everything else on the plate feel intentional. Pile them next to grilled halal chicken and suddenly you’ve got one of those quick family meals that feels like you tried. Fold them into eggs for a not-so-traditional nod to a full english breakfast and you’ll feel like a weekend person on a weekday. Slide them over quinoa with chickpeas and greens and boom: dinner that leans into your protein meal plan without tasting “meal-preppy.”
What I love most is the vibe. You know that gentle hiss when the baking sheet hits the hot oven? The way the house slowly starts to smell sweet but savory, like someone lit a candle called “cozy dinner is happening”? That’s roasted onions. They’re mellow, they’re adaptable, and they play ridiculously well with everything—from high protein meals to veggie bowls and even the inevitable “dessert after dinner” moment. If you’re balancing high macro meals or just hunting for sides that make best dinner prep meals feel easier, roasted onions are your low-lift, high-reward secret.
Why You’ll Love This Recipe
- Almost no effort. Chop, toss, roast. That’s it—peak easy weeknight dinners energy.
- Transformative flavor. Heat coaxes out natural sweetness while the edges get lacy and crisp.
- Flexible and friendly. Works with chicken, salmon, steak, grains, or tucked into sandwiches and wraps for meal prep microwave lunches.
- Affordable. Onions are the hero of budget-friendly recipes—big taste, tiny price.
- Meal-prep gold. Roast a tray on Sunday and you’re halfway to best meals to prep all week.
- Crowd-pleasing. Mild, sweet, and addictive—even picky eaters steal extra pieces.
What Makes This Recipe Special?
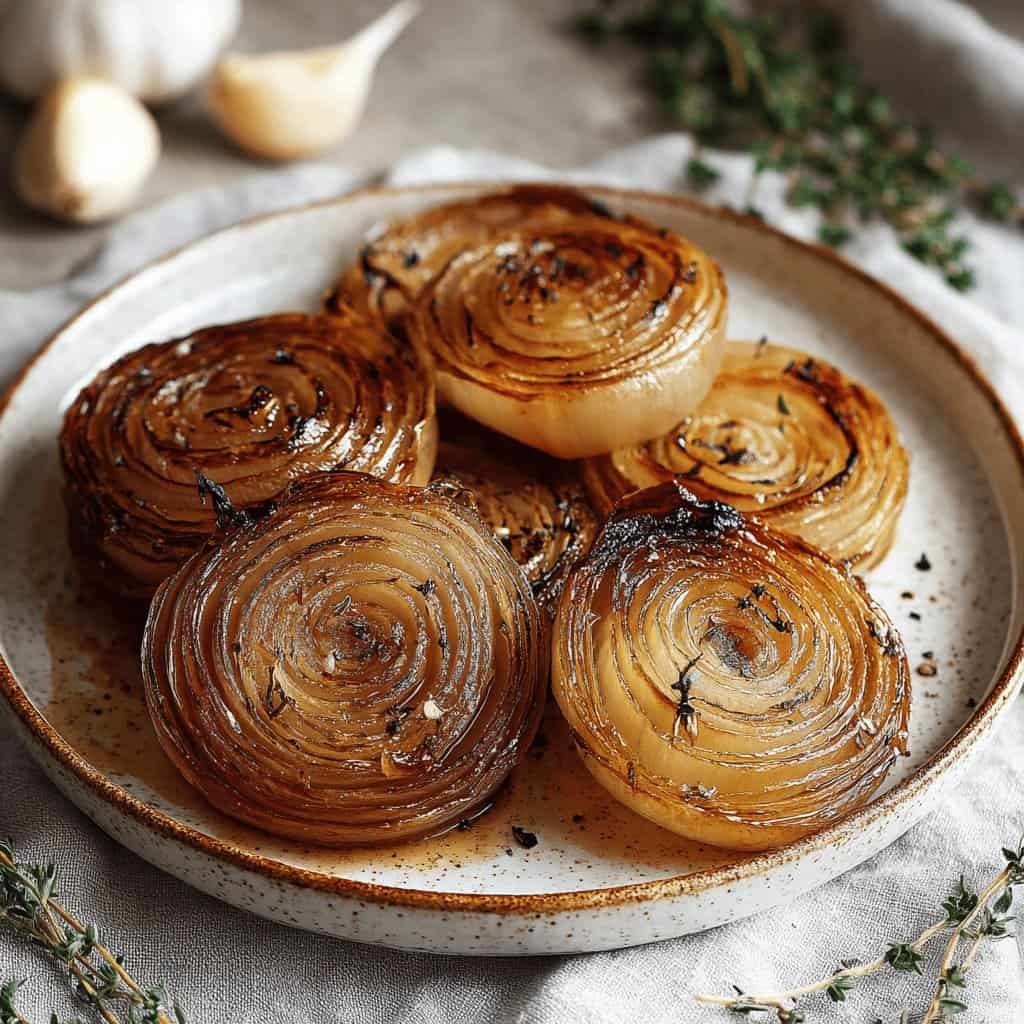
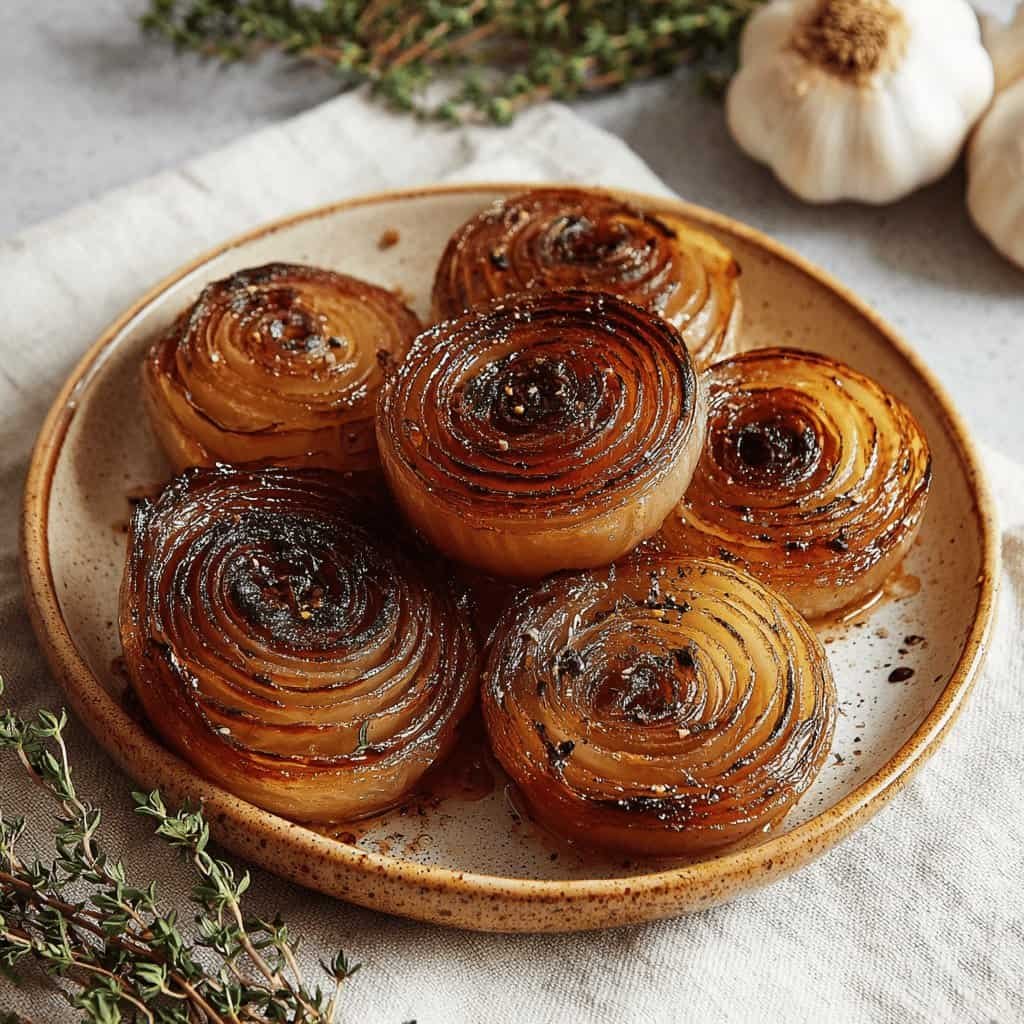
Roasting onions sounds simple—and it is—but there are a few little moves that make them unforgettable. Cutting the onions into wedges exposes lots of cut surfaces, which means more browning, more flavor. Placing those cut sides down gives you that deep, golden sear where onion sugars meet hot metal. A hot oven (400°F) concentrates the flavor without drying them out. And finishing with a tiny splash of acid (lemon or alcohol-free balsamic) wakes up all the sweetness so the onions taste balanced, not heavy. It’s the side dish that does quiet magic for good meal prep plans and last-minute dinners alike.
Ingredients
Onions are humble—sure—but the details here matter. Choose good ones and the oven does the rest.
- Onions: Yellow, red, or sweet onions all roast beautifully. Yellow onions give deep savory sweetness, red onions bring color and a gentle tang, and sweet onions caramelize like a dream. If you want drama on the plate, mix all three.
- Olive Oil: Extra-virgin for flavor, light olive oil for a more neutral profile and slightly higher smoke tolerance. You need just enough to gloss every wedge so edges crisp instead of drying out.
- Salt & Black Pepper: Fine sea salt seasons evenly. Freshly cracked pepper gives a warm bite without competing.
- Fresh Thyme or Rosemary (optional): Thyme is delicate and blends with onion sweetness; rosemary runs more piney and bold. Strip the leaves; no whole woody stems on the sheet—learned the hard way.
- Balsamic Vinegar or Lemon Juice (optional finish): A tiny splash at the end brightens everything. If you’re keeping it strictly halal and avoid traditional wine-based balsamic, choose a certified alcohol-free balsamic, pomegranate molasses, or simply fresh lemon juice.
- Add-Ons (optional): Whole peeled garlic cloves (they’ll roast into spreadable candy), a pinch of chili flakes if you crave a hum of heat, or a whisper of smoked paprika for “did someone grill?” energy.
Brand & shopping tips:
I reach for firm, heavy onions with tight skins—no soft spots, no sprouts. If you’re prepping for healthy eating for two, grab a mixed 3–4 lb bag; it’s cost-effective and perfect for batch roasting. And yes, a basic store-brand olive oil is fine for roasting. Save the fancy bottle for dressings.
Little warnings (“don’t do this” moments):
Don’t crowd the pan or the onions will steam and sulk instead of browning. Don’t roast at too low a temp or you’ll end up with soft but pale wedges (tasty, not gorgeous). Don’t add vinegar at the start; the acid slows browning and can make onions mushy. And please don’t forget parchment—unless you enjoy heroic sheet-pan scrubs later (I do not).
How to Make It Step-by-Step
- Heat the oven.
Set it to 400°F (200°C). Hot enough to brown edges, gentle enough to soften the centers. That first whoosh of warm air when you open the door? It should feel like a hug from the oven. - Cut the onions.
Peel and halve them through the root end. Cut each half into 3–4 wedges, keeping a bit of the root attached so the layers hold together. Bigger wedges = more tender centers; smaller wedges = crispier edges. Choose your destiny. - Toss with oil and seasoning.
In a large bowl, combine the wedges with olive oil, salt, and pepper. If you’re using thyme or rosemary, add the leaves now. The onions should look lightly glossy, not greasy. When you lift one, it should feel coated but not slippery. - Pan placement matters.
Spread onions on a parchment-lined sheet, cut sides down where possible. This is where the browning happens. Think of each wedge as a little canoe that needs contact with the hot pan to caramelize. - Roast, then flip.
Slide the pan onto the middle rack. Roast for 18–22 minutes until the bottoms are golden and edges are starting to char in places. The scent will shift from raw and sharp to sweet and toasty. Flip the wedges (tongs help), then roast 15–20 minutes more, until the centers are tender enough to yield to a fork but still hold their shape. - Finish with brightness.
Pull the pan, breathe in that caramelized perfume, then drizzle with a small splash of lemon juice or alcohol-free balsamic. Toss once or twice on the pan—the steam will carry the aroma up and out like a little kitchen halo. - Serve hot—or stash for later.
Pile them next to grilled chicken, fold into couscous, layer on a steak sandwich, or top a grain bowl. If you’re meal planning chicken for the week, portion a few roasted onion wedges into each container to add instant flavor.
Lessons learned (so you don’t repeat my oops):
I’ve roasted onions on an overcrowded pan and wondered why they were sweaty instead of seared. I’ve also forgotten to flip, which gave me one caramelized side and one pale side. And once, I added vinegar at the beginning because I was feeling “chef-y”—hello, slow browning and mush city. Now I keep it simple: high heat, space on the pan, and acid at the end. Every time, it works.
Tips for Best Results
- Cut evenly. Similar-sized wedges roast at the same pace, which means no overcooked bits or underdone centers.
- Use two pans if needed. When in doubt, spread it out. Better color equals better flavor.
- Middle rack for even heat. If your oven runs hot, check at 30 minutes; if it runs cool, give it the full 45.
- Finish with fat (optional). A pat of butter mixed in at the end makes the onions glossy and luxurious—still great for low fat meal delivery days if you keep it minimal.
- Layer smart for meal prep. Stash a container in the fridge and add a scoop to high protein ready made meals, grain bowls, and omelets. Flavor, on demand.
Ingredient Substitutions & Variations
- Oil swap: Avocado oil works well and has a high smoke point. Ghee adds richness and a faint nuttiness.
- Herb switch-ups: Try sage in fall, parsley and dill in spring. Dried herbs are fine; just use a little less.
- Spice route: Smoked paprika, cumin, or coriander seeds add warmth. A tiny pinch of chili flakes brings friendly heat without overwhelming.
- Sweet finish: A small drizzle of honey or maple in the final 5 minutes creates a shiny glaze—still balanced if you finish with lemon.
- Veggie companions: Roast onions with carrots, beets, or cauliflower for a sheet-pan side that does more. Great for best meal prep healthy goals or vegan meal prep plan weeks.
Serving Suggestions
Roasted onions are the supporting actor who steals the scene. They’re incredible tucked into shawarma-style bowls with halal chicken, rice, and tahini for nights geared toward high protein high carb low fat meals. Slide them onto turkey burgers for that savory-sweet pop, or layer them over mashed potatoes when you’re chasing healthy comfort food without a ton of butter. For brunch, add to a veggie skillet with eggs for a loose riff on a full english breakfast. For lighter cravings, toss warm onions with arugula, feta, and lemon for a salad that works for healthy meal plans for two. And yes, they’re fantastic on pizza—homemade or the store-bought kind you doctor up when you’re leaning into best meals to prep fast.
Pairing Ideas (Drinks, Sides, etc.)
Roasted onions pair beautifully with grilled chicken thighs, pan-seared salmon, or a slice of herb-crusted roast beef—each fits neatly into a protein eating plan. Serve with quinoa, farro, or couscous for whole-grain goodness. On the drinks side, try iced tea with lemon or a fizzy lime seltzer. If you enjoy alcohol, a dry cider complements the sweetness without weighing things down, but a spiced chai or mint tea keeps things equally cozy and halal-friendly. For something fun, blend yogurt, lemon, and garlic into a quick sauce to dollop over everything—suddenly your Tuesday looks curated.
How to Store and Reheat Leftovers
Let the onions cool completely before packing them up. Store in an airtight container for up to 4 days. To reheat, spread on a sheet pan and warm at 350°F for 8–10 minutes until the edges are lively again. The oven keeps their texture, while the microwave is quicker for no prep healthy lunches—just note the edges won’t stay crisp. If the onions look dry after reheating, toss with a tiny splash of olive oil or lemon. Add them straight from the fridge to salads and grain bowls; that cool-sweet contrast is a whole mood and a win for best vegan meal prep days.
Make-Ahead and Freezer Tips
Roast a double batch on the weekend and you’ll glide through the week’s best meal prep plans. Freeze in small bags for up to 2 months. Thaw overnight or reheat from frozen at 350°F until warmed—perfect to upgrade ready made protein meals or top high protein microwave meals. If you’re planning low calorie chicken meal prep, portion ½ cup roasted onions into each container to turn “plain” into “planned.”
Common Mistakes to Avoid
- Overcrowding the pan. If the onions touch too much, they steam. Use two pans or roast in batches.
- Too-low heat. You’ll get soft onions, not caramelization. Stick to 400°F.
- Skipping the flip. One side will color, the other will mope. Flip for even golden edges.
- Adding acid too early. Vinegar or lemon at the start slows browning—finish at the end instead.
- Forgetting the parchment. Trust me, stuck-on sugars are a workout you don’t need.
Frequently Asked Questions (FAQ)
What kind of onions are best?
Yellow, red, and sweet onions all roast beautifully. Red onions bring color, sweet onions caramelize intensely, and yellow onions are the savory middle ground.
Do I need to cover the onions?
No. Roasting uncovered allows moisture to escape and edges to crisp.
Can I roast onions whole?
Yes—small onions work well whole. Roast longer until a knife slips in easily. The interiors become almost jammy.
Are roasted onions sweet?
Yes, naturally. Heat breaks down onion sugars, creating deep sweetness and umami.
Can I use frozen onions?
Fresh is better for texture, but thawed frozen onions will work in mixed dishes. Pat them dry and expect softer results.
Do herbs matter?
They’re optional, but thyme, rosemary, or sage add a fragrant layer that loves roasted meats and grains.
Butter or oil?
Both work. Oil is fuss-free; butter adds richness. A mix is lovely, especially if you’re not strict about fats and you’re aiming for those cozy quick family meals vibes.
Cooking Tools You’ll Need
You don’t need fancy gear—promise. A sharp chef’s knife for clean wedges, a cutting board that won’t slide, a large mixing bowl, a sturdy rimmed sheet pan, parchment paper, and tongs or a thin spatula for flipping. If you’re scaling up for best dinner prep meals or healthy boxed meals style batch-cooking, two sheet pans make life easier. A squeeze bottle or small bowl for lemon juice makes the finishing step extra quick.
Final Thoughts
Roasted onions live in my regular rotation because they make everything else taste like I tried harder than I did. They’re sweet, savory, and deeply comforting without being heavy—a side dish that slips easily into high carb high protein low fat meals or a cozy plate of healthy comfort food. They help stretch leftovers into good meal prep plans, they elevate grain bowls, and they turn a simple piece of grilled chicken into dinner that feels restaurant-adjacent. I’ve eaten them warm from the pan while standing at the counter, and I’ve served them to guests like they were the star. Both felt right.
If you’re balancing a protein meal plan, exploring a high protein keto meal plan, or ordering best high protein frozen meals for busy nights, these onions are the flavorful wildcard that makes it all feel homemade. For couples figuring out healthy eating for two, or nights you’re tempted by meals for 2 delivered and ready meals for 2, a quick sheet pan of roasted onions can turn store-bought shortcuts into “wow, this is great.” They’re proof that simple can be stunning—and that dinner doesn’t need to be complicated to be memorable.
If you enjoyed this recipe, don’t forget to save it on Pinterest or share it with a friend!

Roasted Onions
Ingredients
- 4 medium onions (yellow, red, or sweet), peeled and cut into wedges
- 2 tablespoons olive oil
- 1/2 teaspoon fine sea salt
- 1/4 teaspoon black pepper
- 1/2 teaspoon dried thyme or rosemary (optional)
- 1 teaspoon alcohol-free balsamic vinegar or lemon juice, for finishing (optional)
- chopped fresh parsley, for garnish (optional)
Instructions
- Preheat oven to 400°F (200°C). Line a rimmed baking sheet with parchment paper.
- In a large bowl, toss onion wedges with olive oil, salt, pepper, and dried herbs (if using) until evenly coated.
- Spread onions in a single layer on the prepared baking sheet, positioning cut sides down for better caramelization.
- Roast for 18–22 minutes until the bottoms are golden, then flip the wedges and continue roasting 15–20 minutes more, until tender with crisped edges.
- Remove from the oven and drizzle with alcohol-free balsamic or lemon juice (if using). Toss lightly on the pan to coat.
- Garnish with parsley and serve warm, or cool and refrigerate for up to 4 days. Reheat at 350°F (175°C) for 8–10 minutes or microwave briefly until warmed through.


